EasyManua.ls Logo

DuraMax Cushion Box User Manual

DuraMax Cushion Box
18 pages
To Next Page IconTo Next Page
Page #1 background imageLoading...
Page #1 background image
(EN) Customer Service Hotline.
(FR) Service Hotline Client.
(PT) Linha de apoio ao cliente.
(ES) La Línea Directa del Servicio del cliente.
(DE) Kundendienst Hotline.
(PL) Linia telefoniczna dla klientów
.
(NL) Directe servicelijn.
(SV) Kundtjänst Hotline.
(IT) Linea telefonica per
Assistenza Clienti.
A L L P U R P O S E M E T A L S T O R A G E S H E D S
(800) 483-4674
www.duramaxbp.com
(EN) OWNER’S MANUAL /
Instructions for Assembly
Size 6 Ft x 2 Ft / 1.7 m x 0.7 m
Ver: 3.0
(FR)
MANUEL D’INSTRUCTION /
Instructions pour l'Assemblage
Dimension 6 Pieds x 2 Pieds
/ 1.7 Mètre x 0.7 Mètre
Ver: 3.0
(PT)
MANUAL DO PROPRIETARIO/
Intruções de montagem
Tamanho 6 pés x 2 pés
/ 1.7 Metro x 0.7 Metro
Ver: 3.0
(ES)
MANUAL DE PROPIETARIO /
Instrucciones de montaje
Tamaño 6 Pies x 2 Pies
/ 1.7 Metros x 0.7 Metros
Ver: 3.0
(PL) PODRĘCZNIK UŻYTKOWNIKA /
Instrukcja montażu
Wymiary 6 Stopy x 2 Stopy / 1.7 Metr x 0.7 Metr
Ver: 3.0
(NL) Gebruiksaanwijzing voor eigenaar/
Instructies voor bouw
Maat 6 voet x 2 voet / 1.7 Meter x 0.7 Meter
Ver: 3.0
(DE) Benutzerhandbuch /
Montageanleitung
Größe: 6 Ft x 2 Ft
/ 1.7 m x 0.7 m
Version: 3.0
(IT) MANUALE DEL PROPRIETARIO /
Istruzioni per l’assemblaggio
Dimensione 6Piedi x 2Piedi / 1.7Metri x 0.7Metri
Versione 3.0
(SV) ÄGARENS MANUAL/
Monteringsinstruktioner för
Storlek 6 fot x 2 fot / 1.7 m x 0.7 m
Version: 3.0
(EN) Cushion Box
(FR) Coffre de rangement pour coussin
(PT) Baú De
Arrumaçao
(ES) Baúl
(DE) Metall-Kissenbox
(PL) Pole Metal Poduszka
(NL) Kussenbox
(SV) Kudde Box
(IT) Cuscino Box
(PL) Pole Metal Poduszka
(NL) Kussenbox
(SV) Kudde Box
(IT) Cuscino Box
• Quick & Easy Assembly
• Ridge Reinforced Walls
Available in Various Sizes
(EN)
Assemblage rapide & facile
• Murs à arête renforcé
• Disponible en différentes dimensions
(FR)
• Rápida e fàcil montagem.
• Paredes reforçadas “Ridge”.
• Disponível em diversas dimenções.
(PT)
• De rápido y fácil montaje
• Con aristas para refuerzo de
las paredes
• Disponible en Varios Tamaño
(ES)
• Szybki i łatwy montaż
• Wzmocnione ściany profilowane
• Dostępne w różnych rozmiarach
(PL)
• Makkelijke en snelle montage
• Versterkte geribbelde platen
• Beschikbaar in verschillende
afmetingen
(NL)
• Leichter Aufbau
• Wände mit Verstärkungsrippen
• Verfügbar in verschiedenen Größen
(DE)
• Snabb & enkel montering
• Kantförstärkta väggar
• Finns i olika storlekar
(SV)
Assemblaggio facile e veloce
• Pareti dalla Linea Rinforzata
• Disponibile in Varie Dimensioni
(IT)
(EN) Call us for any missing or damaged parts.
Do not return to the store.
(FR) Appelez-nous pour toute les pièces manquantes ou endommagées.
Ne pas retourner au magasin.
(PT) Contacta-nos para qualquer falta ou partes danificadas.
Não devolver à loja.
(ES) Llámenos para cualquier perder o partes dañadas.
No vuelva a la tienda.
(DE) Bitte melden sie sich bei uns, wenn Teile fehlen oder beschädigt
sind. Senden Sie nichts an das Geschäft zurück.
(PL) Zadzwoń do nas w przypadku braku części lub ich zniszczenia.
Nie zwracaj towaru do sklepu.
(NL) Bel ons als er onderdelen missen of beschadigd zijn.
Niet terug naar de winkel.
(SV) Ring oss beträffande saknade eller skadade delar.
Skicka inte tillbaka till butiken.
(IT) Per qualsiasi parte mancante o danneggiata contattaci
telefonicamente.
Non riportare le parti in negozio.
Question and Answer IconNeed help?

Do you have a question about the DuraMax Cushion Box and is the answer not in the manual?

DuraMax Cushion Box Specifications

General IconGeneral
BrandDuraMax
ModelCushion Box
CategoryOutdoor Storage
LanguageEnglish

Summary

Owner's Manual and Instructions

Quick & Easy Assembly Features

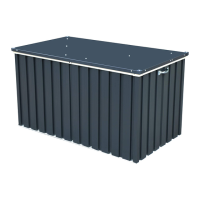
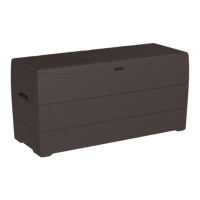
Highlights key features like reinforced walls and size availability for easy assembly.

Customer Service and Support Hotline

Provides contact information for customer service assistance and inquiries.

Reporting Missing or Damaged Parts

Instructions for reporting missing or damaged parts and the procedure for returns.

Duramax Storage Shed Limited Eight Year Warranty

Warranty Claim Procedure

Details how to make warranty claims via phone or mail, requiring proof of purchase.

Warranty Limitations and Exclusions

Outlines what the warranty covers and common exclusions like misuse or neglect.

Assembly Safety Precautions

Essential Safety Gear for Assembly

Recommends wearing work gloves, long sleeves, and eye protection during assembly.

Parts List and Required Tools

List of Tools Needed for Assembly

Lists essential tools such as gloves, cordless drills, and screwdrivers.

Important Screw Usage Guideline

Guideline on using screws with plastic washers on prepainted surfaces only.

Exploded View of Shed Components

Wall Assembly Instructions

Setting Torque Limit for Screws

Instruction to set drill torque to #3 or #4 to prevent stripping metal reinforcements.

Wall Assembly: Steps 1 & 2

Details for attaching panels C14M, C02M, C07M using PW and S1 screws.

Continued Wall Assembly Steps

Wall Assembly: Step 3

Instructions for connecting C12M and C13M panels using S1 and PW.

Wall Assembly: Step 4

Guidance for attaching C07M panel with PW and S1 screws.

Wall Assembly: Step 5

Procedure for securing C12M and C13M panels using S1 and PW.

Further Wall Assembly Steps

Wall Assembly: Step 6

Details for connecting C12M and C14M panels using S1 and PW.

Wall Assembly: Step 7

Instructions for securing C11M and C13M panels with PW and S1.

Wall Assembly: Step 8

Procedure for attaching C11M panels using PW and S1.

Additional Wall Assembly Steps

Wall Assembly: Step 9

Instructions for connecting C03M and C12M panels with S1 and PW.

Wall Assembly: Step 10

Details for attaching C10M and C03M panels using S1 and PW.

Wall Assembly: Step 11

Procedure for securing C01M and C03M panels with S1 and PW.

Final Wall Assembly Steps

Wall Assembly: Step 12

Instructions for attaching E020 and C01M panels with S1 screws.

Wall Assembly: Step 13

Details for connecting C01M and C10M panels.

Wall Assembly: Step 14

Procedure for securing C01M and C04M panels using S1 and PW.

Completing Wall Assembly

Wall Assembly: Step 15

Instructions for attaching C02M and C04M panels with S1 and E020.

Wall Assembly: Step 16

Procedure for securing C02M panels with S1 and S2 screws.

Door Assembly Instructions

Important Screw Usage for Door

Guideline on using screws with plastic washers on prepainted surfaces for the door.

Door Assembly: Step 1

Attaching C08M, C21M, C21M panels with S1 and PW screws.

Continued Door Assembly Steps

Door Assembly: Step 2

Connecting C08M and C09M panels with S1 and PW screws.

Door Assembly: Step 3

Attaching C08M and C09M panels with S1 and PW screws.

Door Assembly: Step 4

Securing C08M panels with S1 and PW screws.

Further Door Assembly Steps

Door Assembly: Step 5

Attaching C22M panels to C08M panels with S1 and C18M.

Door Assembly: Step 6

Securing C08M panels with S2 and TC.

Final Door Assembly Steps

Door Assembly: Step 7

Attaching LH and RH components to C08M panels with S1.

Door Assembly: Step 8

Connecting C03M and C22M components with S1.

Related product manuals