4
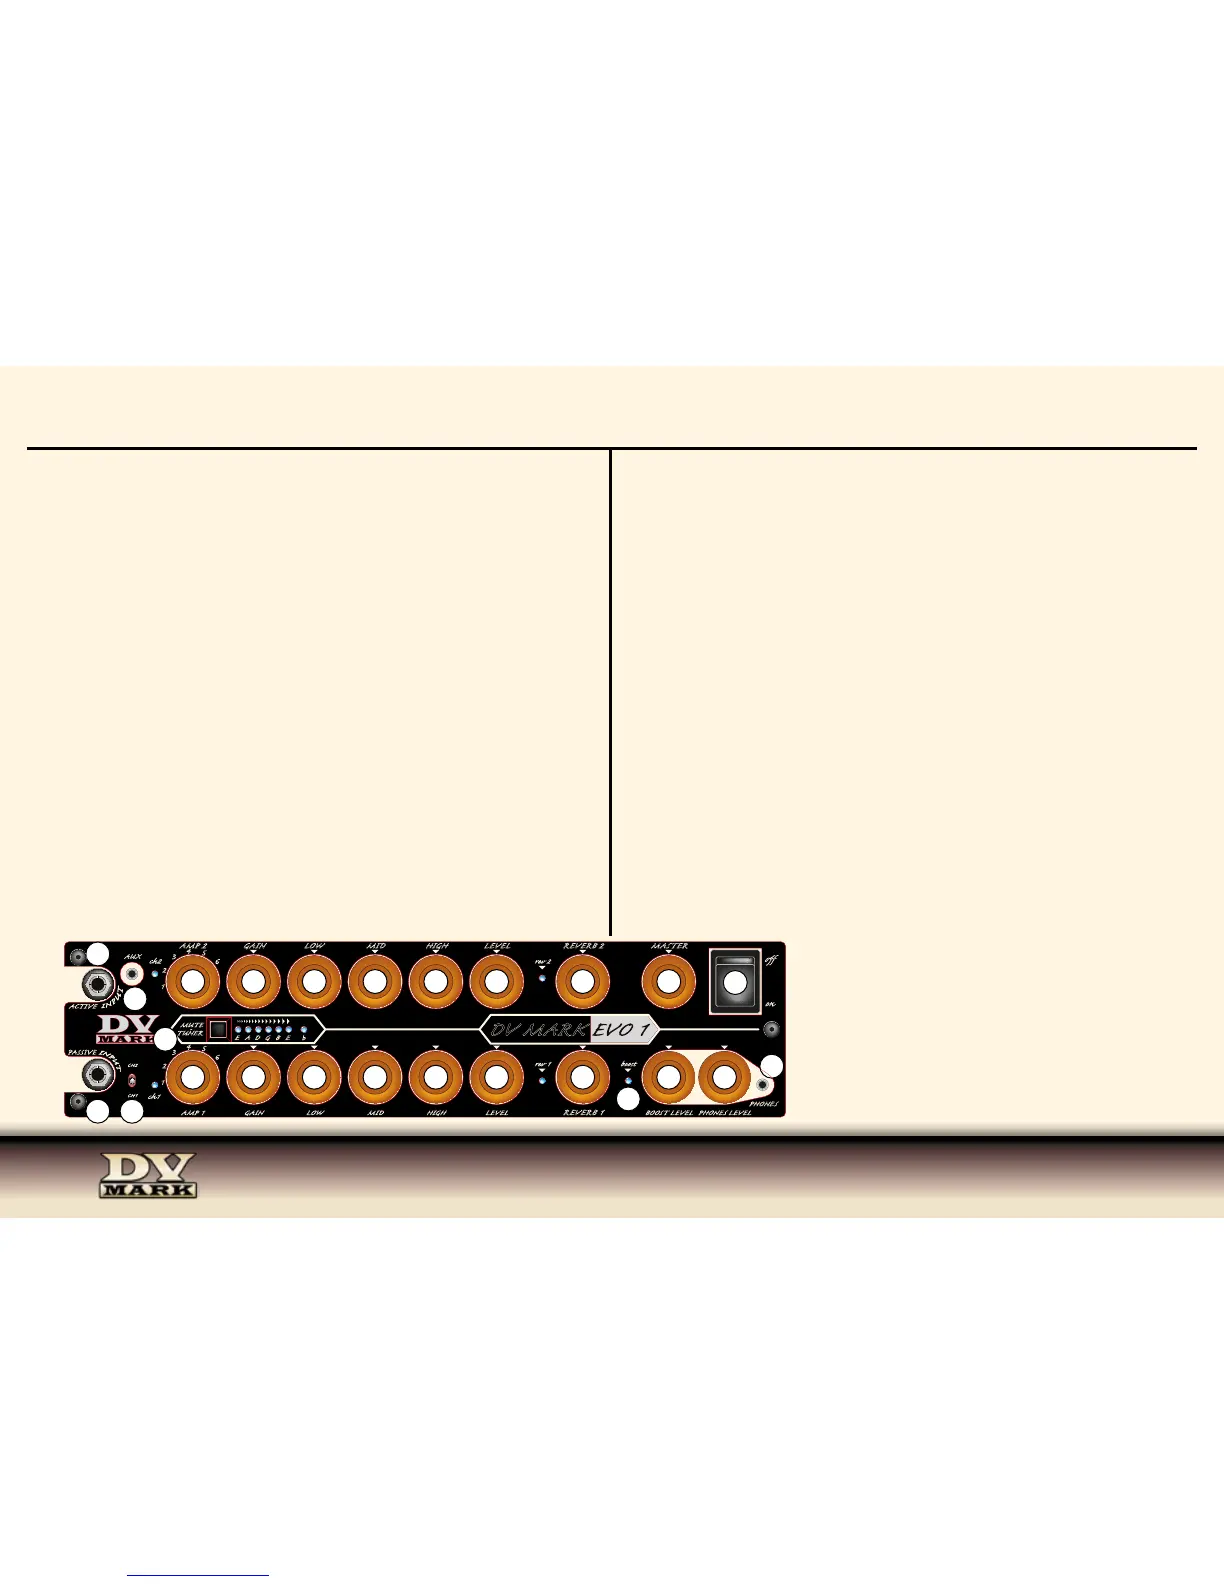
1) PASSIVE INPUT Connect your guitar to this input using a standard ¼” shielded instrument cable, this input is designed to best
interface with signal from instruments with passive electronic/pickups.
2) CH1/CH2 This channel selector switches between the Channel 1 and Channel 2.
Channel-switching can also be controlled by a EVO pedal that can be plugged into the MIDI IN on the rear panel (30).
3) AMP 1 Select between six AMPS tone choices available at channel 1.
FACTORY SETTING CH1
• DARKFACE ‘65 (65 Blackface FENDER
®
TWIN) > CLEAN
• MARAGOLD (DV Mark Greg Howe signature) > CLEAN
• TOP 30 (Vox AC30) > CLEAN
• TRIPLE 6 CH1 (DV Mark Triple 6) > CLEAN
• ROCK ‘75 (UK) (MARSHALL
®
JCM800
®
) > CRUNCH
• ECSTASY CH2 (BOGNER XTC
®
CH2) > CRUNCH
note: You can update AMPs choices for each channel as for your preference between the 15 available at the DV
MARK EVO SOFTWARE)
4) GAIN This knob sets the gain level of the channel 1.
5) LOW This knob controls the amount of low frequencies of the selected AMP / CH1.
6) MID The Mid control regulates the midrange frequencies of the selected AMP / CH1.
7) HIGH The High knob controls the amount of high frequencies of the selected AMP / CH1.
8) LEVEL Controls the level of the selected AMP model on CH1.
9) REVERB 1 Controls the level of the reverb assigned to channel 1.
REV FACTORY SETTING CH1: SPRING REVERB (Accutronics ®)
note: - You can customize the REVERB parameters as for your preference thanks to the DV MARK EVO SOFTWARE.
- REVERB 1 ON/OFF switching can be controlled by the EVO controller.
10) ACTIVE INPUT Connect your guitar to this input using a standard ¼” shielded instrument cable, this input is designed to best
interface with signal from instruments with active electronic/pickups.
11) AUX Use this input to plug in an iPod, CD or MP3 player using a stereo mini plug 1/8”.
This signal mixes in evenly with the instrument connected to the input/s.
FRONT PANEL
12) AMP 2 Select between six AMPS tone choices available at channel 2.
FACTORY SETTING CH2
• TRIPLE 6 CH2 (DV Mark Triple 6) > CRUNCH
• SLODRIVE (US) (SOLDANO X88R ® CH2) > CRUNCH
• JCMARK (MARSHALL ® JCM800 ®) > CRUNCH
• MARAGOLD (DV Mark Greg Howe signature) > LEAD
• SLODRIVE (US) (SOLDANO X88R ® CH3) > LEAD
• RECTO (US) (Mesa Boogie ® DUALRECTIFIER ®) > LEAD
note: You can update AMPs choices for each channel as for your preference between the 15 available at the DV
MARK EVO SOFTWARE)
13) GAIN This knob sets the gain level of the channel 2.
14) LOW This knob controls the amount of low frequencies of the selected AMP / CH2.
15) MID The Mid control regulates the midrange frequencies of the selected AMP / CH2.
16) HIGH The High knob controls the amount of high frequencies of the selected AMP / CH2.
17) LEVEL Controls the level of the selected AMP model on CH2.
18) REVERB 2 Controls the level of the reverb assigned to channel 2.
REV FACTORY SETTING CH2: REVERB (DV MARK custom item)
note: - You can customize the REVERB parameters as for your preference thanks to the DV MARK EVO SOFTWARE.
- REVERB 2 ON/OFF switching can be controlled by the EVO controller.
19) MUTE/TUNER The DV Mark EVO 1 features an onboard tuner that lets you tune your instrument at a regular 440Hz tuning, half
step down and a whole tone down. The default status is 440Hz and the light on the “b” will light in green. Pushing and holding the
MUTE/TUNER button, the LED will light in Orange after releasing it and you can tune your instrument half step down. Pressing and
holding the same button a second time will make the “b” LED light in red, that means you’re ready to tune your instrument a whole
step down. Pressing and holding again you’ll go back to the 440 Hz tuning mode.
20) MASTER This control is the master feed from the end of the channels CH1/CH2 to the power stage. Start with the Master control
OFF (all the way counter-clockwise) and turn it up gradually until you reach your desidered volume.
21) BOOST LEVEL This knob controls the boost level with a range up to +12dB for notching
up your volume for solos during live performance.
22) BOOST This LED signals when the BOOST is actived, BOOST ON/OFF switching is
controlled by the EVO controller.
23) PHONES LEVEL Controls the level of the signal send to the PHONES OUTPUT (24).
24) PHONES For quiet practing plug headphones into this mini plug 1/8” input.
25) ON/OFF SWITCH This switch delivers AC power to the amp.
The DV Mark EVO 1 is manufactured to be used in the country where it has been sold, and it’s
factory preset to that country’s voltage. So make sure you’re sending the correct voltage to your
amp before you connecting it to AC power and turning power on.
10
11
24
AMP 2 GAIN LOW MID HIGH LEVEL
rev 2
REVERB 2 MASTER
ch2
AUX
CH1
CH2
ACTIVE
PASSIVE
AMP 1
GAIN LOW MID HIGH LEVEL
REVERB 1
BOOST LEVEL PHONES LEVEL
MUTE
-
TUNER
PHONES
DV MARK
ch1
on
rev 1 boost
E A D G B E
i
1
2
3
4
5
6
1
2
3
4
5
6
 Loading...