EasyManua.ls Logo

Dynex DX-HTVMM1703-C User Manual

Dynex DX-HTVMM1703-C
16 pages
To Next Page IconTo Next Page
Page #1 background imageLoading...
Page #1 background image
Full Motion Mount for TVs 47" - 70"
DX-HTVMM1703-C
USER GUIDE
Before using your new product, please read these instructions to prevent any damage.
For wood-stud or
concrete wall
installations
For VESA patterns:
7.9 × 7.9" (200 × 200 mm)
11.8 × 7.9" (300 × 200 mm)
11.8 × 11.8" (300 × 300 mm)
15.7 × 7.9" (400 × 200 mm)
15.7 × 11.8" (400 × 300 mm)
15.7 × 15.7" (400 × 400 mm)
19.7 × 15.7" (500 × 400 mm)
23.6 × 15.7" (600 × 400 mm)
DX-HTVMM1703-C_16-0713_MAN_V2_ENG.fm Page 1 Thursday, October 6, 2016 10:47 AM
Question and Answer IconNeed help?

Do you have a question about the Dynex DX-HTVMM1703-C and is the answer not in the manual?

Dynex DX-HTVMM1703-C Specifications

General IconGeneral
BrandDynex
ModelDX-HTVMM1703-C
CategoryRacks & Stands
LanguageEnglish

Summary

USER GUIDE

Safety information and specifications

Tools needed

Package contents

Installation instructions

STEP 1 - Determine whether your TV has a flat back or an irregular or obstructed back

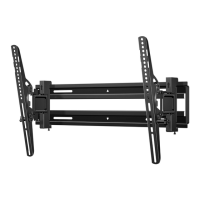
Guides users through identifying the TV's back type to determine mount compatibility and spacer needs.

STEP 2 - Select screws, washers, and spacers

Details how to choose the correct hardware (screws, washers, spacers) based on TV back type.

STEP 3 - Option 1: Attaching the mounting hardware to TVs with a flat back

Instructions for attaching TV brackets to TVs with a flat back using specific hardware.

STEP 3 - Option 2: Attaching the mounting hardware to TVs with irregular or obstructed backs

Instructions for attaching TV brackets to TVs with irregular or obstructed backs using spacers.

STEP 4 - Determine the wall-mount location

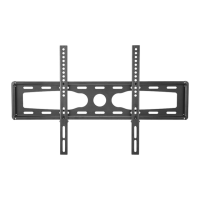
Explains how to measure and mark the optimal location for the wall mount on the wall.

STEP 5 - Option 1: Installing on a wood stud* wall

Step-by-step guide for mounting the wall plate securely onto a wood stud.

STEP 5 - Option 2: Installing on a solid concrete or concrete block wall

Step-by-step guide for mounting the wall plate securely onto a concrete wall.

STEP 6 - Secure the TV to the wall plate

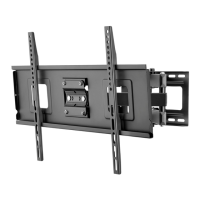
Details on how to safely attach the TV to the mounted wall plate using safety bolts.

STEP 7 - Manage cables

Instructions for organizing and securing cables along the mounting arm using popper buttons.

STEP 8 - Adjust the mount arm and tilt anlges

Guidance on adjusting the mount arm tension and TV tilt angles for optimal viewing.

One-year limited warranty - Dynex

Related product manuals