Do you have a question about the Dynex DX-MLET21 and is the answer not in the manual?
Essential instructions to retain for future reference and safe operation.
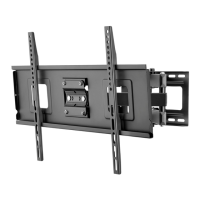
Mount compatibility with TV sizes and weight limits.
Adjustability feature for optimal viewing angle.
Ability to center the TV horizontally on the mount.
Compatibility with various VESA mounting hole patterns.
Lists essential tools including stud finder, tape measure, pencil, drill, hammer, socket wrench, awl, tape, and level.
Required drill bits for wood and concrete wall installations.
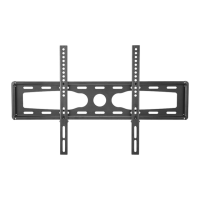
Primary wall mounting component and drilling guide.
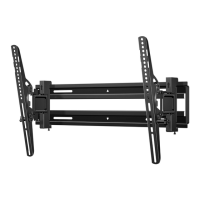
Brackets that attach to the TV for mounting.
Contains various screws, washers, and spacers for TV attachment.
Lists hardware not provided in the kit, requiring separate purchase.
Brackets mount flush, no spacers needed.
Requires spacers for bracket mounting due to jacks or gaps.
Specific screw types recommended for TVs with a flat back.
Screw and spacer recommendations for TVs with obstructed or irregular backs.
Warning about using screws that are too long or too short for secure attachment.
Position TV brackets correctly on the back of the TV.
Ensure tilt tension knobs are oriented towards the outside edges.
Attach brackets using appropriate screws, washers, and spacers.
Tighten screws with a Phillips screwdriver until snug, avoid over-tightening.
Calculate and mark the optimal height for the wall plate on the wall based on TV position.
Guidance on positioning TV for eye-level viewing.
Use a stud finder to locate and mark stud centers for secure mounting.
Position and secure the template at the calculated height for drilling.
Create pilot holes into the center of the studs as per template markings.
Secure the wall plate using lag bolts and washers, ensuring it is level.
Warning to avoid over-tightening lag bolts to prevent wall damage.
Position and secure the template at the calculated height for drilling.
Drill pilot holes into the concrete wall for anchor insertion.
Insert anchors into pilot holes and ensure they are flush with the surface.
Secure the wall plate using lag bolts and washers, ensuring it is level.
Ensure anchors are flush and avoid over-tightening lag bolts.
Key precautions regarding stud type, drywall thickness, and pilot hole depth.
Position and secure the template at the calculated height for drilling.
Drill pilot holes, insert anchors, and install anchor caps for steel stud mounting.
Ensure anchor caps are flush with the wall board surface.
Secure the wall plate using specific screws and washers, ensuring it is level.
Warning to avoid over-tightening screws for secure attachment.
Extend the TV brackets outwards for easier attachment to the wall plate.
Hook the upper edges of the TV brackets onto the wall plate lip.
Warning that lifting and mounting the TV may require help from another person.
Secure the TV to the wall plate by installing locking screws at the bottom.
Ensure locking screws are properly installed before moving the TV.
Instructions for attaching cables to the TV.
Manually adjust the TV's distance from the wall.
Fine-tune tilt tension knobs for smooth, stable adjustment.
Tighten tension knobs after positioning to prevent unwanted movement.
Detach the TV from the wall plate to adjust lateral position.
Determine the new horizontal placement on the wall plate.
Reattach the TV to the wall plate after lateral adjustment.
Extend the TV mount fully before attempting removal.
Remove all cables and unscrew the locking screws securing the TV.
Gently pull the bottom of the TV out and lift it off the wall plate.
Specifies the 90-day period, how to obtain service, and exclusions.
Provides contact phone number and website for product inquiries and service.
This document describes the Dynex Large Extended Tilt Mount, model DX-MLET21, an installation guide for mounting televisions.
The Dynex Large Extended Tilt Mount is designed to securely mount televisions to various wall types, including wood stud, solid concrete/concrete block, and steel stud walls. It allows for adjustment of the TV's position, including tilt and lateral shift, to optimize viewing angles. The mount is built with sturdy steel construction, ensuring durability and dependable use for years. It comes with a full assortment of mounting hardware to accommodate a wide range of TVs.
| Brand | Dynex |
|---|---|
| Model | DX-MLET21 |
| Category | Racks & Stands |
| Language | English |