EasyManua.ls Logo

Dynex DX-TRP60 User Manual

Dynex DX-TRP60
2 pages
To Next Page IconTo Next Page
Page #1 background imageLoading...
Page #1 background image
V5 ENGLISH 13-0524
Important safety instructions
Make sure that all levers, handles, knobs, and leg locks are
correctly tightened, and that all three legs are fully opened
before use.
Do not carry or transport the tripod with camera equipment
attached (for example: over your shoulder or cradled in your
arms).
Do not store or expose your tripod to excessive heat or cold, or
use near any ame or re.
Do not OIL or GREASE any part of the tripod.
Do not use any solvents or thinners to clean your tripod. Use
only a mild detergent and wipe dry with a soft, lint-free cloth.
Do not exceed the load limit of this tripod.
Specications
Folded length: 22.5" (57.1 cm)
Maximum height: 60" (152.4 cm)
Minimum height: 21.7" (55.2 cm)
Weight: 2.75 lbs (1.25 kg)
Load capacity: 7.7 lbs (3.49 kg)
One-year limited warranty
For complete warranty go to www.dynexproducts.com.
1-800-305-2204 (U.S. and Canada) or 01-800-926-3020 (Mexico)
BEST BUY IMPORTS S. DE R.L. DE C.V.
AVENIDA SANTA FE NO. 440 PISO 2 OFNA 202 Y 203 P3 Y P4
COLONIA SANTA FE CUAJIMALPA, C.P. 05348, DELEGACIÓN
CUAJIMALPA DE MORELOS, MEXICO, DISTRITO FEDERAL
RFC: BBI0802114Q2
DYNEX is a registered trademark of BBY Solutions, Inc. Registered in some
countries.
©2013 BBY Solutions, Inc. All Rights Reserved.
QUICK SETUP GUIDE
DX-TRP60
60" Tripod
4
Before using your new product, please read
these instructions to prevent any damage.

Other manuals for Dynex DX-TRP60

Question and Answer IconNeed help?

Do you have a question about the Dynex DX-TRP60 and is the answer not in the manual?

Dynex DX-TRP60 Specifications

General IconGeneral
BrandDynex
ModelDX-TRP60
CategoryCamera Accessories
LanguageEnglish

Summary

Important Safety Instructions

Specifications

One-Year Limited Warranty

Package Contents

Tripod Features

Elevation Locking Knob

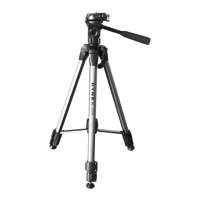
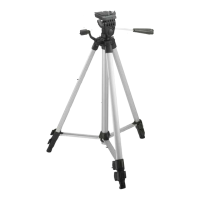
Locks the center column in place, ensuring stability.

Pan Locking Knob

Locks the tripod head for horizontal stability.

Quick-Release Plate

Plate for mounting cameras, attaches to the tripod.

Leveling Bubble

Indicates if the tripod is level when the bubble is centered.

Quick-Release Plate Locking Lever

Secures the quick-release plate to the tripod head.

Vertical Tilt Lock Knob

Adjusts and locks the vertical tilt of the tripod head.

Horizontal Tilt Lock Handle

Adjusts and locks the horizontal tilt of the tripod head.

Elevation Crank

Raises and lowers the tripod's center column.

Locking Collar

Secures the tripod legs for maximum stability.

Flip-Lever Leg Locks

Allows adjustment of leg height and locking.

Rubber Foot with Retractable Leg Spike

Provides non-marring footing or reveals spikes for grip.

Using Your Tripod

Extending and Locking Legs

Open leg locks and extend legs to desired height, then close locks.

Setting Tripod Angle and Stability

Spread legs to preset angle, tighten locking collar for stability.

Adjusting Center Column Height

Loosen elevation knob, use crank to adjust height, then tighten knob.

Mounting Camera to Tripod

Attach camera to quick-release plate, then slide plate onto tripod head.

Adjusting Vertical Tilt

Loosen vertical tilt knob, adjust angle, and retighten knob.

Adjusting Horizontal Tilt

Loosen tilt handle, tilt head as desired, and retighten handle.

Panning the Tripod

Loosen pan knob, pan head as desired, then tighten to lock.

Related product manuals