Do you have a question about the Dyson DC40i and is the answer not in the manual?
Provides UK and ROI contact information, websites, phone numbers, and addresses for support.
Details three methods: online, by phone, and by mail for guarantee registration.
Instructions on how to safely remove and empty the vacuum cleaner's dust bin.
Guidance on identifying and clearing obstructions within the vacuum cleaner.
Guidance on adjusting the appliance for different floor types and brush bar settings.
Information on how to connect and use various cleaning tools and accessories.
Instructions for safely clearing the brush bar when it becomes obstructed.
Step-by-step instructions for dismantling the base plate for maintenance.
Guidelines and precautions for effective and safe vacuuming.
Detailed instructions on how to clean the clear bin unit.
Procedure for washing the appliance's washable filters to maintain performance.
Troubleshooting steps for issues related to the brush bar.
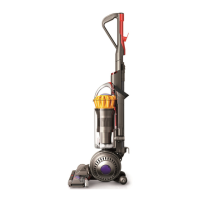
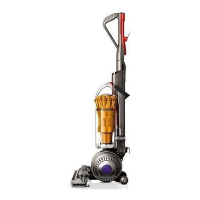
This document is an operating manual for the Dyson DC40 upright vacuum cleaner, providing comprehensive instructions for assembly, operation, maintenance, and troubleshooting. It also includes important safety information, guarantee details, and customer support contacts.
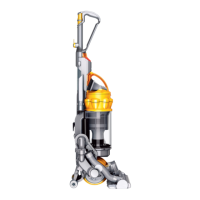
The Dyson DC40 is an upright vacuum cleaner designed for household use, capable of cleaning both carpets and hard floors. Its primary function is to remove dust, dirt, and debris from various surfaces through powerful suction and a rotating brush bar. The appliance features a clear bin for collecting dirt, which needs to be emptied regularly. It also incorporates washable filters that require periodic cleaning to maintain optimal performance. The DC40 is equipped with a wand and various attachments to extend its reach and versatility, allowing for cleaning in tight spaces, on stairs, and with different tools. The brush bar can be switched off for delicate rugs and hard floors, preventing potential damage.
The manual provides a step-by-step guide for assembling the DC40. This includes lying the appliance on its back to attach the cleaner head, ensuring the electrical plug fits correctly and the cleaner head clicks into place. Next, the appliance is stood upright to attach the wand handle, which also clicks into place. The hose needs to be straightened, and the wand slid into the hose, securing it in the handle's recess. The wand cap is then closed, and the tool holder slid onto the side of the duct. Finally, the cyclone and clear bin unit are secured, tools are attached as shown, and the cable is wound anti-clockwise around the cable hooks and secured with a clip. Online video tutorials are available for visual guidance.
To operate the DC40, the cable must first be unwound and plugged into the mains electricity supply. The power button is pressed to switch the appliance 'ON' or 'OFF'. To begin cleaning, the handle is reclined, which automatically lifts the stabiliser stand. After use, the appliance is returned to the upright position, causing the stabiliser wheels to lower. Before changing or using tools, removing the hose or airway inspection parts, the appliance must be switched 'OFF' and unplugged, ensuring it is in an upright position. The cyclone carry handle is used for transporting the appliance.
The wand is released by opening the wand cap and pulling the red tube up and away from the handle until it clicks into place. For hose-only use, the red button is pressed to release the wand from the hose.
The brush bar defaults to 'ON' (spinning) when the appliance is switched 'ON' and reclined. It does not rotate when the appliance is upright. To switch off the brush bar for delicate rugs or hard floors, the appliance is switched 'ON', reclined, and then the brush bar 'ON/OFF' button is pressed. The brush bar automatically stops if obstructed. Users are advised to check manufacturers' cleaning instructions for flooring, rugs, and carpets. If fuzzing occurs on carpets, vacuuming in 'hard floor' mode is recommended. The brush bar may damage some carpet types, so it should be turned 'OFF' if unsure.
The manual emphasizes not using the appliance without the clear bin and filters. Fine dust like plaster or flour should only be vacuumed in small amounts. Sharp hard objects, small toys, pins, or paper clips should not be picked up as they can damage the appliance. Static charges may build up in the clear bin or wand, which are harmless but users should avoid putting hands or objects into the clear bin without emptying and rinsing it first. Powerful suction can cause the hose to 'pull back', so care is advised. The appliance should not be used above the user on stairs or placed on chairs/tables. Before vacuuming highly polished floors, the underside of the floor tool and its brushes should be checked for foreign objects. The cleaner head should not be left in one place on delicate floors.
The clear bin should be emptied as soon as the dirt reaches the MAX mark to prevent overfilling. Before emptying, the appliance must be switched 'OFF' and unplugged. To remove the cyclone and clear bin unit, the red button at the rear of the carrying handle is pressed. To release dirt, the red button is pressed all the way down. To minimize dust/allergen contact, the clear bin should be encased tightly in a plastic bag before emptying. The bag should then be sealed and disposed of normally. To refit, the clear bin base is closed until it clicks, and the cyclone and clear bin unit are pushed into the main body until it clicks into place, ensuring it is secure.
The cyclone and clear bin unit are removed as described above. To separate the cyclone unit from the clear bin, the red button is pressed to open the clear bin base, revealing a small silver button. Press this silver button to separate the cyclone unit from the clear bin. The clear bin should be cleaned with cold water only and must be completely dry before replacing. Detergents, polishes, or air fresheners should not be used. The clear bin is not dishwasher safe. The entire cyclone unit should not be immersed in water, nor should water be poured into the cyclones. The cyclone shroud can be cleaned with a dry cloth or brush to remove lint and dust. To refit, the cyclone shroud is fitted into the clear bin until the silver button clicks and engages, the clear bin base is closed until it clicks, and the cyclone and clear bin unit are pushed into the main body until it clicks into place, ensuring it is secure.
The appliance has two washable filters, which need to be checked and washed regularly (at least every month) with cold water to maintain performance. Filters may require more frequent washing if vacuuming fine dust. Detergents should not be used, and filters should not be placed in a dishwasher, washing machine, tumble dryer, oven, microwave, or near naked flames. To remove filter A, refer to the 'Wash filters' section. After washing, filter A should be laid on its side and left to dry completely for at least 24 hours before refitting. To remove filter B, the central locking dial on the outer cover of the ball is turned anti-clockwise until released, then the cover is lifted off. The filter is then turned one-quarter anti-clockwise to release. Filter B should be rinsed and tapped until the water runs clean, then tapped again to remove excess water. It also needs to dry completely for 24 hours. A grey color for the filter in the ball is normal. To refit filter B, it is placed onto the ball and secured by turning it one-quarter turn clockwise. When refitting the outer cover of the ball, the central locking dial is turned clockwise until it clicks and is locked. Online video tutorials are available for filter washing.
Before checking for blockages, the appliance must be switched 'OFF' and unplugged to prevent personal injury. Blockages should be checked in the wand, airways, and cleaner head. To access obstructions, the base plate may need to be removed (refer to 'Base plate - disassembly/reassembly'). To check for blockages in the airway between the ball and the cleaner head, the cleaner head needs to be removed. Users should beware of sharp objects and refit all parts securely before using. Clearing blockages is not covered by the guarantee.
The appliance has an automatically resetting thermal cut-out. If large items block tools or the wand inlet, the appliance may overheat and cut out. If this happens, the appliance should be switched 'OFF', unplugged, and left to cool for 1-2 hours before checking filters or blockages. Any blockage must be cleared before restarting. Clearing blockages is not covered by the guarantee.
If the brush bar is obstructed and stops spinning, the appliance must be switched 'OFF' and unplugged before proceeding to prevent personal injury. Users should beware of sharp objects. If the obstruction cannot be cleared, the base plate may need to be removed for better access, or Dyson customer support should be contacted. Clearing brush bar obstructions is not covered by the guarantee.
Before proceeding, the appliance must be switched 'OFF' and unplugged. The appliance is laid on its front. The red 'C' clip connecting the cleaner head and the appliance is detached with constant, firm pressure. The cleaner head is pulled away from the appliance with constant, firm pressure. At each end of the cleaner head are two levers that are swung out at right angles, disengaging the base plate. The top edge is lifted to rotate it to the upright position, then lifted out. Users should beware of sharp objects. To refit the base plate, the 3 lugs on the lower edge of the base plate are fitted into the 3 slots in the base of the cleaner head. The upper edge is swung down until it clicks into place. Both levers are pushed back into position to be flush with the surface. The red 'C' clip is refitted onto the cleaner head, with the flatter edge against the cleaner head. The appliance is laid on its back, and the cleaner head is attached by sliding it onto the connections on the lower front part of the ball, ensuring the electrical plug fits into the twin-block connection on the body of the appliance, and the cleaner head clicks into place.
If the brush bar stops spinning, users should follow the instructions for clearing obstructions. Dyson customer support can also be contacted. Online video tutorials are available.
| Model | DC40i |
|---|---|
| Category | Vacuum Cleaner |
| Filter Type | HEPA |
| Suction Power | 220 AW |
| Color | Purple |
| Warranty | 5 years |
| Filtration | HEPA |
| Cord Length | 10 m |
| Dust Capacity (gallons) | 0.55 gallons |
| Bin Capacity | 0.55 gallons |
| Motor Power | 1400 W |
| Features | Ball technology |