EasyManua.ls Logo

Eagle PA5060E User Manual

Eagle PA5060E
6 pages
To Next Page IconTo Next Page
Page #1 background imageLoading...
Page #1 background image
1
IMPORTANT
The wires in the mains lead are coloured in accordance
with the following code:
Green and Yellow: Earth (E)
Blue: Neutral (N)
Brown: Live (L)
As the colours of the wires in the mains lead of this apparatus
may not correspond with the coloured markings identifying the
terminals in your plug proceed as follows:
The wire which is coloured green and yellow must be connected
to the terminal which is marked by the letter E or by the safety
earth symbol or coloured green and yellow. The wire which is
coloured blue must be connected to the terminal which is
marked with the letter N or coloured black. The wire which is
coloured brown must be connected to the terminal which is
marked with the letter L or coloured red.
If a 13 Amp (B.S. 1363) plug or any other type of plug is used, a
5 Amp fuse must be fitted either in the plug or at the distribution
board.
WARNING: THIS APPLIANCE MUST
BE EARTHED
GENERAL INSTALLATION
DO NOT use low impedance loudspeakers.
DO NOT run microphone cables near mains, data,
telephone or 100V line cables.
DO NOT run 100V line cables near data, telephone or
other low voltage cables.
DO NOT exceed 90% of the amplifiers output power
when using 100V line (speech only).
DO NOT exceed 70% of the amplifiers output power
when using 100V line
(high level background music).
DO NOT use re-entrant horn loudspeakers for
background music unless the loudspeaker has
been specifically designed for this purpose.
AVOID jointing the microphone cable, when this is
unavoidable make sure a good screened
connector is used, e.g. XLR.
ALWAYS use a balanced or floating low impedance
microphone terminating into a balanced input
on long microphone cable runs.
ALWAYS use a mains grade double insulated cable for
the loudspeaker cable runs.
ENSURE that all loudspeakers are in-phase.
ENSURE that there are no short circuits on the
loudspeaker line before connecting to the
amplifier.
REMOVE the top cabinet when fitting the 19” rack ears
supplied (these are fitted using the existing
screw holes and screws from the top cabinet).
PA5000 SERIES TWO ZONE
PUBLIC ADDRESS AMPLIFIERS
INSTALLATION AND OPERATING INSTRUCTIONS
Covers Models:
PA5120E Mixer Amplifier PA5060E Mixer Amplifier PAB5120E Booster Amplifier PAB5240E Booster Amplifier
PA5200C Twin Cassette Deck PA5200CT Tuner with blank slot for a Cassette Deck or Tuner
Mixer Amplifiers PA5060E and PA5120E
1. 24V DC Connector 14. Mic 1 Input Socket
2. Mains Connector 15. Mic 1 Priority Socket
3. Loudspeaker Connector 16. Input Overload Indicator
4. Booster Out Phono Socket 17. Mic 1 Level Control
5. Booster Out DIn Socket 18. Mic 2 Level Control
6. Aux 3 Input Socket 19. Mic 3/Aux 1 Level Control
7. Mic 5 Input Socket 20. Mic 4/Aux 2 Level Control
8. Aux 2 Input Socket 21. Mic 5/Aux 3 Level Control
9. Mic 4 Input Socket 22. Bass Control
10. Aux 1 Input Socket 23. Treble Control
11. Mic 3 Input Socket 24. Master Level Control
12. Mic 2 Input Socket 25. Power On/Off Switch
13. Mic 2 Priority Socket 26. Power On Indicator
REAR PANEL
MODEL NO. PA5120E
RATED OUTPUT 120W RMS
MADE IN TAIWAN
MUSIC/SPEECH
OVER-
LOAD
MIC1 MIC2 MIC3/AUX1 MIC4/AUX2 MIC5/AUX3 BASS TREBLE MASTER
16
17 18 19 20 21 22 23 24 25 26
220 - 240V~50/60Hz
24V DC
BOOSTER OUT AUX 3 MIC5 AUX 2 MIC4
AUX 1 MIC3
SPEECH ONLY
250V 2.5A
1 23 4 5 6 7 8 9 10 11 12 13 14 15
FRONT PANEL
GB
Question and Answer IconNeed help?

Do you have a question about the Eagle PA5060E and is the answer not in the manual?

Eagle PA5060E Specifications

General IconGeneral
BrandEagle
ModelPA5060E
CategoryAmplifier
LanguageEnglish

Summary

Safety and Installation Guidelines

Mains Wiring Instructions

Explains mains lead colour coding and connection for safety.

General Installation Precautions

Provides 'Do Not' and 'Avoid' advice for safe and optimal installation.

Mixer Amplifiers PA5060E and PA5120E

Rear Panel Connections

Lists rear panel connectors for PA5060E/PA5120E models.

Front Panel Controls

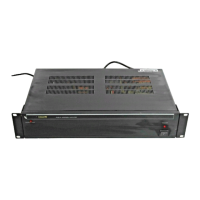
Lists front panel controls and indicators for PA5060E/PA5120E models.

Booster Amplifiers PAB5120E and PAB5240E

Rear Panel Connections

Lists rear panel connectors for PAB5120E/PAB5240E models.

Front Panel Controls

Lists front panel controls and indicators for PAB5120E/PAB5240E models.

Input Connections and Priority

Mic 1 & Mic 2 Input Connections

Details XLR and 180° DIN plug connections for Mic 1 & 2, including priority.

Mic 3 & Aux 1 Connections

Explains Mic 3/Aux 1 connection and re-configuration options.

Mic 4, 5 & Aux 2, 3 Connections

Details Aux inputs and re-configuration for Mic 4/5 using jack sockets.

Advanced Features and Troubleshooting

Phantom Power Setup

Instructions on enabling/disabling phantom power for condenser mics.

Booster Out Connections

Explains RCA Phono and DIN socket connections for booster outputs.

Interconnecting Amplifiers

Guides connecting mixer amps to booster amps using Phono or DIN.

Loudspeaker Connection Notes

Important note on using 100V line speakers and 'Speech/Music' vs 'Speech Only' outputs.

Battery Connections

Instructions for connecting a 24Vdc power source, emphasizing polarity.

Troubleshooting Guide

Lists common issues, causes, and solutions for amplifier operation.

Module Operations and Servicing

Cassette Module Operation and Maintenance

Explains auto-reverse function and cleaning for the cassette player.

Tuner Module Operation and Tuning

Details aerials, station presets, and tuning procedures for the tuner.

Inserting a Cassette

Step-by-step guide for inserting a cassette into the player.

Removing the Cassette

Instructions on how to eject a cassette from the player.

Fast Winding Tapes

How to fast wind tapes in either direction using the controls.

Changing Tape Direction

Procedure to switch between sides of a cassette tape.

Module Removal Procedure

Step-by-step guide for removing modules for service or replacement.

PA5200C and PA5200CT Cassette/Tuner Modules

PA5200C Rear and Front Panel

Details rear panel connections and front panel controls for the PA5200C.

PA5200C Wiring Modes

Instructions for single unit and three unit (master/slave) wiring of the PA5200C.

PA5200C Multi-Deck Operation

Explains how multiple cassette decks in the PA5200C play sequentially.

PA5200CT Rear and Front Panel

Details rear panel connections and front panel controls for the PA5200CT.

PA5200CT Output Mode Selector

Explains how to select separate or mixed outputs for modules A and B.