EasyManua.ls Logo

EarthMinded RBK-0001 - User Manual

EarthMinded RBK-0001
2 pages
Print Icon
To Next Page IconTo Next Page
Loading...
EarthMinded has assembled all the parts needed to make a rain barrel using a recycled barrel or plastic waste barrel
(barrel not included). Using this kit, anyone who can use a drill can make and install a rain barrel in minutes!
User Guide RBK-0001 V.2
Do-It-Yourself Rain Barrel Diverter and Parts Kit
Select a location for your rain barrel
4
28” MAX
6” MIN
There are 2 options for installing the front fittings. Option A has a single
spigot at the bottom of the barrel and is recommended if you will only be
using a garden hose to access the water in the barrel. This configuration
gives access to most of the water in the barrel. A raised base is
recommended to increase water pressure. Option B has a mid-height
spigot and a bottom drain and is recommended for use with a watering
can.
Option A: Bottom spigot only
1. Find the front of the barrel; measure up 3” (76mm) from the bottom
of the barrel and mark the center for the spigot hole. Drill a hole using
the (SMALL) 1-1/4” hole saw included in the set.
2. Insert the threaded rubber seal into the hole. Pinch the seal into a “U”
shape for easier insertion.
3. Thread the spigot into the seal until the hex collar on the spigot sits
firmly against the seal and the water outlet points down. Soapy water
or hand lotion on the internal threads will reduce friction and improve fit.
Parts list
Tools needed
2
5
Installing the front fitting on the barrel
3”
3”
Please read all instructions and warnings before installation, and retain this Booklet for future reference
1
Rain barrels have been used for hundreds of years to harvest and
store rainwater for use with plants, gardens, and other outdoor
chores.
EarthMinded’s DIY Rain Barrel Kit can be used to make a state-
of-the art sealed rainwater collection system when used with
a barrel or container you supply. Our patent pending FlexiFit™
diverter installs easily by drilling a single hole into any standard
2” x 3” or 3” x 4” rectangular downspout*. The diverter sends
rainwater into the barrel. Once the barrel is full, the diverter will
automatically pass excess water through the downspout.
General description
Selecting a container
3
EarthMinded supplies only the parts and fittings to be added to a
barrel you supply. Therefore, we take no responsibility for losses,
damages, or injury caused by failure of the barrel, or improper
installation of the parts. Follow these instructions carefully for
successful results.
This kit will work on both sealed barrels and open top barrels with lids.
Open top barrels are easier to clean, and provide quick access to the
water using a bucket or watering can, but present a safety concern for
children; the lid must always be latched and locked.
Water weighs 8.3 lbs. per gallon. Be sure to select a sturdy container that
can support the weight when full. 55 gallons of water weighs 465 lbs.
Select a sturdy water tight container:
a. A heavy duty or commercial grade plastic waste barrel with
latching lid.
b. A traditional wood barrel can make an attractive and natural
looking rain barrel. Make sure it is in good condition, clean and
water tight.
c. If using a recycled barrel, use only FDA approved food grade
barrels. Make sure the barrel is clean and has not been used to
contain toxic or hazardous substances.
The container selected should be sealed, or have a latching lid to help
prevent mosquitoes, animals, and children from entering the barrel.
This kit is not recommended for use with metal drums or barrels.
Before assembling the parts to the barrel we recommend that you select
and prepare the location where the barrel will be used. This will help you
locate the fittings on the barrel in the most convenient location.
Choose a downspout that is near the plants or garden beds to be
watered.
The downspout must be a rectangular 2” x 3” or 3” x 4”*
The barrel must be located within 28” (71cm) of the downspout to
use the fill hose provided.
The ground under the barrel must be level and firm. A solid surface
base of wood, pavers, or stone is recommended.
If the surface is not level, use a shovel or rake to grade the surface.
Check by placing a level on the rim of the barrel before continuing.
Place the barrel in the intended location with the front facing out.
1. Mark the front of the barrel. This will be the side with the spigot facing
out. The spigot should be located on a flat or evenly curved surface without
ridges or features that can affect the water seal.
2. Hold the fill hose in position between the barrel and the downspout and
mark the water inlet location on the rim of the barrel. This mark can be at
the back, right, or left side of the barrel.
Check that the hose can reach horizontally from the rim of the barrel to the
downspout.
*Water capture percentage is reduced with 3”x 4” downspouts
6
Installing the fill hose seal
1. Locate the water inlet mark on the rim of the barrel (from Step 4).
Measure down 3” (76mm) and mark the center for the water inlet hole.
Make sure the inlet is located on a flat or evenly curved surface: avoid
ridges or other features that could affect the water seal.
2. Drill a single hole using the (MEDIUM) 1-1/2” hole saw included in the set.
3. Insert the fill hose seal into the hole. Pinch the seal into a “U” shape
for easier insertion.
About the FlexiFit diverter
7
Plastic Waste Barrel (Open Top) Wood Barrel Recycled Plastic Barrel (Sealed)
WARNING
Damage to home or
property may occur if
improperly installed.
3
INCORRECT
If the hole is cut too low,
the barrel will not fill.
INCORRECT
For open top containers
only, If the hole is cut too
high, water will overflow
from the barrel rim.
1
2
1. Safety Glasses
2. Safety Gloves
3. Drill
4. Measuring
Tape or Ruler
5. Pencil
6. Phillips
Screwdriver
7. Level
1. Spigot
2. Drain or hose
attachment
3. Fill hose
4. FlexiFit diverter
5. Winter hole cover
Some areas prohibit the
use of rain barrels. Please
check local regulations
before installing.
The FlexiFit diverter helps discourage mosquitoes, pests, and
algae-causing sunlight from entering the barrel. The diverter is
easy to remove from the downspout and the kit includes a winter
hole cover.
The FlexiFit diverter offers many advantages over conventional
top fill rain barrels that commonly flood with heavy rain, require
permanent modifications to your downspout, and use unsightly
overflow hoses.
*Water capture percentage is reduced with 3”x 4” downspouts
Round downspout diverter available as an accessory
1
1
2
2
3
3
4
4
5
Open Top Container Sealed Barrel
3 Pc. Hole Saw Set
Threaded
Rubber Seal
Spigot
Threaded
Rubber Seal
Fill Hose
Screws
Winter Hole
Cover
Instructions
Barrel Not
Included
Top View
Optional
Stand
12”
6”
Option A Option B
TIP
Pinch the threaded rubber seal
into a “U” shape before inserting
into the hole in the barrel.
TIP
Soapy water or hand lotion on the
hose cuff and rubber seal reduces
friction and makes insertion easier.
Back of barrel
CORRECT
Option B: Mid-height spigot with bottom drain
1. Mark the hole for the spigot. Find the front of the barrel, measure up
12” (30cm) from the bottom of the barrel and mark the center for the
mid-height spigot hole.
2. Mark the hole for the drain. Measure up 3” (76mm) from the bottom
of the barrel and mark the center for the drain hole. If you plan on
connecting a garden or soaker hose to the drain fitting, we recommend
that the drain be located 6” (15mm) off center, to the left, or right side
of the spigot to give clearance for filling the watering can.
3. Drill 2 holes on these marks using the (SMALL) 1-1/4” hole saw included
in the set. You may need to remove the plastic cut out from the end of
the hole saw after drilling the first hole.
4. Insert 2 threaded rubber seals into both the spigot and drain holes.
Pinch the seal into a “U” shape for easier insertion.
5. Thread the spigot and drain into the seals until the hex collars sit firmly
against the seals. Soapy water or hand lotion will reduce friction and
improve fit.
1-1/4”
(32mm)
Hole Saw
1-1/2”
(38mm)
Hole Saw
1
2
1
2
WARNING
Stored rainwater is not for
human or animal consumption
WARNING
Stored rainwater is not
suitable for human or
animal consumption
Sticker
FLB-204
Do Not
Drink
Water
Fill Hose Seal
Inside Barrel Outside Barrel
Remove lid
before measuring
5
3”
3”
FRN-015
FRN-054
FRN-043
FRN-009
FRN-061
FRN-067
Drain Assembly
FRN-080
FRN-067
(71cm)
(15cm)
FlexiFit Diverter
FRN-008
DO NOT CUT THE DOWNSPOUT UNTIL READING THE ENTIRE GUIDE!
The FlexiFit diverter redirects water from your downspout to the barrel
and automatically passes water through the downspout when the barrel
is full of rainwater.
The diverter is installed in a hole that is cut in the downspout.
1. The hole must be cut at the correct height for the diverter to work
properly.
2. If the diverter is installed too low, the barrel will not fill properly.
3. If the diverter is installed too high, water will overflow from the rim
of the barrel (this only applies to open top barrels).
IMPORTANT: There are two ways to install the diverter depending on the type
of barrel you use. If the barrel is a sealed container without a lid or screen, the
diverter can be located at the same level as the rim of the barrel or higher. This
will improve the filling efficiency of the diverter.
If the barrel has a removable lid or screen, the center of the diverter hole must
be drilled 3”(76mm) below the level of the rim of the barrel to prevent water
from leaking from the lid seam or screen. The diverter will not work if it is
placed below the level of the water inlet on the barrel.
The diverter provided in this kit is not for use with round downspouts.
A round downspout diverter available as an accessory at
www.earthmindedconsumerproducts.com
Question and Answer IconNeed help?

Do you have a question about the EarthMinded RBK-0001 and is the answer not in the manual?

Summary

Installing Barrel Fittings

Option A: Bottom Spigot Installation

Step-by-step guide for installing a single spigot at the bottom of the barrel for water access.

Installing the Fill Hose Seal

Marking the Downspout for Diverter Installation

Downspout Marking Procedure

Instructions for marking the downspout at the correct height based on barrel type (sealed or open top).

Drilling the Downspout Hole

Drilling the Diverter Hole

Guide on using the 2-1/8" hole saw to drill the main hole in the downspout for the diverter.

Installing the FlexiFit Diverter

Securing the Diverter and Hose

Steps for inserting the diverter into the downspout, securing it with screws, and connecting the fill hose.

Connecting the Fill Hose to the Barrel

Winterizing the Rain Barrel

Troubleshooting Rain Barrel Issues

Safety Warnings and Precautions

General Safety Warnings

Covers drowning, electrocution, tipping hazards, and the importance of wearing safety gear and securing the lid.

Overview

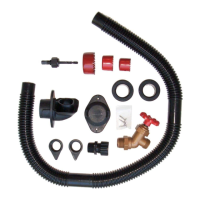
The EarthMinded Rain Barrel Diverter and Parts Kit is designed to simplify the process of collecting rainwater from a downspout into a rain barrel, offering an eco-friendly solution for water conservation. This kit allows users to harvest rainwater for various non-potable uses, such as watering gardens, washing cars, or other outdoor tasks, thereby reducing reliance on municipal water and lowering water bills.

The primary function of the kit is to divert rainwater from a standard residential downspout into a rain barrel. It features a FlexiFit diverter that is installed directly into the downspout. When it rains, water flows down the downspout, and a portion is channeled through the diverter and a fill hose into the rain barrel. Once the rain barrel is full, the diverter automatically allows excess water to bypass the barrel and continue down the downspout, preventing overflow and ensuring proper drainage. This automatic bypass feature is a key advantage, as it eliminates the need for manual intervention to prevent the barrel from overflowing.

The kit is versatile and can be used with various types of rain barrels, including sealed barrels without an opening lid and open-top containers. For sealed barrels, the diverter is typically installed at a specific height relative to the barrel's water inlet. For open-top containers, the diverter's height is adjusted to ensure efficient filling. The installation process involves marking and drilling a hole in the downspout using a 2-1/8" (54mm) hole saw, then inserting and securing the FlexiFit diverter. The fill hose connects the diverter to the rain barrel, and its flexible design allows for bending to form elbows, accommodating different barrel placements.

One of the usage features is the ability to link multiple rain barrels together, significantly increasing water storage capacity. There are two primary methods for linking: rim-to-rim or bottom drain-to-bottom drain. The rim-to-rim method, often utilizing an EarthMinded Linking kit (sold separately), allows the first barrel connected to the downspout to fill completely before overflowing into subsequent barrels. The bottom drain-to-bottom drain method, which typically uses a modified garden hose or washing machine hose, ensures that all linked barrels fill up to the same level simultaneously. This method is particularly useful for placing barrels further apart on level ground, such as on patios or decks.

The collected rainwater can be accessed in several ways. Users can fill a watering can or bucket directly from the spigot on the barrel or by removing the lid of an open-top barrel. A garden hose can be connected to the spigot or bottom drain to water remote areas, with the effectiveness enhanced by elevating the rain barrel to increase water pressure. For automated watering, a rain barrel soaker hose can be connected to the spigot or bottom drain, optionally with an inline garden hose valve for control. A garden hose timer, designed for low-pressure applications, can also be fitted between the bottom drain and a soaker hose to dispense water at regular intervals. For drip irrigation systems, it is recommended to use emitters designed for 4 gallons per hour.

Maintenance features are straightforward and focus on ensuring the longevity and proper functioning of the system. Winterizing the barrel is crucial in regions where temperatures drop below freezing to prevent damage from ice expansion. This involves removing the FlexiFit diverter by unscrewing two screws and pulling it out in an upwards motion. The barrel should then be completely drained, ensuring water is directed away from the house's foundation. A winter hole cover, secured with two screws, is provided to seal the hole in the downspout during the colder months. The diverter and barrel should be stored for winter.

Regular checks are recommended to ensure the system operates efficiently. Users should periodically inspect the gutter for blockages at the downspout connection and ensure the downspout, diverter, and fill hose are free of leaves or debris. It's important to verify that the diverter is installed with the collection cup (arrow) facing up and that no point of the fill hose is above the level of the diverter, as this could impede water flow. The diverter must be installed at the correct height relative to the barrel's water inlet to ensure proper filling; if the barrel overflows or doesn't fill, it may need to be raised or lowered. Additionally, checking the spigot and drain for leaks is important, as even a slow drip can empty the barrel over time. The kit also includes a "Do Not Drink Water" warning sticker to be placed on the barrel, reminding users that stored rainwater is not for human or animal consumption. Safety warnings are provided throughout the manual, addressing potential hazards such as drowning, electrocution, tilting/tipping, contamination, installation, and infestation, emphasizing the importance of securing lids and installing the barrel on a solid, level base.

EarthMinded RBK-0001 Specifications

General IconGeneral
Product TypeRain Barrel Kit
Capacity50 gallons
CompatibilityStandard downspouts
MaterialPolyethylene
IncludesSpigot

Related product manuals