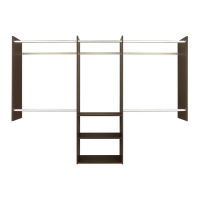
L ift a s s e m b le d s e c tio n o n to th e tra c k a n d p o s itio n it. If u n it
w a s a s s e m b le d o n th e flo o r, it is h e lp fu l to h a v e tw o p e o p le
fo r th is s te p . M a k e s u re th a t th e v e rtic a l p a n e ls a re lo c a t-
ed w ithin 3" of a screw attached to a stud or a toggle bolt
(fro m s te p tw o ). If th e y a re n o t, re p o s itio n th e a s s e m b le d
section or add screw s and toggle bolts.
Figure 6.
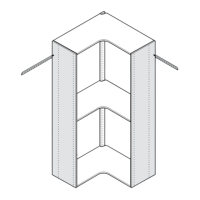
In s ta ll th e ro d e n d s in to th e s e c o n d s e t o f h o le s in th e
vertical panels of the center unit. S nap the 23 7/8" long
w a rd ro b e ro d s in to p la c e .
Figure 6a.
D e te rm in e th e d e s ire d lo c a tio n o f th e a d ju s ta b le s h e lf.
Push the shelf pins into the vertical panels and position the
shelf.
Figure 6b.
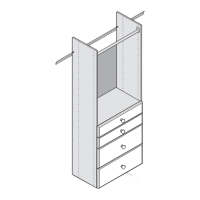
Position the outside vertical panels on the track.
N O T E : O n c lo s e ts le s s th a n 9 6 " w id e , th e le n g th o f th e
w ardrobe rods and shelves on one of the outside
s e c tio n s w ill n e e d to b e s h o rte n e d b y c u ttin g .
B e fo re c u ttin g a n y th in g , in s ta ll th e d e s ire d 3 4 5 /8 " lo n g
w ardrobe rods, and shelves in the section that w ill not need
to b e c u t d o w n . F o u r (4 ) 3 4 7 /8 " w a rd ro b e ro d s a re
included; this w ill allow tw o w ardrobe rods per side, if
desired.
R efer to Figures 6 and 7.
M easure the w idth of the rem aining section for the w ard-
robe rod. Allow 1/4" for the rod ends w hen m easuring the
le n g th , a tig h t fit is im p o rta n t. C u t th e ro d s to th e c o rre c t
size using a hacksaw .
If c u ttin g th e s h e lv e s , m e a s u re a t th e b a c k a n d fro n t, a s th e
side w all m aybe bow ed. C ut the shelves using a circular
saw , table saw w ith a quality carbide blade, or a hand saw .
For extra stability on vertical panels, screw the plastic rod
e n d to th e v e rtic a l p a n e l. D rill a 1 /8 " h o le th ro u g h th e ro d
end and secure w ith a #6 x 1/2" zinc screw . This w ill
prevent the panels from spreading.
F ig u r e 6 a .
3
A ssem ble U nit, continued
4
Figure 6
W a rd ro b e R o d
R od End
For an exact fit on a
w all less than 96" w ide,
one section of rod(s)
m ust be cut dow n.
Shelves can also be
c u t to s iz e .
C enter
Unit
#6 x 1/2'" Zinc
Screw (optional)
Shelf
Shelf P in
Figure 6a
Figure 6b
#6 x 1/2" Zinc Screw
Shelf Pin
For Adjustable S helves
 Loading...