EasyManua.ls Logo

Easy Track RB1460 User Manual

Easy Track RB1460
6 pages
To Next Page IconTo Next Page
Page #1 background imageLoading...
Page #1 background image
M odel R B 1460 Includes:
2 - 7 2 " V e rtic a l P a n e ls
2 - 4 8 " V e rtic a l P a n e ls
3 - 2 3 7 /8 " S h e lv e s
4 - 3 4 5 /8 " W a rd ro b e R o d s
1 - 2 3 7 /8 " W a rd ro b e R o d s
1 - 2 3 7 /8 " S u p p o rt C le a t
10 - R od H olders
18 - #8 x 50 m m Screw s
1 8 - W h ite S c re w C o v e rs
8 - S helf P ins
8 - # 6 x 1 /2 " Z in c S c re w s
4 - Toggle B olts w ith S crew s
2 - 48" E A S Y TR AC K
1
4' to 8' Tow er C loset
R B 1460
PLEASE READ INSTALLATION INSTRUCTIONS
BEFORE ASSEMBLING.
IF YOU ARE MISSING PARTS OR HAVE QUESTIONS
PLEASE CALL OUR
CUSTOMER HELP LINE:
TRACK must be screwed into studs behind wallboard. Warranty is void if TRACK is
only screwed into drywall, as TRACK will fall down when screws pull out of drywall.
1(800)562-4257
Tools Required:
12'
Tape M easure
Level
H acksaw
H and or E lectric S aw
(if you need to cut shelves)
IMPORTANT:
EASY TRACK
8 AM TO 5 PM EST
Monday - Friday
Visit Our Web Site For Design Ideas and Frequently Asked Questions.
www.windquestco.com
B a tte ry o r E le c tric D rill
w ith N o . 2 P h illip s , 1 /8 " ,
and 1/2" D rill B its
Question and Answer IconNeed help?

Do you have a question about the Easy Track RB1460 and is the answer not in the manual?

Easy Track RB1460 Specifications

General IconGeneral
BrandEasy Track
ModelRB1460
CategoryIndoor Furnishing
LanguageEnglish

Summary

Tools Required for Easy Track Installation

Prepare and Attach Track

Remove Existing Shelving

Remove existing closet rod, shelf, and shelf support before proceeding.

Attach Track to Wall

Draw a level line, locate studs, and attach the track securely using appropriate hardware.

Attaching Track to Standard Drywall

Secure track to studs using #8 x 50mm screws after drilling pilot holes. Ensure support.

Attaching Track with Toggle Bolts

Install toggle bolts by drilling a 1/2" hole, inserting the channel, and securing the cap.

Assemble and Install Closet Unit

Assemble the Closet Unit

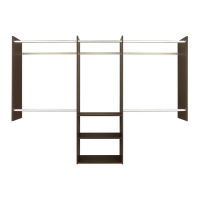
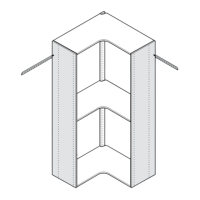
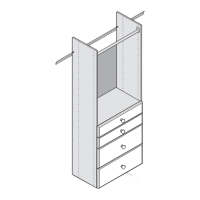
Position vertical panels and attach fixed shelves using #8 x 50mm screws.

Position and Install Assembled Unit Components

Lift unit onto track, align panels, install rod ends, shelf pins, and optional rod end screws.

Customize Rod and Shelf Lengths

Measure and cut wardrobe rods and shelves to fit specific closet widths, ensuring proper fit.

Attach Support Cleat

Ten Year Limited Warranty

Related product manuals