EasyManua.ls Logo

Easypix XTasy - User Manual

Easypix XTasy
3 pages
Print Icon
To Next Page IconTo Next Page
Loading...
1. Key Features
Record max 1080p Full HD video by using one easy slide switch
Take 5MP digital photographs
Support up to 32GB MicroSD card and allows you to take FHD videos for 4 hours
Built-in 1200mAh Li-Polymer battery for around 2.5 hours continuously use
Waterproof up to 10 meters depth without using extra casing
2. Package Contents
Carefully unpack the package and ensure that you have the following items:
1
Camera body
12
Helmet mount
2
Back Cover
13
Double Sided Adhesive - Helmet x 2
3
Mini USB cable
14
Single Sided Adhesive - Helmet
4
HDMI Cable
15
Fitting piece
5
USB adapter
16
Double Sided Adhesive - Fitting
6
Secure strap
17
Single Sided Adhesive - Fitting
7
CamLocker
18
Mount strap - short
8
CamLocker Key
19
Mount strap - medium
9
CamLocker Socket - Ball Joint
20
Carry Bag
10
CamLocker Socket - Ball Joint (L)
21
Carabineer
11
Bike Mount
22
User Manual
3.Functional Parts
.
1
Power/ Shutter button
1. Turn the camera on or off
2. Take single photograph
2
LED indicator
Show the camera status
3
Recording Slide Switch
Slide to start or stop video recording
4
Lens
High quality lens
5
Micro SD card slot
Micro SD card storage location
6
Mini HDMI Port
Connect the camera to TV via HDMI cable
7
Video Resolution Switch
Select video resolution: FHD (Full HD) or HD.
8
USB Port
1. Connect to computer for data transfer or camera
setup
2. Charge your camera
9
Reset button
Reset the camera
10
Back Cover
Rotate to seal the camera
4. Using The Camera
4.1 Charging up Your Camera
Charge your camera with either the USB cable or AC/DC adapter. The red LED lights up to
indicate the camera is charging and turns off as soon as the camera has been fully
charged. It takes about 3 hours to fully charge the camera.
4.2 Inserting a Memory Card
Insert a MicroSD card (not included) before using your camera. Assure that the camera
power is turned OFF before inserting the card to the slot.
Notes
1. There is only one correct direction to insert the MicroSD
card into the slot. Do not force the card into the card slot as it
may damage both the camera and the MicroSD card.
2. A new MicroSD card should be formatted before using.
For more information, please see section 5.3
4.3 Set up Date and Time
You can set the camera’s clock with the software to ensure that your video and photo files
are saved with the correct date/ time information.
To set up the camera clock
1. Connect your camera to a computer with the USB cable. Run actionplus.exe at your
MicroSD card folder.
2. Find the “Date and Time” and click “SET”.
3. Adjust the date and time or click “ Sync with PC” to set with your PC clock.
4. Click “Ok” to save the settings.
4.4 Sealing Your Camera
The Waterproof Housing lets the camera perform up to 10
meters or 30 feet under water. You must seal the camera with
BACK COVER in order to protect the camera when using it in
wet or moist conditions.
To secure the BACK COVER
1. Attach the BACK COVER to the back of the camera and
rotate clockwise until the two black dots are aligned.
2.Slide the latch on the BACK COVER to lock it.
To open the back cover, slide the latch on the back cover to
loosen it. Rotate the cover counterclockwise until the white and
black dots are aligned.
Notes
1. Failure to properly seal your camera can result in leaks that
damage or destroy your camera. Your warranty does not cover water damage resulting
from user damage.
2. The rubber seal on the BACK COVER forms the waterproof barrier to protect the
camera in wet and underwater conditions. You must keep this seal clean as a single strain
of hair or grain of sand can cause a leak into the product.
3. After every use in salt water, you will need to rinse the outside of the product and the
seal with non-salt water and dry. Not doing this can cause corrosion in the product or
failure in the seal, in turn, damaging the product.
4.5 Power On & Power Off
To power ON the camera:
Press and hold the Power button. The camera will vibrate and the Green LED will turn
on.
To power OFF the camera:
Press and hold the Power button. The camera will vibrate two seconds and the Green
LED will turn off.
4.6 Recording Video
Before starting recording, select the video resolution by switching the Video Resolution
Switch
There are two methods available for starting the video record function. When starting a
video recording, a short vibration indicates recording started. The LED indicator illuminates
RED throughout the recording.
1. Whether the camera power is ON or OFF, simply slide the Recording Slide Switch
from STOP to REC to start recording.
2. When your camera is OFF and the Recording Slide Switch is at REC location,
press and hold the Power button to turn the camera ON and it will start recording.
Move the Recording Slide Switch from REC to STOP to stop recording. The
camera will vibrate and the LED indicator will illuminate GREEN to indicate the recording
has stopped. The camera will then enter Standby mode.
An additional option is to hold the Power button to stop the recording and turn the
camera off. The camera will vibrate two seconds and the Red LED light will turn off.
Notes
1. An additional 432x240 (w/ 1080p/720p) or 320x240 (w/ 960p) video file in the file name
ACTPXXXX_thm.mov (XXXX is 4 numeric digit) will be created simultaneously with the
recording of an HD/FHD video file. The smaller video file size allows for more efficient
uploading of content to social media sites and email.
2. Changing video resolution is disabled during video recording.
3. There will be around 1-2 seconds delay before the camera starts recording.
4. The various video resolution options for HD and FHD can be changed under the
“Settings” selection in the software.
5. Assure there is sufficient memory available on the MicroSD card. If the card is full, the
camera will vibrate for five seconds and the Green LED will flash continuously.
4.7 Taking Photos
1. Turn on the camera by pressing the Power button.
2. After the camera power has been turned on, press the Power button to take a
photo. A short vibration and a flash of Green LED indicate the action was successful.
Notes
1. The Still Photo function is disabled during video recording.
2. The default photo mode is “single photo”. Burst mode gives you a continuous 10
photo shots to capture that “can’t miss” moment. Interval shooting mode can be
utilized to take a series of photos at 5, 10, 30 or 60-second intervals. To change the
mode, please refer to the section “Run the software / Change the camera settings”
3. If the card is full, the camera will vibrate for five seconds and the Green LED will flash
continuously.
4.8 Auto Rotation
The camera has a built-in G-sensor which is able to detect the camera orientation. By
rotating your camera to 90
o
, 180
o
or 270
o
from the default position (refer to the picture), the
recorded view will be rotated in the same angle. This allows the user to mount the camera
in different orientation without recording a rotated or inverted view. The video resolution
will be adjusted for 90
o
and 270
o
.
Question and Answer IconNeed help?

Do you have a question about the Easypix XTasy and is the answer not in the manual?

Summary

Using The Camera

Charging up Your Camera

Charge camera using USB cable or AC/DC adapter; red LED indicates charging.

Inserting a Memory Card

Insert MicroSD card into the slot with camera power OFF; do not force the card.

Set up Date and Time

Set camera's clock via software to ensure correct date/time on files.

Sealing Your Camera

Seal camera with BACK COVER for waterproof protection up to 10 meters.

Power On & Power Off

Turn camera ON or OFF by pressing and holding the Power button.

Recording Video

Start/stop recording by sliding the Recording Slide Switch or using the Power button.

Taking Photos

Turn on camera and press Power button to take a photo; still photo function disabled during video.

Auto Rotation

Camera automatically rotates recorded view based on G-sensor orientation.

Connecting Your Camera

Connecting Your Camera to a PC

Connect camera to PC via USB for mass storage, data transfer, and formatting.

Run The Software; Change the camera settings

Use software to change photo/video settings, general settings, date, and time.

Connecting Your Camera to a TV;HDTV

Connect camera to TV/HDTV via HDMI cable for viewing and file management.

Mounting Your Camera

Secure Strap

Use secure strap to attach camera to holes and secure places.

Fix The CamLocker

Attach CamLocker to camera's tripod socket and tighten securely.

Installing your Helmet Mount with Strap

Mount strap on helmet, securing it with clips and vents.

Mounting on your Bike Helmet

Attach helmet mount to bike helmet using adhesive and straps.

Mounting on your Motorcycle Helmet

Mount camera on motorcycle helmet using adhesive and straps.

Mounting on the Handlebar or Pole

Attach mount to handlebar/pole, secure with screws, adjust with ball joint.

Troubleshooting

System Requirements

Trademark Information

Overview

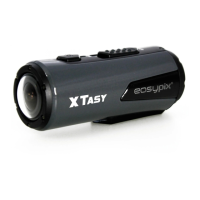
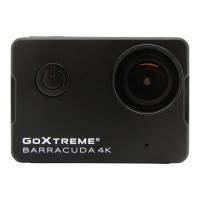
The XTASY Full HD Action Camcorder is a versatile and robust device designed for capturing high-definition video and still photographs in various environments, including underwater. Its compact design and comprehensive mounting system make it suitable for a wide range of action-oriented activities.

Function Description

The primary function of the XTASY camcorder is to record Full HD video at a maximum resolution of 1080p. This is achieved through a simple slide switch, allowing users to quickly initiate recording. In addition to video, the device can capture 5MP digital photographs. It supports MicroSD cards up to 32GB, providing ample storage for extended recording sessions, with the capability to record FHD videos for up to 4 hours on a single card. The camcorder is powered by a built-in 1200mAh Li-Polymer battery, offering approximately 2.5 hours of continuous use. A key feature is its waterproof capability, allowing it to operate up to 10 meters deep without the need for an additional casing, thanks to its high-quality aluminum barrel and rubberized finishing.

The camcorder incorporates a G-sensor for auto-rotation, which detects the camera's orientation and adjusts the recorded view accordingly. This means users can mount the camera at 90°, 180°, or 270° from the default position without recording an inverted or rotated view. The video resolution will be adjusted for 90° and 270° orientations.

Connectivity options include a Mini USB port for data transfer, camera setup, and charging, as well as a Mini HDMI port for connecting to a TV or HDTV. This allows the camera to function as a viewfinder, enabling users to playback, delete, and format files directly on a larger screen.

Usage Features

Power On & Off: The camera is powered on by pressing and holding the Power button, indicated by a vibration and a green LED. To power off, the Power button is pressed and held again, resulting in a two-second vibration and the green LED turning off.

Charging: The camera can be charged using either the included USB cable or an AC/DC adapter. A red LED indicates charging status, turning off once fully charged, which typically takes about 3 hours.

Memory Card Insertion: A MicroSD card (not included) must be inserted before use. It's crucial to ensure the camera is turned off and to insert the card in the correct direction to avoid damage. New MicroSD cards should be formatted prior to use.

Date and Time Setup: The camera's internal clock can be set using the provided software (actionplus.exe) when connected to a computer via USB. This ensures that video and photo files are stamped with accurate date/time information.

Sealing for Waterproofing: For underwater use or in wet conditions, the camera must be properly sealed with the BACK COVER. The cover is attached by rotating it clockwise until two black dots align, and then locked with a latch. To open, the latch is loosened, and the cover is rotated counterclockwise until the white and black dots align.

Video Recording: Video recording is initiated by sliding the Recording Slide Switch from STOP to REC. A short vibration and a red LED indicate that recording has started. Alternatively, if the camera is off and the switch is at REC, pressing and holding the Power button will turn on the camera and begin recording. To stop, the switch is moved from REC to STOP, resulting in a vibration and a green LED, entering Standby mode. An additional option to stop recording and power off the camera is to hold the Power button, which will cause a two-second vibration and the red LED to turn off. The camera simultaneously creates a smaller 432x240 or 320x240 video file (thm.mov) alongside the main HD/FHD file for efficient uploading to social media and email. Video resolution cannot be changed during recording.

Photo Taking: After the camera is powered on, pressing the Power button takes a photo. A short vibration and a green LED flash confirm a successful capture. The default photo mode is "single photo," but burst mode (10 continuous shots) and interval shooting (series of photos at 5, 10, 30, or 60-second intervals) are also available and can be changed via the software. Still photo function is disabled during video recording.

Mounting System: The XTASY features a versatile mounting system, including a secure strap, CamLocker, helmet mounts (for bike and motorcycle helmets), and a handlebar/pole mount.

  • Secure Strap: Loops through strap holes on the camera and attaches to other mounts or secure places.
  • CamLocker: Screws onto the camera's tripod socket, providing a secure attachment point for various mounts.
  • Helmet Mounts: Utilize single-sided and double-sided adhesive mounts to secure the helmet mount base. Straps are then threaded through helmet vents and secured with clips. The CamLocker Socket attaches to the helmet mount, allowing for angle adjustment.
  • Handlebar/Pole Mount: Attaches to handlebars or poles using screws, with the CamLocker Socket allowing for angle adjustment.

Connecting to PC: The camera connects as a mass storage device via USB. Users can browse files, format the MicroSD card, and run the "actionplus.exe" software to change camera settings such as photo resolution and mode, video resolution, TV type, language, auto power off, auto rotation, and date/time.

Connecting to TV/HDTV: The HDMI cable allows the camera to connect to a TV or HDTV, enabling it to be used as a viewfinder for taking photos/videos, playing back files, deleting files, and formatting the MicroSD card.

Maintenance Features

Lens Care: It is crucial to keep the lens clean, as dirt and fingerprints can significantly affect the quality of captured images.

Waterproof Seal Integrity: The BACK COVER must be properly closed for effective water sealing. The camera should never be opened underwater. The rubber seal on the BACK COVER forms the waterproof barrier; it must be kept clean, as even a single hair or grain of sand can cause a leak.

Post-Saltwater Use: After every use in salt water, the exterior of the product and the seal must be rinsed with non-salt water and thoroughly dried. Failure to do so can lead to corrosion or seal failure, damaging the product.

Storage: After use, the camera should be rinsed with clean water and kept dry for storage.

Easypix XTasy Specifications

General IconGeneral
SeriesXTasy
Battery TypeLithium-ion
Image SensorCMOS
Waterproof Depth30m (with housing)
ConnectivityHDMI, USB
StorageMicroSD

Related product manuals