Do you have a question about the EasyPro LA1 and is the answer not in the manual?
Explains how EasyPro systems aerate, de-stratify, and circulate pond water for improved oxygen levels.
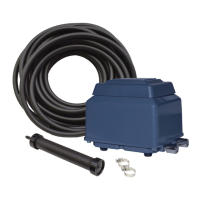
Details linear diaphragm (LA1-LA4) and linear piston (LA5W-LA15W) compressors for quiet, efficient operation.
Covers shock risks, proper grounding, GFCI use, drip loops, and avoiding wet plugs for safe operation.
Guidance on horizontal installation above water level and avoiding submergence or falling into water.
Instructions for placing the compressor on a level, shaded, ventilated surface, protected from elements.
Steps for connecting tubing, manifold, and diffusers to the compressor and securing with hose clamps.
Guidance for diffuser placement during winter or in deeper ponds to prevent mixing cold water.
Instructions for servicing, cleaning, and diagnosing loss of air output, including part replacements.
Details compressor and tubing warranty periods, exclusions, and conditions for coverage.
Procedures for obtaining an RA number, shipping returns, and requirements for warranty claims.
This document describes the EasyPro Aeration Kit, a system designed for aerating, de-stratifying, and circulating water in koi and ornamental ponds, as well as aquariums and small fish holding systems. The primary function of these kits is to increase oxygen levels in the water, which is beneficial for any pond, especially those containing fish.
The EasyPro Aeration Kit operates using a quiet, continuous-duty compressor. Each system includes the compressor, tubing, an air diffuser, and necessary assembly parts. The kits are categorized into two main series based on their compressor type: LA1 through LA4 Series and LA5W through LA15W Series. The LA1 through LA4 Series systems utilize linear diaphragm compressors, which are known for their quiet operation, energy efficiency, affordability, and solid durability. For applications requiring deeper water capability and enhanced durability, the LA5W through LA15W Series systems feature linear piston compressors, also characterized by quiet operation and energy efficiency.
The core function of the EasyPro Aeration Kit is to introduce air into the water, thereby increasing dissolved oxygen levels. This process of aeration is crucial for maintaining a healthy aquatic environment. By de-stratifying the water, the system helps to equalize water temperatures and oxygen concentrations throughout the pond, preventing stagnant zones and improving overall water quality. The circulation created by the air bubbles also aids in distributing nutrients and preventing the buildup of harmful gases. These systems are designed to be energy-efficient, providing continuous aeration without excessive power consumption. The different models cater to various pond sizes, ensuring appropriate aeration for a range of aquatic setups.
Installation and operation of the EasyPro Aeration Kit are straightforward. The compressor should be placed on a level surface above the water level and protected from the elements, ideally in a shaded area free from excessive dust or moisture, yet properly ventilated. It is crucial not to submerge the compressor or place it where it could fall into water.
For LA1 through LA4 kits, a rubber elbow is connected to the compressor using pinch clamps, and then the manifold is connected to the compressor. Airline tubing is then connected from the manifold to the diffusers. For kits with a manifold system, the manifold connects directly to the compressor, and individual airline runs connect from the manifold to the diffusers, secured with hose clamps. It's important not to use tubing to connect the compressor to the manifold, as this would be too restrictive. For other kits, one end of the airline connects directly to the compressor outlet and is secured with a hose clamp. The other end of the tubing connects to the diffuser(s), also secured with hose clamps. Specifically, the LA15W model uses a tee where two diffusers are screwed in, and tubing connects to a barbed male adapter installed in the short side of the tee.
Once assembled, the diffuser(s) are placed in the pond at desired locations for optimal aeration. The compressor is then plugged into a 120V AC GFCI (Ground Fault Circuit Interrupter) protected outlet. A "drip loop" should be provided for the line cord to prevent water from traveling along the cord into the receptacle. The unit should always be installed horizontally.
For winter operation, especially if fish are present, the diffuser should be placed between the shallowest and deepest portions of the pond. For example, if the pond depth ranges from 1 foot to 6 feet, the diffuser should be placed in the 2-3 foot range. This strategic placement prevents the deepest water from mixing with colder water, which is vital for fish survival during colder months.
Regular maintenance is essential to ensure the longevity and optimal performance of the EasyPro Aeration Kit. Before any service, cleaning, or maintenance, the unit must always be unplugged from its power source to prevent electrical shock.
Over time, the compressors may require replacement of the diaphragm or piston. The manual provides a chart for compressor repair kits to facilitate this. Troubleshooting steps are also outlined for common issues such as loss of air output while the unit is running. Users should check for blocked or clogged air filters, kinked or plugged lines, and inspect the diffusers for cleanliness, replacing or cleaning them as necessary. In winter, if ice forms in the air line, a small amount of rubbing alcohol can be run down the line to thaw it. Diaphragms or pistons should also be inspected and replaced if needed. The compressor manual provides more detailed troubleshooting information.
It is important to note that during operation, the lower housing of the compressor can become hot (approximately 70°C or 158°F). While this temperature does not affect pump performance, a thermal overload will shut off the compressor if it gets too hot. The unit will restart once it cools down. Causes for excessive heat, such as lack of ventilation or excess back pressure in the system, should be identified and eliminated to prevent frequent overheating. Proper sizing and selection of tubing, tubing length, number of diffusers, and diffuser depth are critical for maximizing performance. Restrictive tubing, undersized or clogged diffusers, incorrect valve systems, or deeper water can create excess back pressure, leading to increased wear and tear on rubber diaphragms and potentially more frequent repairs.
| Category | Lawn and Garden Equipment |
|---|---|
| Starting System | Recoil Start |
| Engine Type | 4-Stroke OHV |
| Fuel Tank Capacity | 1.0 L |
| Wheel Size | 8 inches |
| Cutting Height | 25-75 mm |