EasyManua.ls Logo

EasyPro PA6SWN - User Manual

Default Icon
4 pages
Print Icon
To Next Page IconTo Next Page
Loading...
Thank you for your purchase of an EasyPro shallow water pond aeration system. EasyPro complete
aeration systems are designed to be an energy ecient way to aerate, de-stratify and circulate water
in ponds. The increase in oxygen levels provided by an aeration system is benecial to any pond but
especially to ponds with sh. These kits are ideal for ponds up to seven feet deep for PA6SWN and eight
feet deep for PA8SWN.
Each aeration system is powered by a quiet, continuous duty compressor and includes tubing, air diuser
and parts to assemble.
Safety and Electrical
Warning - Risk of electrical shock. For your protection always unplug the unit from its power source
before installing or servicing.
Warning - This compressor is solely intended to pump air. It is not for use with oil, solvents or any
petroleum products (gasoline, diesel, etc.).
Always use a properly grounded AC outlet. Keep plug end from moisture and do not attempt to plug in
a wet plug.
Avoid using extension cords to operate compressor.
Provide a “drip loop” for the line cord. This is a loop in the cord below the level of the receptacle or
plug that prevents water from traveling along the cord into the receptacle.
Be sure that a Ground Fault Circuit Interrupter (GFCI) is installed in the branch circuit supplying the
aquarium, fountain or pond equipment.
Unit should be installed horizontally and above the height of water surface.
Do not submerse compressor. Do not place compressor where it could fall into water.
Do not operate if power cord is damaged.
Use extreme caution when operating in winter. Danger due to thin ice can cause drowning. Unseen
currents can cause thin ice in areas long distances away from diuser operation. Provide adequate
warning for others using a pond with a diused aeration system.
Always wear a Coast Guard approved life vest when working in or near water and follow all safety
guidelines.
Note: EasyPro Pond Products is not responsible for losses, injury or death as a result of failure to follow
these safety warnings, misuse or abuse of equipment.
PA6SWN • PA8SWN
Aeration Kit
Instructions for Operation • Safety • Warranty
PA6SWN
PA8SWN
Question and Answer IconNeed help?

Do you have a question about the EasyPro PA6SWN and is the answer not in the manual?

Summary

Safety and Electrical Precautions

Electrical Shock Hazard

Warning: Risk of electrical shock. Always unplug the unit before installation or servicing.

Compressor Usage Limitations

Compressor is intended for air only; do not use with oil, solvents, or petroleum products.

Grounding and Moisture Protection

Use a grounded AC outlet, keep plug dry, use a drip loop, and ensure GFCI protection.

Installation and Operation Safety

Install unit horizontally above water, do not submerge compressor, and avoid damaged power cords.

Winter Operation Safety

Exercise caution in winter due to thin ice risks; mark open water areas with warnings.

Personal Safety Gear

Always wear a Coast Guard approved life vest when working in or near water.

Aeration Kit Features and General Instructions

Shallow Water Aeration Kit Specifications

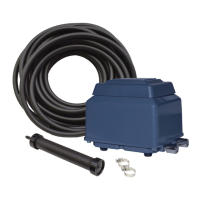
Details on kit part numbers, pond size, compressor warranty, CFM, and recommended depth.

Compressor Placement and Environment

Place compressor on a level, shaded surface above water, free from dust and moisture.

Diffuser Assembly and Pond Placement

Assemble diffusers, attach tubing, and position in pond for maximum circulation.

Tubing and Airline Connections

Connect airline tubing to diffusers and compressor securely with provided clamps.

Power Connection

Connect the compressor to a 120v AC GFCI protected outlet for operation.

Operation, Maintenance, and Troubleshooting

Continuous Operation Recommendation

Systems are designed for continuous operation to achieve maximum circulation and aeration.

Initial Stratification Procedure

Gradually start aeration in stratified ponds to prevent oxygen depletion and potential fish kill.

Winter Operation Guidelines

Mark thin ice, bury tubing, protect compressor from elements, and thaw frozen lines if necessary.

Routine Maintenance Procedures

Unplug before service, replace diaphragms as needed, and clean diffusers periodically.

Troubleshooting Loss of Air Output

Check air filter, lines, diffusers, and compressor diaphragms for common issues.

Product Warranty and Claims

Warranty Coverage Period

Details warranty periods for compressor, tubing, and diffusers; excludes wear items and misuse.

Making a Warranty Claim

Procedure requires RA number, original receipt from authorized seller, and contact information.

Limitation of Liability

Disclaims liability for consequential damages, loss of fish, or other livestock due to product failure.

Overview

This document describes the EasyPro Shallow Water Pond Aeration Kit, available in models PA6SWN and PA8SWN. These kits are designed to provide energy-efficient aeration, de-stratification, and water circulation in ponds, increasing oxygen levels which is beneficial, especially for ponds with fish. The kits are suitable for ponds up to seven feet deep for the PA6SWN model and eight feet deep for the PA8SWN model.

Function Description

The EasyPro Shallow Water Pond Aeration Kit is a complete system that uses a quiet, continuous-duty compressor to pump air through tubing to an air diffuser, which then releases bubbles into the pond. This process aerates the water, mixes different temperature layers (de-stratification), and circulates the water, thereby increasing dissolved oxygen levels.

Important Technical Specifications

Models:

  • PA6SWN:
    • Maximum Pond Size: 3/8 Acre
    • Compressor Warranty: 3 Years
    • Maximum CFM (cubic feet per minute): 3.17 cfm
    • Maximum Recommended Depth: 7 feet
    • Compressor Model: KLC60
    • Tubing: 50' Quick Sink (1/2" ID)
    • Diffuser(s): DM4 (includes four RAD650W self-weighted rubber membrane diffusers)
    • Compressor Repair Kit: KLC68DK
  • PA8SWN:
    • Maximum Pond Size: 3/4 Acre
    • Compressor Warranty: 3 Years
    • Maximum CFM (cubic feet per minute): 3.7 cfm
    • Maximum Recommended Depth: 8 feet
    • Compressor Model: KLC80
    • Tubing: 100' Quick Sink (1/2" ID)
    • Diffuser(s): Two DM4 (each includes four RAD650W self-weighted rubber membrane diffusers)
    • Compressor Repair Kit: KLC68DK

General Specifications:

  • Power: 120v AC GFCI protected outlet.
  • Compressor Type: Oil-less motor, continuous duty.
  • Diffuser Type: Rubber membrane diffusers (RAD650W).
  • Tubing: Quick Sink tubing, 1/2" ID.

Safety Warnings:

  • Risk of electrical shock: Always unplug the unit from its power source before installation or servicing.
  • Compressor is for air only; not for use with oil, solvents, or petroleum products.
  • Use a properly grounded AC outlet; keep plug end from moisture.
  • Avoid extension cords.
  • Provide a "drip loop" for the line cord.
  • A Ground Fault Circuit Interrupter (GFCI) must be installed in the branch circuit.
  • Install unit horizontally and above the water surface.
  • Do not submerge compressor or place where it could fall into water.
  • Do not operate if the power cord is damaged.
  • Exercise extreme caution in winter due to thin ice caused by aeration; provide adequate warnings.
  • Wear a Coast Guard approved life vest when working in or near water.

Usage Features

Installation:

  1. Place the compressor on a level surface above the water level, in a shaded area free from excessive dust or moisture. Ensure adequate air circulation and avoid low spots where water may puddle.
  2. Assemble diffusers by threading rubber membrane diffusers into the provided PVC assembly and securing them with zip ties to a plastic underlay.
  3. Attach Quick Sink tubing to the barbed outlet of the diffuser assembly and secure with hose clamps and strain relief clamps.
  4. Unroll the tubing and install the diffuser(s) into the pond, lowering them where circulation is maximized. Trim tubing to length at the compressor.
  5. Connect the rubber elbow to the compressor using pinch clamps or hose clamps.
  6. Connect the end of the airline to the compressor outlet and secure with a hose clamp. For PA8SWN with a manifold system, connect the manifold to the compressor, then the airline runs to the manifold system, securing with hose clamps.
  7. Plug the compressor into a 120v AC GFCI protected outlet.

Operation:

  • Compressors are designed for continuous operation.
  • For stratified ponds, start aeration gradually: 1-2 hours on the first day, increasing by 1-2 hours each day for the first week, then run continuously. This prevents a sudden depletion of oxygen and potential fish kill.
  • Winter Operation:
    • Clearly mark areas with warnings about open water or thin ice.
    • Bury tubing leading into the pond to prevent ice formation and kinking.
    • Protect the compressor from snow and water by using a cabinet or shelter, ensuring adequate air ventilation.
    • If lines freeze, rubbing alcohol can be used to thaw them.

Maintenance Features

Routine Maintenance:

  • Always unplug the unit before any service or cleaning.
  • Compressor diaphragms may need replacement over time (see chart for repair kits).
  • If not operated in winter, disconnect the compressor, cover tubing ends, and store the compressor indoors.
  • Diffusers may require cleaning every 2-5 years, depending on water conditions.

Troubleshooting (Loss of air output but unit is running):

  • Check for blocked or clogged air filter.
  • Inspect lines for kinks or plugs; check for ice in winter. Use rubbing alcohol to thaw ice if present.
  • Inspect diffusers for cleanliness; clean or replace as necessary.
  • Inspect compressor diaphragms; replace as necessary (refer to compressor manual for details).

Warranty:

  • KLC Compressor: Three years from the date of purchase.
  • Quick Sink Tubing and Diffusers: Five years from the date of purchase.
  • Other kit items are considered wearable and not covered under this limited warranty.
  • Warranty covers properly installed and maintained products sold by authorized EasyPro Sellers.
  • Does not cover normal wear and tear, overloading, improper use, negligence, improper installation, acts of God, accidents, or modifications.
  • Claims require a Return Authorization (RA) number, original receipt from an authorized seller, and proper packaging for return.
  • EasyPro is not liable for incidental/consequential damages, loss of fish, plants, or other livestock.

EasyPro PA6SWN Specifications

General IconGeneral
BrandEasyPro
ModelPA6SWN
CategoryLawn and Garden Equipment
LanguageEnglish

Related product manuals