EasyManua.ls Logo

Eaton CROUSE-HINDS Champ NPFMA20L - User Manual

Eaton CROUSE-HINDS Champ NPFMA20L
12 pages
Print Icon
To Next Page IconTo Next Page
Loading...
SAVE THESE INSTRUCTIONS FOR FUTURE REFERENCE
IF 1849
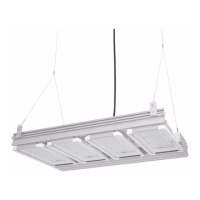
Champ LED Floodlight
NPFMA20L/25L LED Fixtures
Installation & Maintenance Information
IF 1849 • 03/19 Copyright
®
2019, Eaton’s Crouse-Hinds Division Page 1
WARNING
To avoid the risk of fire, explosion or electric shock, this product should be
installed, inspected and maintained by a qualified electrician only, in accordance
with all applicable electrical codes.
WARNING
To avoid electric shock:
Be certain electrical power is OFF before and during installation and
maintenance.
Floodlight must be supplied by a wiring system suitable per local code with
an equipment grounding conductor.
To avoid burning hands:
Make sure LEDs and drivers are cool to touch when performing
maintenance.
WARNING
To avoid potentially unsafe operating conditions:
Make sure the supply voltage is the same as the rated floodlight voltage.
Do not operate in ambient temperatures above those indicated on the
floodlight nameplate.
Use only replacement parts from Eaton’s Crouse-Hinds Division.
Use proper supply wiring as specified on the floodlight nameplate.
All surfaces must be clean.
LED compartment non-serviceable. Do not open.
Before opening wiring compartment, electrical power to the floodlight
must be turned off. Keep tightly closed when in operation.
INSTALLATION
Mounting
Yoke Mount - Wall Mount Using Floodlight Yoke Only
1. Using floodlight yoke as a template, mark and drill desired location on mounting
surface.
2. Secure floodlight yoke to surface using ½” bolts or lag screws (not provided).
WIRING
Wiring the Floodlight
1. Open back cover/heat sink by loosening nine (9) #10-24 x 0.75” stainless steel
cover screws using a 5/16” nut socket or flat head screwdriver
(see Figure 1).
The heat sink cover should be removed by pulling back on one corner of the top
most edge to prevent damage to gasket.
NOTE: To avoid pinching hazard between heat sink cover and driver housing, ensure
that floodlight is oriented in vertical position before, and during, wiring procedure.
2. All components in the fixture are pre-wired so only line in, neutral and ground
need to be connected in the fixture using the supplied Wago connectors, using
methods that comply with all applicable codes. See Figure 2 for wiring diagram.
Wire range from AWG 18-14 (0.75 - 2.5mm²) for neutral, and line (strip
length 0.43” [10.9mm]), and AWG 16-14 (1.5 - 2.5mm²) for ground
connections (strip length 0.43” [10.9mm]).
Entries to driver housing shall be sealed, using HTL or STL, with
devices rated a minimum of IP66.
Standard openings are M20, M25 or 3/4” NPT.
Optional openings are M20 (20mm) and/or M25 (25mm).
Secure all electrical connections and wiring entry glands.
Ensure that the following lengths for field wiring, internal to the driver
housing compartment, are followed:
– 4.5” ± 0.25” (114 ± 6mm) for ground wire
– 2.5” ± 0.25” (64 ± 6mm) for neutral wire
– 2” ± 0.25” (51 ± 6mm) for line in wire
APPLICATION
Pro Flood LED floodlights’ construction is designed for use indoors and outdoors in
marine and wet locations, where moisture, dirt, corrosion, vibration and rough usage
may be present.
• IEC 60598-1 and IEC 60598-2-1
• Wet Locations
• IP66
• CE marked
Champ
LED floodlights’ construction is designed for use indoors and outdoors in
marine and wet locations, where moisture, dirt, corrosion, vibration and rough usage
may be present.
Champ
LED floodlights are supplied for use with a choice of voltages:
• 100-277 VAC, 50/60 Hz
• 127-300 VDC
• 347-440 VAC, 50/60 Hz
COVER SCREWS
LINE TERMINAL
NEUTRAL TERMINAL
GROUND TERMINAL
Figure 1
Cover/heat sink
DO NOT PLACE
ADDITIONAL WEIGHT
ON THE BACK COVER/
HEAT SINK

Questions and Answers

  • S
    Sandra MccormickAug 20, 2025
    What to do if the Power LED is not lit on my Eaton Industrial Electrical?
    • G
      gibbsamberAug 20, 2025
      If the Power LED is not lit on your Eaton Industrial Electrical, you should first check the polarity and integrity of the trunk cable connections to the enclosure. Also, verify that the d.c. supply powering the incoming trunk is operating correctly.
  • S
    Scott DeanAug 22, 2025
    What to do if the power LED is not lit on my Eaton Control Unit?
    • J
      jeffrey04Aug 22, 2025
      If the power LED on your Eaton Control Unit isn't lit, verify the polarity and integrity of the trunk cable connections to the enclosure. Also, check that the d.c. supply powering the incoming trunk is operating correctly.
  • W
    William BradfordAug 25, 2025
    What to do if alarms on my Eaton Security System remain on and cannot be reset?
    • L
      lori41Aug 25, 2025
      If alarms are set to operate from normally closed contacts and the signal supply fuse blows, all alarms will operate as though an alarm has occurred. To resolve this, check the signal supply fuse F1 (rated at 125mA), located in the top right-hand corner of the unit when viewed from the rear, to see if it has blown. Also, ensure that the inputs have been correctly set to operate from either a normally open (N.O.) or normally closed (N.C.) configuration and haven't been accidentally inverted.
  • E
    elizabeth98Aug 26, 2025
    How to fix the audible alarms not sounding on my Eaton Security System?
    • J
      Jeffery JordanAug 27, 2025
      Each channel can be selected to operate either of the two integral horns / horn relays as required. Internal horns and horn relays are enabled by placing the following switches to the ON position on the SPR Card: HNA – SW5 - Position 5, HNB – SW5 - Position 6. Each pair of channels can be set to activate either of the audibles using the following switches located on each alarm module: Channel 1 & 2 HNA – SW4 Position 7 set to ON, HNB – SW4 Position 8 set to ON; Channel 3 & 4 HNA – SW6 Position 7 set to ON, HNB – SW6 Position 8 set to ON.
  • M
    Marisa MyersAug 27, 2025
    What to do if signal inputs that alarm and quickly return to normal are not being picked up by the Eaton Security System annunciator?
    • J
      James WhiteAug 28, 2025
      Check that the response time has been set to suit the application.
  • V
    vwatsonAug 29, 2025
    Why individual repeat relays do not act as slaves of the signal input on my Eaton Security System?
    • B
      Brittany StephensAug 29, 2025
      The operation of the repeat relays is selectable by the user to either follow the signal contact or to remain in the alarm state until the input has returned to normal and the operator has cleared the alarm.
  • M
    Mark RamirezAug 31, 2025
    How to troubleshoot a non-lit green LED for supply 1 and active power failure alarm on my Eaton Security System?
    • A
      amanda91Sep 1, 2025
      Measure the voltage on the power input terminals marked supply 1 located on the rear of the unit and verify that the level matches the requirement and is connected in the polarity indicated.
  • J
    James VargasSep 2, 2025
    How to troubleshoot a non-lit green LED for supply 2 and active power failure alarm on my Eaton Security System?
    • J
      Jeffrey BarkerSep 2, 2025
      Measure the voltage on the power input terminals marked supply 2 located on the rear of the unit and verify that the level matches the requirement and is connected in the polarity indicated.
  • S
    Samantha NelsonSep 4, 2025
    What to do if no alarm occurs on the annunciator when the signal input contact closes or opens on my Eaton Security System?
    • J
      Jill HortonSep 4, 2025
      Check that the signal supply fuse F1 rated @ 125mA, located in the top right hand corner when viewed from the rear of the unit, is in working order and check that the corresponding signal supply voltage is present on the customer terminals on the rear of the unit which can be measured between terminals OVC and any of the terminals marked C (Common) located at the top of each row of signal input terminals.
  • R
    ryan61Sep 6, 2025
    How to solve the Individual channel Repeat Relay contact is Normally Closed in the non alarm state but should be Normally Open on my Eaton Security System?
    • A
      Angela McleanSep 6, 2025
      Each pair of repeat relays can be set to normally energised or normally de-energised using switches located on the Alarm Card and the contact state can also be selected as normally open or closed.

Eaton CROUSE-HINDS Champ NPFMA20L Specifications

General IconGeneral
CategoryLighting Equipment
Wattage20W
Voltage120-277 V
Color Temperature5000K
Operating Temperature-40°C to 40°C
Ingress ProtectionIP66
MountingPendant
Number of Lamps1
Lamp TypeLED
Wattage per Lamp20W
Housing MaterialAluminum
Lens MaterialPolycarbonate
ColorGray
CertificationUL, CSA
Hazardous LocationClass I, Division 2
TypeLED

Related product manuals