EasyManua.ls Logo

Eaton Halo RL560 Series User Manual

Eaton Halo RL560 Series
8 pages
To Next Page IconTo Next Page
Page #1 background imageLoading...
Page #1 background image
F. E26 Edison screw base adapter (For retrofit only -
see included retrofit instructions)
Adaptateur pour culot vissé Edison E26 (pour une
installation dans le cadre de travaux de modernisation
seulement - reportez-vous aux instructions relatives à
ce type d’installation)
Adaptador Edison E26 con base enroscable (solamente
para adaptación; consulte las instrucciones incluidas
para adaptación)
E. Gasket (Use as applicable, per local code)
Joint d’étanchéité (le cas échéant, selon
le Code local)
Junta (utilícela según corresponda, de
acuerdo con el código local)
RL560 Wireless Series Instructions
Instructions pour la série sans fil RL560
Instrucciones para la serie RL560 inalámbrica
Packaging Contents
Contenu de l’emballage
Contenidos del embalaje
ITEMS REQUIRED
(Purchase separately)
Screwdriver
Gloves
ARTICLES NÉCESSAIRES
(à acheter séparément)
Tournevis
Gants
ARTÍCULOS NECESARIOS
(se compran por separado)
Destornillador
Guantes
D. #8-32 Hex Nut (included)
Écrou hexagonal #8-32 (inclus)
Tornillo N.° 8-32 autorroscante
(incluido)
C. #8-32 Screw (included)
Vis no 8-32 (fournie)
Tornillo #8-32 (incluido)
B. #8-32 Self tapping screw (included)
Vis autotaraudeuse no 8-32 (fournie)
Tornillo mecánico #8-32 (incluido)
G. Torsion springs (see torsion spring installation
method)
Ressorts de torsion (consultez la méthode
d’installation du ressort de torsion)
Muelles de torsión (consulte el método de
instalación del muelle de torsión)
H. Friction clips (3) (see friction clip installation
method)
Ressorts de sécurité (3) (consultez la méthode
d’installation du collier de friction)
Ganchos de fricción (3) (consulte el método de
instalación del gancho de fricción)
A. LED module and connector
Módulo LED y conector
Module à DEL et connecteur
H
* For App and wireless control set up please refer to the quick start guide.
* Pour l’installation de l’application et la commande sans fil veuillez consulter le guide de démarrage rapide.
* Consulte la guía de inicio rápido para ver la configuración de la Aplicación y del control inalámbrico.
* For HUB set up please refer to HUB manufacturer App or website.
* Pour l’installation du concentrateur veuillez consulter l’application ou le site web du fabricant du concentrateur.
* Consulte la Aplicación HUB o el sitio web del fabricante para ver la configuración del HUB.
INS #
IB518094ML
Question and Answer IconNeed help?

Do you have a question about the Eaton Halo RL560 Series and is the answer not in the manual?
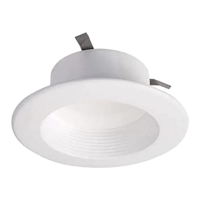
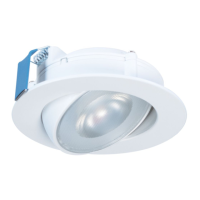
Eaton Halo RL560 Series Specifications

General IconGeneral
CRI90
Voltage120V
ENERGY STAR certifiedYes
IC RatedYes
Air TightYes
SeriesRL560
Color Temperature2700K, 3000K, 3500K, 4000K, 5000K
Trim StyleBaffle
Life Hours50, 000
Trim ColorWhite

Summary

Packaging Contents

Included Hardware and Components

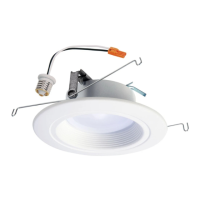
Lists included hardware such as screws, nuts, adapter, and LED module for installation.

Required Items for Purchase

Tools and Supplies

Lists items required for installation that must be purchased separately, such as screwdrivers and gloves.

Important Safety Instructions

Electrical Safety Warnings

Crucial warnings regarding fire risk, electric shock, and wiring protection during installation.

Installation Cautions

Cautions about sharp edges, correct power connection, and installer qualifications.

FCC Compliance Statement

States compliance with FCC Part 15 rules, including conditions for operation and potential interference.

Non-Screwbase LED Luminaire Compatibility

Compatibility and UL Listing

Details compatibility with specific Halo housings and UL/cUL listing requirements for recessed fixtures.

Wire Installation

Ground Wire Installation Methods

Explains three methods for connecting the ground wire from the LED module to the housing.

Retrofit Installation (E26 Edison Base)

Step-by-step guide for installing the RL560 into luminaires with an E26 Edison screw base.

Installation in Non-Screwbase LED Luminaires

Mounting Procedures

General mounting guidance, including gasket use and specific methods.

Torsion Spring Mounting Method

Details the installation process using torsion springs for 5" and 6" luminaires.

Friction Clip Mounting Method

Details the installation process using friction clips for 5" and 6" luminaires.

Rewiring and Uninstalling

Torsion Spring Removal

Step-by-step instructions for uninstalling the module when torsion springs were used.

Friction Clip Removal

Step-by-step instructions for uninstalling the module when friction clips were used.

5-Year Limited Warranty

Limitation of Liability

Details limitations on Eaton's liability for damages, lost profits, and labor charges.

Related product manuals