1.
2.
3.
4.
5.
6.
7.
8.
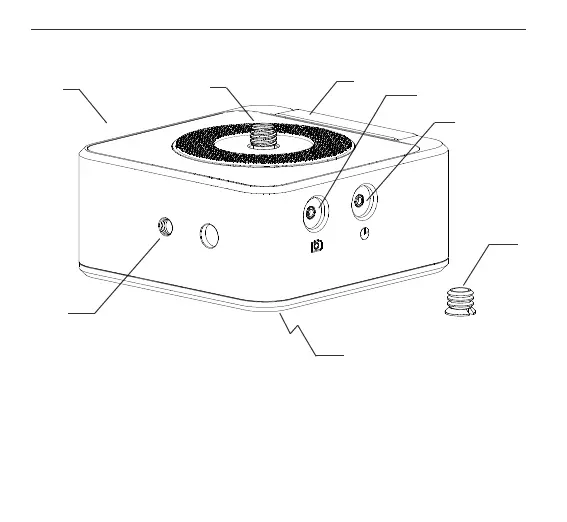
LANC port
3/8”-16 to 1/4"-20 reducer bushing**
3/8”-16 mounting port
1/4”-20 mounting port
HeadONE
3/8”-16 mounting screw
Built in LP-E6 battery bracket
Shutter trigger port
3
2
1
8
6
7
3
2
1
TABLE OF CONTENTS
WHAT’S IN THE BOX & THE BASICS
3/8” REDUCER BUSHING & 1/4” POP UP MOUNTING SCREW
MOUNTING (CAMERA-TRIPOD-FLEXTILT HEAD 2)
USING WITH FLEXTILT HEAD 2
START USING
1.
2.
3.
4.
5.
1. WHAT’S IN THE BOX & THE BASICS
3. MOUNTING (CAMERA-TRIPOD-FLEXTILT HEAD 2)
4
5
2. 3/8” REDUCER BUSHING & 1/4” POP UP MOUNTING SCREW
1. Attach your HeadONE on your tripod
by rotating it clockwise.
2. Attach your FlexTILT Head 2 on your
HeadONE by rotating it clockwise.
3. Attach your camera on your FlexTILT Head 2
or on your tripod head.
A detailed video explaining the mounting process can be found at:
http://edel.kr/ho
**Reducer busing (6) is mounted on the 3/8”-16 mounting port (7)
Dettach the 3/8”-16 Reducer bushing
by turning it counter clockwise.
HeadONE has 3/8”-16 screw hidden
inside for your tripod head. You can
access this screw with the help of a coin.
Turn the screw using a coin until it
pops out. To hide the screw back in its
place, just press it down and turn it
counter clockwise.