>> FRONT PANEL
16 MUTE
The »MUTE« switch should be depressed when you po-
wer up or down your T 1000 – the push button switch
illuminates when the function is engaged. In this mode
no audio signal will be processed and heard at any out-
put except the »TUNER« jack (#31). That way you don’t
have to turn down the volume for silent tuning or when
changing instruments, thus you do without the nasty
cling which you usually hear when you unplug the jack.
The »MUTE« switch also interrupts the signal path at the
transformer balanced »DI OUT« (#18), no matter which
position the switch »POST« (#17) is in (that way your si-
lent tuning or changing instruments won’t be heard in
the PA, either).
During breaks the amp should be set to »MUTE« rather
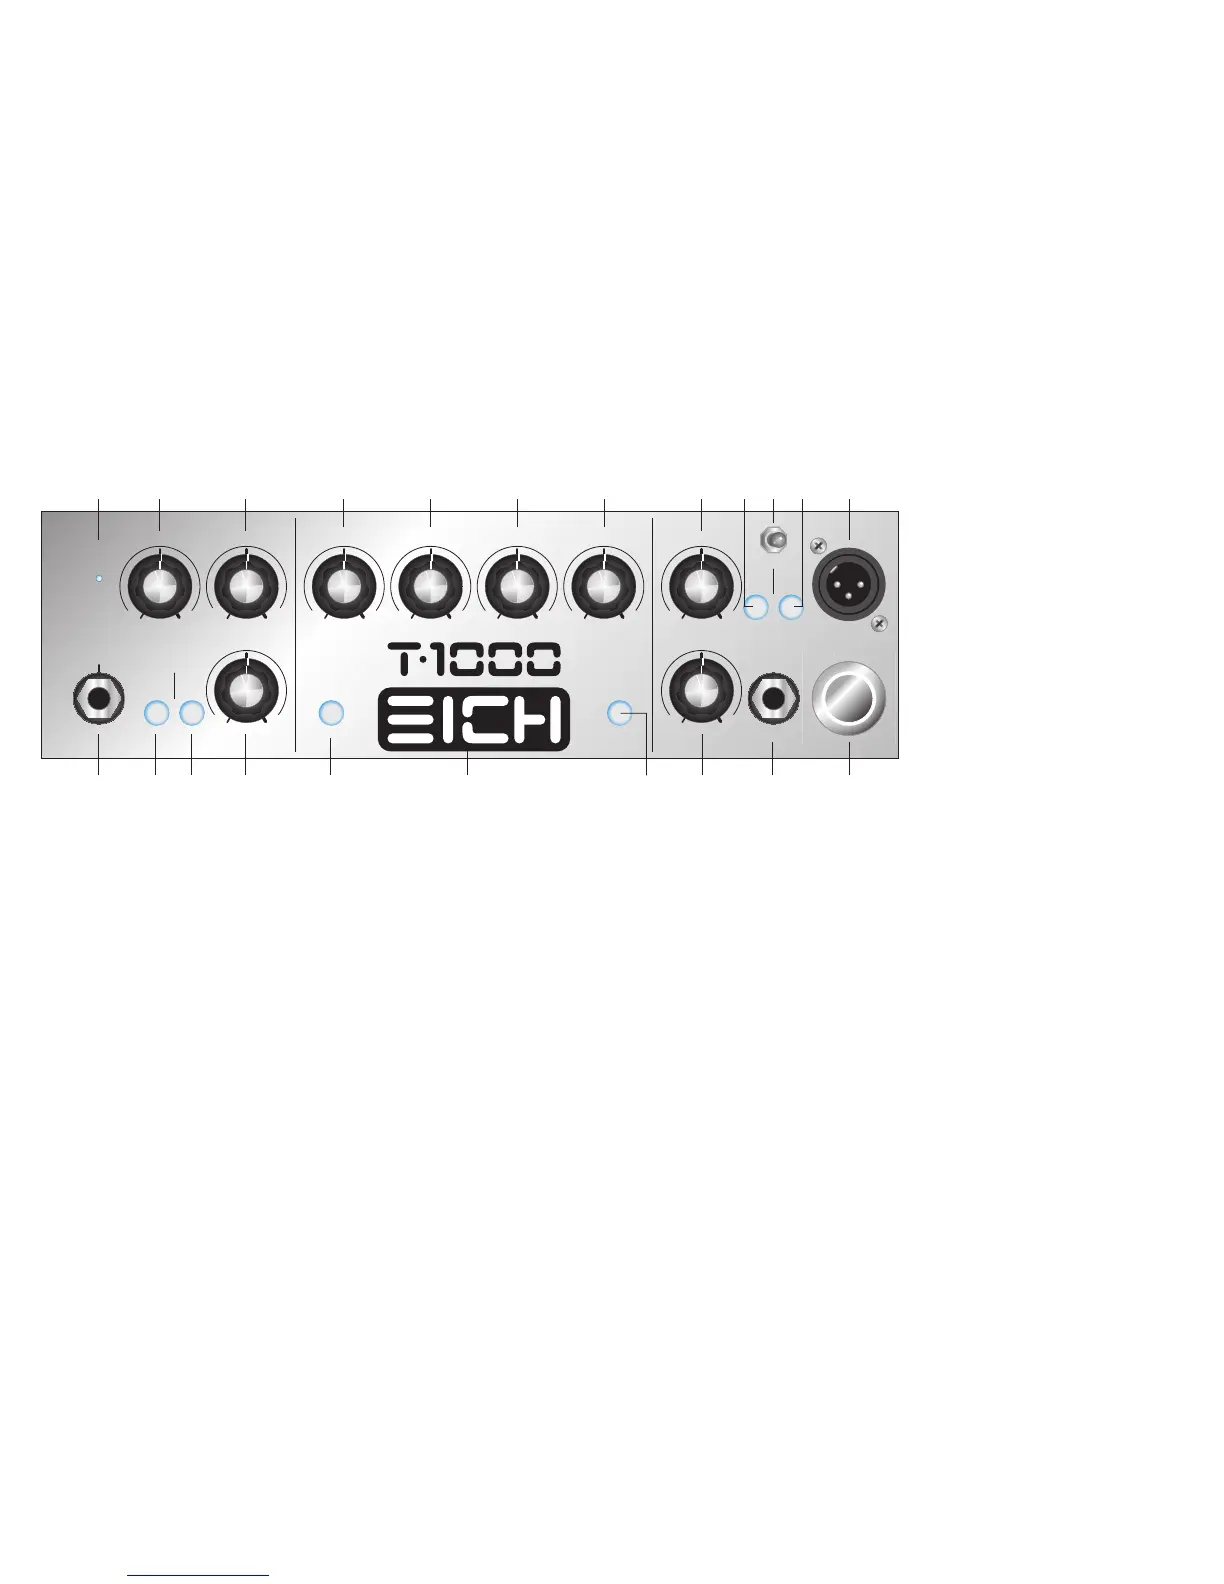
than switched off completely. That way the internal fan
stays on and cools down the power amp circuitry if ne-
cessary. Disengage the »MUTE« function and start to
rumble – now there is signal at all outputs again.
17 POST
With this switch the transformer balanced »DI OUT« (#18)
can be selected to be a »PRE« or »POST« preamp signal. In
the »PRE« position (switch is not depressed) the »DI OUT«
signal is tapped directly after the input stage including the
»-10 dB« function (#2), if activated, as well as the »GAIN«
control (#4). In the »POST« position (switch depressed) the
»DI OUT« signal is taken after it has been processed by
the complete preamp, i.e. including the »GAIN« control
(#4), the tone control section (#8 through #13), and the »EF-
FECTS LOOP« (#14, #29). It is not affected by the »MAS-
TER« control (#15). As a reference the push button switch
will be illuminated when the »DI OUT« is set to »POST«.
18 DI
T 1000 supplies a balanced line output signal for connec-
ting to a house mixing board, recording console or exter-
nal amplifier(s) with balanced inputs. Connect a shielded
3-core microphone cable with XLR plugs to this male XLR
output. The need for an additional active DI box, which
can be pretty expensive, is obsolete. Due to the advanced
circuit design using only the best components available
the high sound quality of the »DI OUT« makes it the amp
of choice in any recording studio (you can use the T 1000’s
pre amp on its own without driving any speakers). The DI
signal can be tapped either before or after the preamp, as
determined by the switch »POST« (#17).
18a GND/LIFT
There is no need to be afraid of nasty ground loops any-
more. In case you will get a ground loop, please switch the
»GROUND LIFT« (#18a) into the »LIFT« position.
19 FS/MUTE/COMPRESSOR
Connect the optional footswitch for the T1000 to this
6.3 mm stereo jack with the cable which comes included
with the footswitch. This will allow you to switch the
functions »MUTE” (#16) and »COMPRESSOR« (#7) re-
motely. For the footswitch to work properly the »MUTE«
switch on the front panel of the amp must be »OFF«. The-
re is a red LED indicating that the »MUTE« function is
active, and likewise a blue LED for the »COMPRESSOR«
function on the footswitch. Even with the footswitch
connected the »MUTE« function can still be engaged
with the »MUTE« switch on the front panel of the amp
(#16).
20 POWER
Activating the »POWER SWITCH« will light up the switch
and make the EICH logo on the front panel (#21) illumi-
nate.
Before you turn on the amp do make sure that the
»MUTE« switch (#16) is depressed and the voltage
is correct (see #23)!
21 EICH Logo
The EICH logo in the centre of the front panel will illumina-
te blue when the “POWER” switch (#19) is turned on and
the included power strip is plugged in.
98
Gain
Clip
Input
Attack
Time
Bass
Boost
High
Boost
Taste Master
Mute Post
Gnd Lift
DILo HiLoMidHiMid
Compressor Line/Effect Mix
Footswitch
Compressor/
Mute
Power
-10
0 10 0 10 0 10 0 10 0 10
010
0 10
010
RichDry
 Loading...