- 29 -
4. Technical data
See warranty card of your country.
Sound and vibration
Sound and vibration values were measured in
accordance with EN 62841.
Wear ear-mus.
The impact of noise can cause damage to hea-
ring.
Total vibration values (vector sum of three direc-
tions) determined in accordance with EN 62841.
Warning!
The specied vibration value was established in
accordance with a standardized testing method. It
may change according to how the electric equip-
ment is used and may exceed the specied value
in exceptional circumstances.
The specied vibration value can be used to
compare the equipment with other electric power
tools.
The specied vibration value can be used for initi-
al assessment of a harmful eect.
Keep the noise emissions and vibrations to a
minimum.
•
Only use appliances which are in perfect con-
ditions.
•
Service and clean the appliance regularly.
•
Adapt your working style to suit the appliance.
•
Do not overload the appliance.
•
Have the appliance serviced whenever ne-
cessary.
•
Switch the appliance off when it is not in use.
Residual risks
Even if you use this electric power tool in
accordance with instructions, certain resi-
dual risks cannot be rules out. The following
hazards may arise in connection with the
equipment’s construction and layout:
1. Lung damage if no suitable protective dust
mask is used.
2. Damage to hearing if no suitable ear protec-
tion is used.
3. Health damage caused by hand-arm vib-
rations if the equipment is used over a pro-
longed period or is not properly guided and
maintained.
5. Before starting the equipment
Before you connect the equipment to the mains
supply make sure that the data on the rating plate
are identical to the mains data.
Warning!
Always pull the power plug before making
adjustments to the equipment.
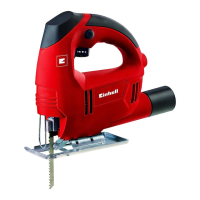
5.1 Safety guard (Fig. 1/Item 13)
•
The safety guard (13) protects the user from
accidentally touching the saw blade (12) and
nevertheless enables you a free view of the
cutting area.
5.2 Changing the saw blade (Fig. 2/Item 12)
Danger!
•
Pull the mains plug before you fit or replace a
saw blade.
•
Press the blade holder (8) and insert the saw
blade (12) into the blade holder (8) as far as
the stop (Fig. 2). The teeth on the saw blade
must be pointing forwards.
•
Allow the blade holder (8) to slide back to
starting position.
•
The saw blade (12) must sit in the guide roller
(10).Check that the saw blade (12) is secure-
ly mounted in the blade holder.
•
Follow the instructions above in reverse order
to remove the saw blade.
Warning! Hold the saw blade securely while
releasing it because otherwise it may jump
out of the blade holder.
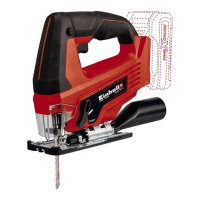
5.3 Setting the soleplate for miter cuts
(Figs. 3-4)
•
Use the hexagon key (4) to loosen the screws
for the soleplate (11) on the bottom of the ad-
justable soleplate (7) (Figure 3).
•
Pull the sole plate (7) backwards slightly. The
soleplate can now be swiveled a maximum
45° to the left and right.
•
If the soleplate (7) is pushed back to the
front again it will only function in the locking
positions at 0°, 15°, 30° and 45°, which are
marked on the graduated scale for the sole-
plate (9) (Figure 4). Move the soleplate into
the required position and refasten the screw
securing the soleplate (11).
•
However, the soleplate (7) is also easily set to
another angle. To do so, move the soleplate
(7) to the rear, set the desired angle and re-
fasten the screw securing the soleplate (11).
Anl_SA_TC_JS_60_1_SPK8.indb 29Anl_SA_TC_JS_60_1_SPK8.indb 29 04.10.2021 09:42:5804.10.2021 09:42:58