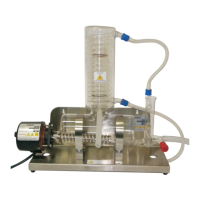
5. Mount the Glass Condenser (Part No. 3) onto the vapour tube of the
Glass Boiler (Part No.2). The distillate outlet tube or vent should face
the front.
11. Connect the distillate outlet on the Glass Condenser (Part No. 3) to a
suitable collection reservoir with the help of Silicon tubing with plastic
connector (Part No. 14)
12. Connect the mains of the Metal Heater (Part No. 4) to a fused 13 amp
electric supply capable of providing a load of 3KW at 230V ± 10% 50
cycles single phase.
IMPORTANT : THE EQUIPMENT MUST BE EARTHED
STARTING THE WATER STILL
1. Turn on the cold water supply and adjust the flow rate to
approximately 60ltr/hr. Allow the water to flow via the Glass
Condenser (Part No. 3) into the Glass Boiler (Part No. 2). When the
water level reaches the correct operating level and excess water
flows to the drain, turn on the heater.
2. When the boiling commences and the distillate emerges from th
Glass condenser (Part No. 3) start collecting in the reservoir.
6. Take the silicon tubing with Screw thread connectors at either end
(Part No. 13). Screw one end of the silicon tubing on to the upper
outlet of the Glass Condenser (Part No. 3) and the other end to the
Glass thread on the Glass Boiler (Part No. 2) inlet.
7. Take the PVC Drain Pipe (Part No. 12) and connect to the drain of the
Glass Boiler (Part No. 2).
8. Lead the free end of the PVC Drain Pipe (Part No. 12) to the drain.
Ensure that there are no kinks or bends in the tube so that water flow
is not impeded.
9. Ensure that the Teflon drain cock on the Glass Boiler (Part No. 2) is
closed.
10. Connect the cooling water inlet of the Glass Condenser (Part No. 3)
to the cold water feed supply through the hose provided. For easy
attachment to the Glass Condenser (Part No. 3) a plastic screw
thread is provided along with the hose.
-5-
© EISCO SCIENTIFIC ● www.eiscolabs.com