Do you have a question about the ElectrIQ EGH20AWB and is the answer not in the manual?
Crucial safety precautions for operating the heater, including electrical safety and user restrictions.
Advice on airflow and placement for energy efficiency and safe operation.
Step-by-step guide to attaching the heater's feet for portable use.
Instructions for securely mounting the heater to a wall, including drilling and fixture advice.
Basic steps to turn on the heater and perform initial operations.
Instructions for configuring the current day and time settings on the heater's display.
How to change desired temperature, select power levels, and activate child lock.
Feature that stops heating when a sudden temperature drop indicates an open window.
How to set a countdown timer or program a weekly heating schedule.
Instructions to download the required mobile application from app stores.
Explanation of Quick Connection and AP modes for connecting the heater to WiFi.
Detailed guide for connecting the heater to WiFi using the Quick Connection method.
Detailed guide for connecting the heater to WiFi using the AP (Access Point) mode.
Steps to create a user account within the Tuya Smart app.
How to create a home environment and rooms within the app for device management.
Navigating the app's home screen to quickly control heater functions.
Detailed controls available on the device screen for managing heater functions.
Creating custom one-touch scenes for the heater based on specific conditions.
Setting up automated actions for the heater triggered by time or other events.
Guidelines for cleaning the heater and proper storage procedures.
Solutions for problems like no power, odour emission, and strong vibrations.
Official statement regarding the heater's compliance with EU directives.
Key technical details including model number, voltage, power, and dimensions.
Contact information and basic troubleshooting steps for customer support.
Guidance on the proper disposal and recycling of the electrical product.
Detailed breakdown of the heater's performance characteristics and control options.
This document serves as a user manual for the electriQ 2.0 KW Designer Glass Panel Heater, models EGH20AW and EGH20AWB. It provides comprehensive instructions for safe operation, setup, control, and maintenance of the appliance, along with guidance for connecting it to a smart home application.
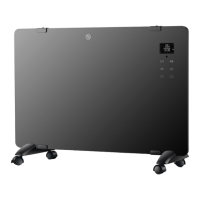
The electriQ Designer Glass Panel Heater is a 2.0 KW electric heater designed for indoor use in well-insulated spaces or for occasional use. It operates on a 220-240 V / 50 Hz earthed outlet and offers both portable and wall-mounted installation options. The heater provides various heating modes, including High Heat (2KW), Low Heat (1KW), and Anti-Frost, allowing users to adjust the room temperature between 10°C and 49°C, or maintain a temperature between 5°C and 9°C in Anti-Frost mode to prevent freezing.
A key feature of this heater is its smart control capabilities. It can be connected to the "TUYA SMART" app via Wi-Fi, enabling remote control and integration into smart home systems like Google Home and Amazon Echo. The app allows for advanced functionalities such as setting up "Smart Scenes" and "Automation," which customize the heater's operation based on internal and external environmental conditions, time, and other connected smart devices.
The heater also includes a Standby Timer for countdown operation up to 24 hours and a Weekly Timer for programming up to six time periods per day, allowing for precise scheduling of heating cycles and desired temperatures throughout the week. An "Open Window Detection" mode is incorporated, which automatically stops heating and enters standby if a significant drop in ambient temperature (5°C within 10 minutes) is detected, helping to conserve energy.
For safety, the unit features a Child Lock function that disables the control panel buttons, preventing unintended adjustments. The appliance is IP24 rated, making it suitable for use in bathrooms, provided it is installed according to regulations and protected by a suitable RCD.
The electriQ glass panel heater offers a user-friendly experience with both manual controls and smart app integration.
Installation: The heater can be used as a portable unit by attaching the supplied legs and castors. This involves turning the heater upside down, positioning the feet, aligning them with the screw holes, inserting and tightening the screws, and then turning the heater upright. Alternatively, it can be wall-mounted using the provided brackets. This requires measuring the distance between the three wall hanging holes on the rear of the heater, marking their positions on the wall, drilling 8mm diameter holes, inserting wall plugs, and then inserting long screws (protruding 5-10mm). The heater is then hung onto these screws and pushed to the side to secure it. It's crucial to ensure the heater is installed at least 15cm from the floor and 50cm from the ceiling, and to check for wires or pipelines behind the wall before drilling.
Basic Operation: To switch on, plug the heater into the power supply and turn on the main power switch on the side. The unit will emit a sound, and the LED display will illuminate when the STANDBY button is pressed. The desired room temperature can be adjusted using the UP and DOWN buttons, with a range of 10°C to 49°C. The MODE button allows users to cycle through High Heat (2KW), Low Heat (1KW), and Anti-Frost modes. In Anti-Frost mode, the temperature is fixed between 5°C and 9°C. The Child Lock is activated or deactivated by pressing and holding the UP and DOWN buttons for 3 seconds.
Timer Functions: The Standby Timer is set by pressing the TIMER button while the unit is running. The countdown timer symbol will illuminate, and "00:00" will flash. Repeatedly pressing the TIMER button increases the duration up to 24 hours. After selection, the timer starts automatically after 10 seconds, and the heater enters standby mode when the time expires. The Weekly Timer is activated by holding the PROGRAM button for 3 seconds, indicated by "Prog" on the display. Users can select a weekday using the UP and DOWN buttons, then confirm with the TIMER button. For each day, up to six time periods can be programmed. The start and stop hours and minutes are set using the UP and DOWN buttons, confirmed by the TIMER button. The desired temperature for each period is also set similarly. These settings are saved as long as power is maintained.
Smart App Control (TUYA SMART): The app can be downloaded via QR codes for Android/iOS or by searching in app stores. Registration: Users register by providing an email or phone number, agreeing to the privacy policy, and entering a verification code. A password (6-20 characters, letters and numbers) is then created. Home Setup: The app requires users to create a "Home" and assign rooms for device management. New rooms can be added, and unnecessary ones unticked. The user's location can also be set for weather-responsive features. Device Connection: The heater supports two Wi-Fi setup modes: Quick Connection (WiFi indicator flashes twice per second) and AP (Access Point) mode (WiFi indicator flashes once per second). To activate Wi-Fi, hold the UP button for 3 seconds. To switch between modes, hold the DOWN button for 3 seconds (from Quick Connection to AP) or UP button for 3 seconds (from AP to Quick Connection). For Quick Connection, users open the app, press "+", select "Heater" under "Home Appliance," confirm the rapidly blinking indicator, enter the Wi-Fi password, and confirm. The app then transfers settings to the heater. For AP Mode, users follow similar steps but press the "AP Mode" button in the top right corner, confirm the slowly blinking indicator, enter the Wi-Fi password, and then connect their phone to the "SmartLife xxx" Wi-Fi network (no password required) before returning to the app. Device Screen: The app's device screen allows users to turn the unit on/off, adjust desired temperature, change modes (Comfort/High Heat, Eco/Low Heat, Anti-Frost), and set countdown timers. It also provides access to settings like Child Lock. Smart Scenes and Automation:
Profile Tab: Provides options to edit user details, manage homes (add/remove rooms, share devices), view notifications, access help, and integrate with other smart home platforms.
Proper maintenance ensures the longevity and safe operation of the electriQ heater.
Cleaning: Before any cleaning or maintenance, it is essential to shut off the unit and unplug it from the mains power supply. The surface of the heater should be cleaned with a duster or a soft, wet cloth. Users must avoid using chemical solvents such as benzene, alcohol, or gasoline, as these can cause irreversible damage to the unit. Care should be taken to prevent water from entering the control panel or any gaps in the casing. The unit should not be operated until it is completely dry after cleaning.
Storage: When not in use, especially for extended periods, the heater should be stored in its original box or covered to protect it from dust. It should be kept in a cool, dry place.
Troubleshooting: The manual advises against attempting to repair or disassemble the unit by oneself, as unauthorized repairs will void the warranty and could lead to bodily harm. Common issues and their solutions are provided:
For any problems not resolved by the provided solutions, users are instructed to contact the service center.
| Heater Type | Convector |
|---|---|
| Power | 2000 W |
| Cool Air Function | No |
| Thermostat | Yes |
| Overheat Protection | Yes |
| Tip-Over Switch | Yes |
| Remote Control | No |
| Heat Settings | 2 |
| Timer | Yes |