Do you have a question about the Electrolux EKG9686X and is the answer not in the manual?
This document outlines the functions, usage, and maintenance of an Electrolux cooker, covering various models including gas and electric ovens, and different hob configurations.
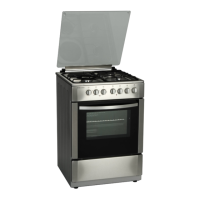
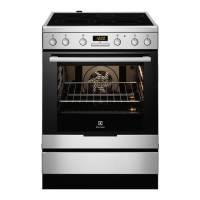
The Electrolux cooker is designed for domestic food preparation, offering a range of cooking methods through its gas hob burners, gas oven, and electric oven with grill functions. The appliance is equipped with multiple burners on the hob, varying in power and size, to accommodate different cooking needs. The ovens provide diverse heating alternatives, including conventional heat, hot air, defrost, and various grill modes, to suit a wide variety of dishes. Some models feature a turnspit for roasting and a mechanical timer for setting cooking durations.
The gas hob burners are designed for efficient cooking, with specific models featuring a wok burner, triple burner, rapid burner, fish burner, semi-rapid burner, and auxiliary burner, each with distinct heat input capabilities. The gas ovens are equipped for baking and roasting, with controls to adjust flame intensity. Electric ovens offer a broader range of functions, including:
Some models also include a gas cylinder compartment, indicating their suitability for LPG use.
Installation and Safety: The cooker requires professional installation by qualified installers according to local regulations. Electrical modifications should only be performed by a qualified technician. It is crucial to avoid installing the cooker near flammable materials and to ensure adequate ventilation, with a minimum air inlet section of 100cm² for both gas and electric cookers. If a cooker hood is installed, there must be a minimum of 65cm clearance to its underside. The cooker chassis must not sit directly on the floor; adjustable feet, if supplied, must be used. The appliance should always be lifted by two people to prevent damage to the adjustable feet and should not be dragged. The anti-tip chain must be securely installed to a wall behind the cooker to prevent accidental tipping.
First Use: Before cooking, it is recommended to heat the oven to 180°C for two hours to "run in" the new oven. After cooling, wipe the oven interior, racks, and shelves with hot water and a mild detergent. During initial heating, a smell from residual oil and minor noises from parts settling are normal.
Gas Hob Burners: To light a gas burner, push and turn the knob anti-clockwise to the maximum position, holding it for 3-5 seconds while pushing the ignition button. The flame should be blue. If the burner fails to light, return the knob to its original position and try again. For 90cm ovens with a bottle compartment, initial ignition may take longer as the LPG fills the system, a symptom also present after a gas cylinder replacement. Burner caps must be correctly installed. For models with a fish burner and griddle (e.g., EKG9688X), the tray must be installed before use.
Gas Oven: For manual ignition of the oven burner, open the oven door, push and turn the oven knob anti-clockwise to maximum, and introduce a small flame or spark lighter to the ignition hole at the front of the oven burner cover. For the grill burner, open the oven door, push and turn the oven knob anti-clockwise to maximum, and hold a flame near the grill burner holes. It is critical not to slam the oven door. After ignition, gently close the door and check the flame through the ignition hole. If the flame extinguishes, re-light immediately. After a few minutes, check and adjust the temperature. When using the gas grill burner, apply the knob protection plate (stored in the compartment) and leave the oven door half open. In case the oven flame extinguishes, immediately shut off the oven control knob and the gas cylinder valve, do not re-ignite, open the oven door for at least 15 minutes to vent unburnt gas, then re-ignite carefully with a spark gun.
Electric Oven: The electric oven functions are selected via a selector switch. The oven light remains on in all selector positions. For grilling with the electric grill, place the oven drip pan under the grid rack, close the oven door until it touches the knob protection plate, and switch on the grill button. Preheating the grill for at least 10 minutes is advisable.
Mechanical Timer: Some models include a 60-minute mechanical timer. To use, turn the knob clockwise to the full setting, then slowly turn it back to the desired time. The timer will ring once the set time is reached, but the oven will remain on. If the knob is not turned to the full setting first, the timer may ring prematurely.
Turnspit: To use the turnspit, insert the forked branch into the motor spindle, remove the hook, and hang the turnspit with food on the hook. When removing, reverse the order. After use, clean with detergent and dry with a cloth. The turnspit can hold up to 2.5kg of food and should be carried with two hands.
Cooking Tips:
General Maintenance: Before any maintenance or cleaning, disconnect the appliance from the power supply and gas hose, and allow it to cool down.
Oven Lamp Replacement: Disconnect power, unscrew the old lamp, and replace it with a high-temperature fitting (300°C) with specifications: 220-240V, 50-60Hz, 23W, E14. Only use a lamp designed for high temperatures.
Cleaning the Hob: Remove sauce or fruit juice spills immediately with a soft cloth soaked in warm detergent water. Do not use steel wool or knives for stubborn dirt. Use a well-wet soap-impregnated pad for stubborn marks, taking care not to scratch the enamel. Enameled grids can be washed with water and detergent, or in a dishwasher. Remove burner covers and grids, wash carefully with warm water and detergent, and dry thoroughly before re-positioning. Ensure burner covers are always correctly positioned. Burners can be cleaned with steel wool or a slightly abrasive cloth. For automatic ignition cookers, periodically clean the spark plug and ensure burner holes are not obstructed.
Cleaning the Door and Glass Hob Cover: Clean with warm water, avoiding rough cloths or abrasive substances.
Cleaning the Oven: Clean the oven cavity carefully after use while it is still warm. Deposits of fats or other substances are easier to remove when the oven is slightly warm, using warm detergent water or an appropriate spray oven cleaner. Do not spray directly at the mat steel. Clean oven accessories (grate, hot-plate, etc.) with warm water and detergent, removing incrustations with a slightly abrasive powder. Never line any part of the oven, especially the bottom, with aluminum foil, as this can accumulate heat, affect cooking results, and damage the oven enamel.
Gas Cylinder Safety: Periodically check the flexible hose of the gas connection for abnormalities and replace it yearly. For models with a gas cylinder compartment, do not use this space for non-connected or empty cylinders. Ensure sufficient ventilation for units with a cylinder compartment. If the gas cylinder becomes too hot to touch during operation, switch off the cooker and contact the Customer Service Center.
Troubleshooting: If gas flow seems abnormal, check if the gas cylinder is empty, if burner holes are dirty or clogged, or if the gas regulator is not working. If the oven does not heat up, check if the gas valve is open, if oven knobs are properly opened, if the oven fire has blown out (for gas ovens), or if the power supply is switched on (for electric ovens). If the cooker smokes, it may be due to burning oils and fats left behind, which must be cleared after cooking.
Guarantee and Service: Electrolux provides a 12-month warranty against faulty workmanship or materials, offering repair or replacement free of charge, provided the appliance is correctly installed, used for normal domestic purposes according to instructions, and not serviced or tampered with by unauthorized persons. All service work must be undertaken by an Electrolux Service Centre. The warranty does not cover maintenance like hood cleaning. The manufacturer disclaims liability for failures due to non-observance of installation, maintenance, and usage instructions. For further inquiries or after-sales service, contact the Consumer Care Center.
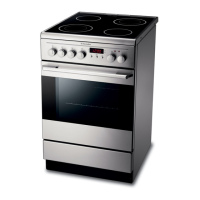
| Type | Freestanding Cooker |
|---|---|
| Fuel Type | Electric |
| Number of Ovens | 1 |
| Number of Cooking Zones/Burners | 4 |
| Self-Cleaning | Yes |
| Colour | Stainless Steel |
| Power Levels | 9 |
| Cooking Zone Types | Rapid |
| Safety Features | Child Lock |
| Control Type | Touch Control |