Rev. 041818BR 4 www.elitescreens.com
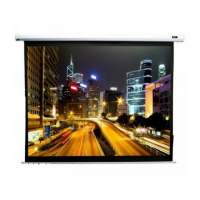
2. Once the screen material is fully extended, secure the material by snapping the buttons onto the frame
studs. Fasten the buttons in the following order as shown on Fig.1.
Note: Snap the buttons on each corner first, then work your way out to the center on each side.
Leg Attachment for 100”/ 120” Models
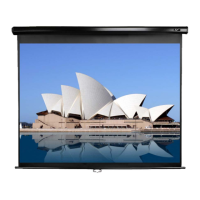
1. Carefully take the left and right folding legs (B) out of the carrying bag (F) and place it on a flat
surface. Unfold the left and right legs leaving the front foot folded as shown below. Make sure the hinges
click into place.
2. Once the legs are unfolded, lay the frame on the floor and position the legs over both sides of
the frame. Use the knob screws (C) to attach the frame to the legs.
Warning: The additional support sections, located at the middle section of the legs, may unfold on its own. Please
be sure to use caution while removing/placing the legs from/to the bag
Warning: When attaching the legs, make sure to screw the top of the leg to the last hole of the frame to reach max
height. Attaching the legs lower to the frame and leaving an extra space on top may cause the screen to tip over
 Loading...