EasyManua.ls Logo

Elite Screens Yard Master 2 User Manual

Elite Screens Yard Master 2
3 pages
To Next Page IconTo Next Page
Page #1 background imageLoading...
Page #1 background image
Rev. 121119-BR
www.elitescreens.com
1
ZOMS2-LEGS-Z
Yard Master 2 Extension Legs
Quick Guide
Thank you for choosing the Extension Legs accessory for your Yard Master 2 portable projection screen!
Please read through this user guide before utilizing the accessory. Correct usage and maintenance will
ensure a long product life
Care & Use Instructions
After using the extension legs, disassemble and store them in a safe and secure location.
NOTE: Extension Legs will NOT fit in carrying bag supplied with the Yard Master 2 Series.
To avoid damage and injury, the screen and extension legs should only be operated by adults.
Product Description
Design: The aluminum frame is designed to be lightweight and easy to carry, assemble and disassemble.
Replacing the Yard Master 2 legs
To replace your current legs with the new extension legs on your assembled screen, please follow the
disassembly steps on page 2. If the legs on your screen are already removed, proceed with the assembly
steps starting below. For full assembly instructions on your screen, please refer to the Yard Master 2
Series User Guide.
Assembly
1After the initial assembly of the screen frame, insert
the extension legs into the openings located at the left
and right bottom sides of the folding frame. Secure them
by fastening the knob screw into the adjacent hole. Next,
screw the eyebolts into the openings located at the top of
the frame (Fig.1)
Fig.1
Question and Answer IconNeed help?

Do you have a question about the Elite Screens Yard Master 2 and is the answer not in the manual?

Elite Screens Yard Master 2 Specifications

General IconGeneral
FormatHDTV
Diagonal90 \
Drive type-
Screen gain1
Diagonal (metric)229 cm
Native aspect ratio16:9
Viewable screen width (W)1992 mm
Viewable screen height (H)1120 mm
Overall screen size (Height x Width)112 x 199.2 cm
Borders75 mm
Mounting typeFloor
Weight and Dimensions IconWeight and Dimensions
Depth33 mm
Width2124 mm
Height1860 mm
Weight- g

Summary

Care & Use Instructions

Product Description

Assembly

Step 1: Insert Extension Legs

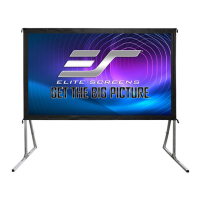
Insert extension legs into frame bottom openings and secure with knob screws. Screw eyebolts into top openings.

Step 2: Lift and Open Screen

Lift screen and open frame legs, ensuring they lock into place by pressing hinges.

Step 3: Connect Back-Leg

Lift additional back-leg and connect it using the knob screw as shown.

Step 4: Ensure Stability

Confirm screen is secure and stable, making any necessary adjustments.

Disassembly

Step 1: Unlatch Support Bars

Remove ropes/stakes, unlatch hinged support bars on front of legs, and fold half the legs up.

Step 2: Lower Screen

Slowly lower the screen to the ground towards the closed legs.

Step 3: Fold Legs and Remove Screws

Unlatch hinged support bars, fold down other half of legs, and remove knob screws.

Step 4: Remove Legs

Remove the extension legs from the folding frame.

Related product manuals