Page 11 1000002119 (Rev. B- 06/15)
ENLZS8WS_1F
Service Instructions
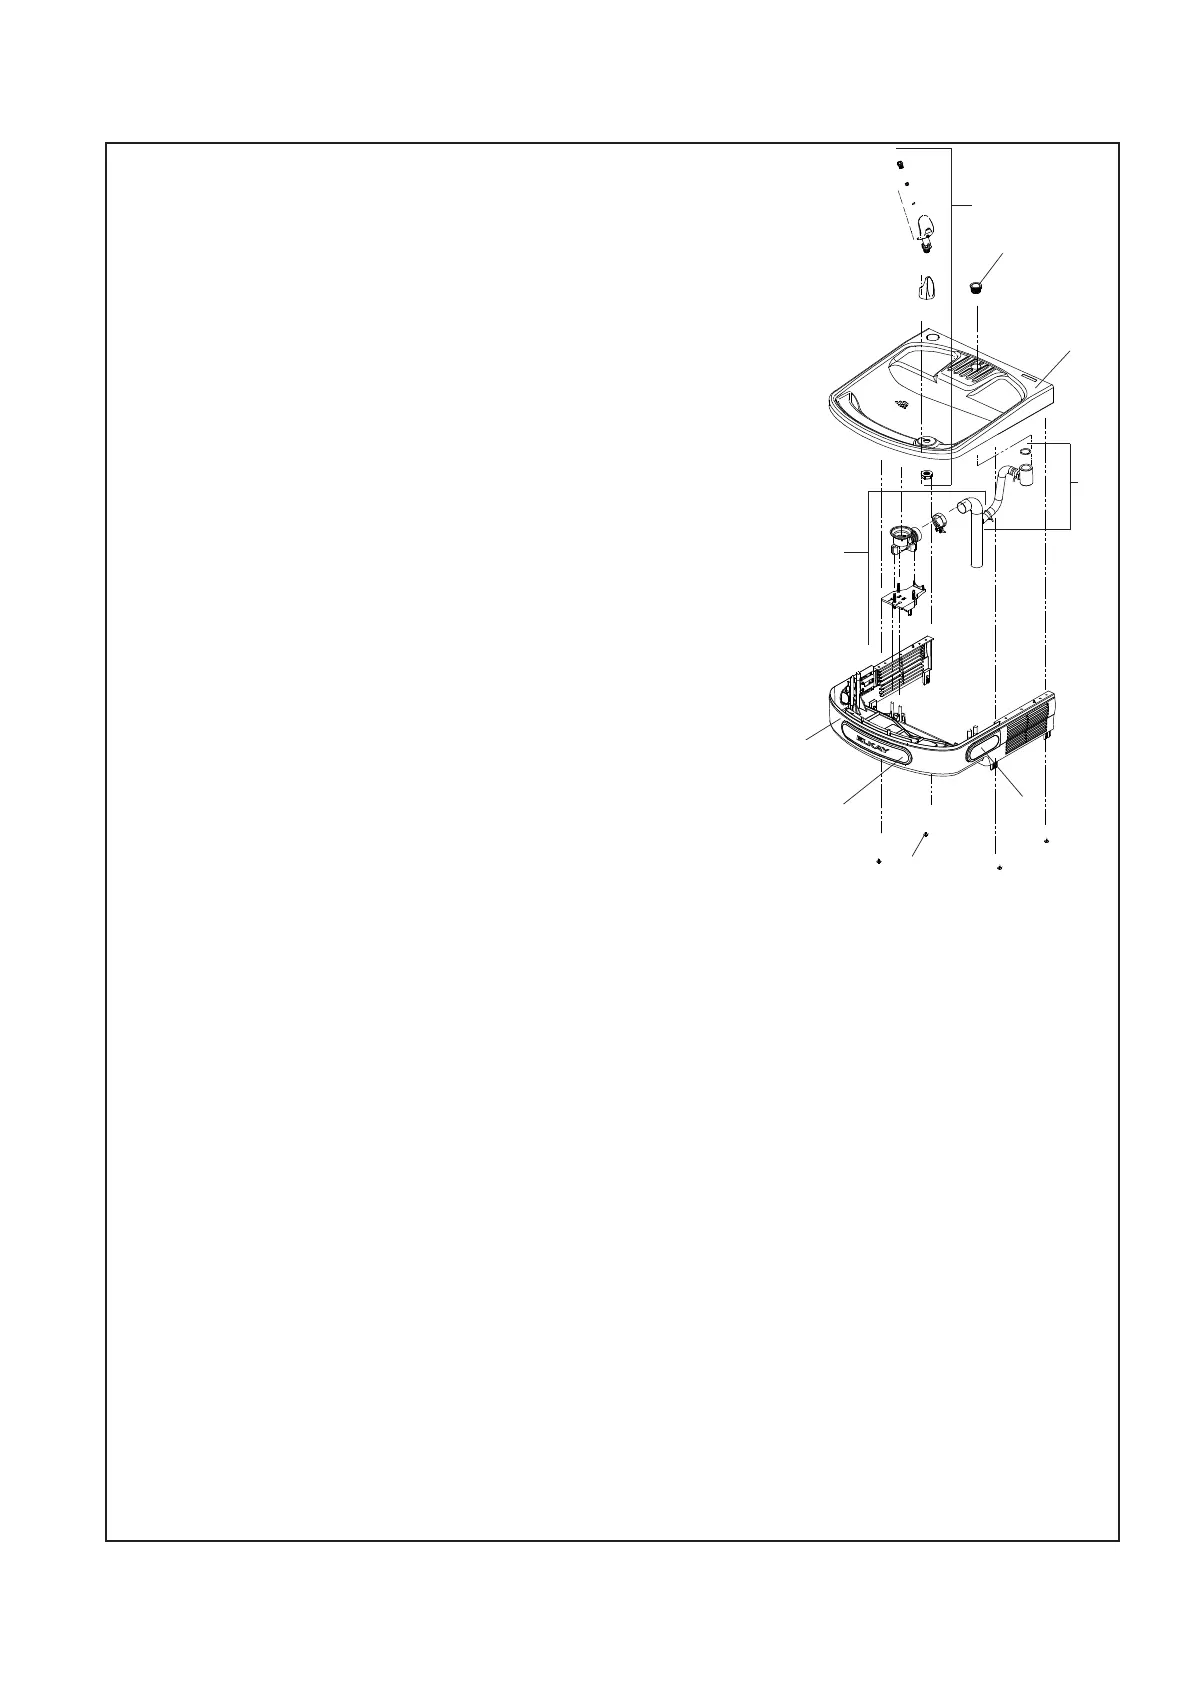
Lower and Upper Shroud
To access the refrigeration system and plumbing connections, remove four screws from bottom
of cooler to remove the lower shroud. To remove the upper shroud for access to the pushbars,
regulator, solenoid valve or other components located in the top of the unit, remove lower shroud,
disconnect drain, remove four screws from tabs along lower edge of upper shroud, unplug two
wires and water tube.
Bubbler
7RUHPRYHWKHEXEEOHU¿UVWGLVFRQQHFWWKHSRZHUVXSSO\7KHXQGHUVLGHRIWKHEXEEOHUFDQEH
reached through the access panel on the underside of the upper shroud. Remove the access
panel by removing the retaining screw. To remove the bubbler, loosen locknut from the underside
RIWKHEXEEOHUDQGUHPRYHWKHWXELQJIURPWKHTXLFNFRQQHFW¿WWLQJSHUWKH2SHUDWLRQ2I4XLFN
Connect Fittings section in the General Instructions. After servicing, replace the access panel
and retaining screw.
Switches Behind the Push Bar
The regulator in an EZ cooler is always held fully open by the use of a single regulator nut (See
Fig. 17, Pg 10). Water is not dispensed until the pushbar is depressed to activate a switch which
then opens a solenoid valve.
6LQJOHEDUXQLWVZLOOKDYHWKHVDPHZLULQJDVVLGHSXVKEDUXQLWVEXWZLOOQRWKDYHWKHH[WUDOHDGV
attached to sidebars.
7RUHPRYHVLGHEDUVIURPWKHLQVLGHFRPSUHVVWKHÀDUHGWDEVDQGSXOORXWFDUHIXOO\7RUHLQVWDOO
VLGHSXVKEDUVWKHIURQWRIWKHSXVKEDULVLQVHUWHG¿UVW:KLOHNHHSLQJWKHVZLWFKGHSUHVVHG
snap the rear of the pushbar into position.
Instrucciones de mantenimiento
Recubrimiento inferior y superior
3DUDDFFHGHUDOVLVWHPDGHUHIULJHUDFLyQ\DODVFRQH[LRQHVGHSORPHUtDUHWLUHORVFXDWUR
tornillos de la parte inferior del bebedero para retirar el recubrimiento inferior. Para retirar el
recubrimiento superior y acceder a las barras de empuje, al regulador, a la válvula de solenoide
o a otros componentes ubicados en la parte superior de la unidad, retire el recubrimiento inferior,
desconecte el desagüe, retire los cuatro tornillos de las lengüetas a lo largo del borde inferior del
recubrimiento superior, desconecte los dos cables y la tubería de agua.
Boquilla
3DUDUHWLUDUODERTXLOODSULPHURGHVFRQHFWHHOVXPLQLVWURGHHQHUJtD6HSXHGHDOFDQ]DUODSDUWH
LQIHULRUGHODERTXLOODDWUDYpVGHOSDQHOGHDFFHVRHQHOODGRLQIHULRUGHOUHFXEULPLHQWRVXSHULRU
3DUDUHWLUDUHOSDQHOGHDFFHVRUHWLUHHOWRUQLOORGHUHWHQFLyQ3DUDUHWLUDUODERTXLOODVXHOWH
ODFRQWUDWXHUFDGHODSDUWHLQIHULRUGHODERTXLOOD\UHWLUHODWXEHUtDGHOFRQHFWRUGHFRQH[LyQ
UiSLGDGHDFXHUGRFRQODVHFFLyQ)XQFLRQDPLHQWRGHORVFRQHFWRUHVGHFRQH[LyQUiSLGDHQ
las instrucciones generales. Después de realizar mantenimiento, vuelva a colocar el panel de
acceso y el tornillo de retención.
Interruptores detrás de la barra de empuje
El regulador de un bebedero EZ se mantiene siempre completamente abierto mediante el uso
de una tuerca reguladora simple (consulte la Fig. 17, pág. 10). El agua no se dispensa hasta
TXHVHSUHVLRQDODEDUUDGHHPSXMHSDUDDFWLYDUXQLQWHUUXSWRUHOFXDOOXHJRDEUHXQDYiOYXODGH
solenoide.
/DVXQLGDGHVGHXQDVRODEDUUDWLHQHQHOPLVPRFDEOHDGRTXHODVXQLGDGHVFRQEDUUDGHHPSXMH
lateral, pero no tienen los conductores adicionales conectados a las barras laterales.
Para retirar las barras laterales, desde el interior comprima las lengüetas acampanadas y
ViTXHODVFRQFXLGDGR3DUDYROYHUDLQVWDODUODVEDUUDVGHHPSXMHODWHUDOHVSULPHURVHLQVHUWD
la parte delantera de la barra de empuje. Mientras mantiene el interruptor presionado, encaje la
parte posterior de la barra de empuje en su posición.
Instructions d’entretien
Carénage supérieur et inférieur
3RXUDFFpGHUDXV\VWqPHGHUpIULJpUDWLRQHWDX[UDFFRUGHPHQWVGHWX\DXWHULHUHWLUHUOHV
TXDWUHYLVGXGHVVRXVGHODIRQWDLQHjHDXIUDvFKHSRXUGpSRVHUOHFDUpQDJHLQIpULHXU3RXU
GpSRVHUOHFDUpQDJHVXSpULHXUHWDFFpGHUDX[SRXVVRLUVDXUpJXODWHXUjO¶pOHFWURYDQQHHWDX[
autres composants installés dans la partie haute de l’appareil, déposer le carénage inférieur,
GpEUDQFKHUO¶pFRXOHPHQWGHYLGDQJHUHWLUHUOHVTXDWUHYLVGHVSDWWHVOHORQJGXUHERUGLQIpULHXU
GXFDUpQDJHVXSpULHXUGpEUDQFKHUOHVGHX[¿OVHWOHWXEHjHDX
Barboteur
3RXUGpSRVHUOHEDUERWHXUGpEUDQFKHUG¶DERUGO¶DOLPHQWDWLRQpOHFWULTXH/HGHVVRXVGX
EDUERWHXUHVWDFFHVVLEOHSDUOHSDQQHDXG¶DFFqVVLWXpVXUOHGHVVRXVGXFDUpQDJHVXSpULHXU
5HWLUHUODYLVGH¿[DWLRQSRXUGpSRVHUOHSDQQHDXG¶DFFqV3RXUGpSRVHUOHEDUERWHXUGHVVHUUHU
l’écrou de blocage du dessous du barboteur et retirer le tube du raccord rapide conformément
DX[LQVWUXFWLRQVGHODVHFWLRQ)RQFWLRQQHPHQWGHVUDFFRUGVUDSLGHVGDQVOHVLQVWUXFWLRQV
JpQpUDOHV$SUqVO¶LQWHUYHQWLRQUHPRQWHUOHSDQQHDXG¶DFFqVHWODYLVGH¿[DWLRQ
Interrupteurs derrière le poussoir
/HUpJXODWHXUGDQVXQHIRQWDLQHjHDXIUDvFKH(=HVWWRXMRXUVPDLQWHQXFRPSOqWHPHQWRXYHUWDX
PR\HQG¶XQpFURXGHUpJXODWHXUXQLTXHYRLU)LJS/¶HDXV¶pFRXOHORUVTXHOHSRXVVRLU
HVWHQIRQFpSRXUDFWLRQQHUXQLQWHUUXSWHXUTXLFRPPDQGHDORUVO¶RXYHUWXUHG¶XQHpOHFWURYDQQH
/HVPRGqOHVjSRXVVRLUXQLTXHFRPSRUWHQWOHPrPHFkEODJHTXHOHVPRGqOHVjSRXVVRLUV
ODWpUDX[PDLVVDQVOHV¿OVVXSSOpPHQWDLUHVUDFFRUGpVDX[SRXVVRLUVODWpUDX[
3RXUGpSRVHUOHVSRXVVRLUVODWpUDX[FRPSULPHUOHVSDWWHVpYDVpHVGHSXLVO¶LQWpULHXUHWH[WUDLUH
DYHFSUpFDXWLRQ3RXUUHPRQWHUOHVSRXVVRLUVODWpUDX[UHPHWWUHG¶DERUGOHSRXVVRLUIURQWDOHQ
SODFH7RXWHQPDLQWHQDQWO¶LQWHUUXSWHXUHQIRQFpHQFOLTXHWHUOHSRXVVRLUODWpUDOHQSODFH
Cleaning
Stainless Steel
• General cleaning: use an ordinary mild detergent and soft cloth, rinse and towel dry.
• Steel soap pads should never be used; particles can adhere to a stainless steel basin
surface and will eventually rust.
• Light scratches are normal for stainless steel basins; over time they will blend into the
XQLIRUP¿QLVKSDWWHUQ
Plastic Components
• General cleaning: use an ordinary mild detergent and soft cloth, rinse and towel dry.
• Wiping the surface clean to remove debris or build up will not hurt the antimicrobial
properties.
Limpieza
Acero inoxidable
/LPSLH]DJHQHUDO8VHXQGHWHUJHQWHFRP~QVXDYH\XQSDxRVXDYHHQMXDJXH\VHTXH
con una toalla.
• Nunca se deben usar almohadillas de acero con jabón; las partículas se pueden adherir
DODVXSHU¿FLHGHDFHURLQR[LGDEOHGHODWDUMD\¿QDOPHQWHVHR[LGDUiQ
/DVUD\DVOLJHUDVVRQQRUPDOHVHQODVWDUMDVGHDFHURLQR[LGDEOHFRQHOWLHPSRVH
mezclarán en un patrón de acabado uniforme.
Componentes de plástico
/LPSLH]DJHQHUDO8VHXQGHWHUJHQWHFRP~QVXDYH\XQSDxRVXDYHHQMXDJXH\VHTXH
con una toalla.
/LPSLDUODVXSHU¿FLHFRQXQSDxRSDUDUHWLUDUGHVHFKRVRDFXPXODFLRQHVQRDIHFWDUiODV
propiedades antimicrobianas.
Nettoyage
Acier inoxydable
1HWWR\DJHJpQpUDOXWLOLVHUXQGpWHUJHQWGRX[RUGLQDLUHHWXQFKLIIRQGRX[ULQFHUHW
sécher avec une serviette.
1HMDPDLVXWLOLVHUGHWDPSRQVDYRQQHX[HQODLQHG¶DFLHUGHVSDUWLFXOHVSHXYHQWDGKpUHU
jODVXUIDFHGHODFXYHHQDFLHULQR[\GDEOHHWURXLOOHUDYHFOHWHPSV
/HVUD\XUHVOpJqUHVVRQWQRUPDOHVVXUOHVFXYHVHQDFLHULQR[\GDEOHDYHFOHWHPSV
HOOHV¿QLURQWSDUIRUPHUXQPRWLIGH¿QLWLRQXQLIRUPH
Pièces en plastique
1HWWR\DJHJpQpUDOXWLOLVHUXQGpWHUJHQWGRX[RUGLQDLUHHWXQFKLIIRQGRX[ULQFHUHW
sécher avec une serviette.
/HIDLWG¶HVVX\HUODVXUIDFHSRXUpOLPLQHUOHVVDOHWpVRXOHVGpS{WVQ¶DOWqUHSDVOHV
propriétés antimicrobiennes.
Fig. 18
11
2
12, 13
6
8
12
20
23
23
 Loading...