Page 61000004299 (Rev. B - 04/2018)
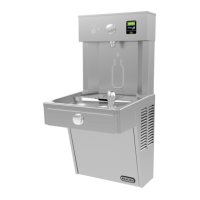
LVRC8WS_2AWR, LVRCWS_2AWR
“UNIT TYP” - Type of unit (REFRIG or NON-RFRG)
“FLT SIZE” - Select lter capacity
“RST BCNT” - Reset bottle count.
When display shows “RNG SET” push program button once the
display will show current value (can be 1 – 10) e.g. “RNG = 3”.
Once display shows current value push the program button to scroll
through value of 1 – 10. Select the desired range setting.
Once range is selected allow approximately 4 seconds to pass and
then the display will go back to bottle counter and be in run mode.
Test bottle ller by placing bottle or hand in front of sensor to make
sure water is dispensed.
SETTING UNIT TYPE
Depress the program button for approximately 2 seconds until the
display changes then release. The display will change and scroll
through two messages:
“RST FLTR” – Reset Filter Status LED
“SETTINGS” – System Settings Sub Menu
If the program button is not pushed again the display will scroll
through the two messages above for three cycles and then default
back to bottle count and be back in run mode.
When the display changes to “SETTINGS”, depress the button again.
The display will change to show:
“RNG SET“- Range set for IR sensor.
“UNIT TYP“ - Type of unit (REFRIG or NON-RFRG)
“FLT SIZE” - Select lter capacity
“RST BCNT“ - Reset bottle count
If the button is not pushed again the display will scroll through the
four messages above for three cycles and return to run mode.
When display shows “FLT SIZE” push program button once. The
display will show current value. Can be 3000GAL or 6000GAL.
Push program button again to display the desired “FLT SIZE”.
Allow approximately 4 seconds to pass and the display will return to
bottle counter and be in run mode.
Service
• Safety Glasses
• Protective gloves
• Hex drives
Service: Adjustments
1. Temperature Control: Factory set for 50ºF ± 5º (10ºC ± 5º) water under normal conditions. To adjust water temperature, turn screw clockwise
for colder, counter clockwise for warmer.
2. Water Stream Height: Stream height is factory set at 35 psig (0.24 MPa). If supply pressure varies greatly from this, adjust screw using the
access hole in the pushbutton (insert athead screwdriver). Clockwise adjustment will raise stream and counter-clockwise adjustment will-
lower stream height. For best adjustment, stream should hit basin approximately 6.5” (165mm) from bubbler.
3. Water coming out of Bubbler continuously: When this occurs at the end of the compressor cycle, turn the cold control warmer (counterclock-
wise) ¼ turn.
Service: Inspection/Cleaning
3. Condenser Fan Motor: Conrm condenser fan turns freely. If the condenser fan does not spin freely, have an authorized service personnel
replace.
4. Ventilation: Cabinet louvers and condenser ns should be periodically cleaned with a brush, air hose or vacuum cleaner. Cleaning should be
one twice each year or more frequently if needed due to environment. Excess dirt or poor ventilation can cause no cold water and compres-
sor cycling on the compressor overload protector.
5. Water Flow: Conrm proper water ow. If water ow is slow, inspect lter or inline strainer for restriction. Replace lter cartridge if required.
Disassemble inline strainer and clean if required.
6. Lubrication: Motors are lifetime lubricated.
7. Actuation of Quick Connect Water Fittings: Cooler is provided with lead-free connectors which utilize o-ring water seal. To remove tubing
from the tting, relieve water pressure, push in on the gray collar before pulling on the tubing. To insert tubing, push tube straight into tting
until it reaches a positive stop, approximately 3/4” (19mm).
3.
4.
5.
6.
7.
1.
2.
3.
4.
5.
SETTING FILTER CAPACITY
• Inspect Bottle Filler and Cooler twice each year for proper operation and performance.
• Inspection of the unit will require disconnecting electrical supply, removal of panels, etc. and reassembly and return to service practices.
For proper and safe servicing, please read these instructions completely.
DANGER
• All Service and Maintenance must be performed by an authorized service personnel.
• Disconnect electrical supply to the unit before any service work to reduce risk of electrocution.
• Shut off water supply serving the unit before any service work to reduce risk of water damage.
CAUTION
• To prevent scratching the basin, place a towel or soft cloth over the entire basin when working above it.
• Tools/Items required but not provided, for Servicing:
1. Cleaning: Warm, soapy water or mild household cleaning products can be used to clean the exterior panels. Extra caution should be used
to clean the mirror nished stainless steel panels. They can be easily scratched and should only be cleaned with mild soap and water or
Windex glass cleaner and a clean, soft cloth. Use of harsh chemicals or petroleum based or abrasive cleaners will void the warranty.
2. Bubbler: Mineral deposits on the orice can cause water ow to spurt or not regulate. Mineral deposits may be removed from the orice with
small round le not over 1/8” (3 mm) diameter or small diameter wire.
CAUTION
DO NOT le or cut orice material. Care must be taken not to damage the orice(s)
 Loading...