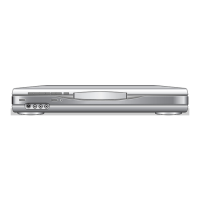
Why Emerson DVD Recorder discs recorded on this unit cannot be played back on other DVD players?
- JJulia MontgomerySep 2, 2025
If you are using DVD-RW/-R, please ensure you finalized the disc after recording.
Why Emerson DVD Recorder discs recorded on this unit cannot be played back on other DVD players?
If you are using DVD-RW/-R, please ensure you finalized the disc after recording.
Why Emerson DVD Recorder disc does not play back?
If the disc is upside down, insert it with the labeled side facing up. If moisture has condensed inside the unit, remove the disc and leave the unit turned on for about 2 hours until the moisture evaporates.
Why is Emerson DVD Recorder sound noisy?
Clean the disc with a cleaning cloth.
Why does picture noise appear on Emerson DVD Recorder?
Clean the disc with a cleaning cloth.
Why setup menu cannot be called up on Emerson DVD Recorder?
Setup menus cannot be called up during DVD recording or DVD playback.
Why there is no image from HDMI connection on Emerson DVD Recorder?
Check the HDMI connection and the status of HDMI related indications. Verify that the connected monitor device or other device supports HDCP, as this unit will not output a video signal without HDCP support. Also, check the HDMI settings and ensure the output format of this unit (HDMI FORMAT) matches the supported input format of the other connected device. If the unit is connected to an unauthorized display device with an HDMI cable, the audio/video signal may not be output when playing back a commercial DVD-video.
Why Emerson DVD Recorder timer recording is impossible?
Make sure that the corresponding indicator appears on the front panel display of this unit. If it does not, press [TIMER SET].
Why Emerson DVD Recorder cannot record a TV program?
This unit does not have a tuner to receive TV broadcasting. You must connect this unit to an external tuner to record TV programs.
What to do if there is no sound or the sound is distorted on Emerson DVD Recorder?
Ensure all connections are securely re-connected and that the connecting cord is not damaged. Check the connections to the amplifier input and verify that the input device setting on the amplifier is correct. Note that when the unit is in pause mode or slow-motion playback, sound is not output, and this is not a malfunction. Similarly, sound is not output in fast forward or fast reverse mode, which is also normal. Also, while the setup menu or timer programming display is shown or while the screen saver is active, the audio is muted.
What to do if Emerson DVD Recorder unit does not operate properly?
If static electricity or other factors cause the unit to operate abnormally, unplug the unit and then plug it in again.
Media Type | DVD |
---|---|
Recordable Media | DVD-R, DVD-RW, DVD+R, DVD+RW |
Video Recording Format | MPEG2 |
Audio Recording Format | Dolby Digital |
Tuner | NTSC |
Remote Control | Yes |
Disc Compatibility | CD, CD-R, CD-RW |
Output Resolution | 480p |
Inputs | Composite Video, S-Video |
Outputs | Composite Video, S-Video |
Lists essential safety guidelines for using the apparatus, covering fire, shock, and operational precautions.
Details FCC compliance requirements and provides measures to correct radio or television reception interference.
Describes the unit's capabilities for recording onto discs/tapes and playing back various media formats.
Covers disc compatibility, editing functions, and other features like progressive scan and HDMI.
Explains the various icons used to denote disc types and applicable functions throughout the manual.
Describes the buttons, indicators, and ports located on the front of the unit.
Details all the input and output jacks located on the rear of the unit.
Instructions for installing batteries and using the remote control effectively.
Explains the meaning of various symbols and messages displayed on the unit's front panel.
General guide to connecting the unit to a television set using various methods.
Steps for connecting an external tuner to the unit for recording.
Steps for connecting the unit to a TV via an HDMI compatible port.
Steps for connecting the unit to a TV using component video input jacks.
Steps for connecting the unit to a TV using an S-video input jack.
Steps for connecting the unit to a TV with standard RCA audio/video input jacks.
Steps for connecting to TVs that lack AV inputs, using an RF modulator.
Describes coaxial and HDMI audio connection methods for enhanced sound.
Describes connecting the unit to a stereo system via analog audio inputs.
Guides on selecting the correct TV input channel for the connected device.
Explains the on-screen displays and menus for easy operation.
Covers accessing the main menu, general settings, and DVD/playback modes.
Instructions on selecting DVD/VCR mode and inserting discs or cassette tapes.
Steps for initial unit configuration when powered on for the first time.
Step-by-step guide for setting the unit's internal clock for accurate timer programming.
Lists recordable and unrecordable disc types recommended for optimal performance.
Explains available recording modes, quality settings, and copy protection limitations.
Procedure to finalize recorded discs, making them playable on other DVD players.
How to automatically set chapter marks at specified time intervals.
Selecting audio quality for XP mode and setting video aspect ratio for recording.
Step-by-step guide for recording TV programs from an external tuner.
How to set a simple timer recording by selecting desired duration.
Steps to program timer recordings for future broadcasts.
How to check, cancel, or correct programmed timer recordings.
Tips for timer recording and rules for handling overlapping program settings.
Steps for setting up automatic recording based on external tuner signal.
Important information and considerations regarding the satellite link feature.
Guide to properly connecting external devices like camcorders or VCRs.
How to select the correct video input source for external devices.
Steps to record content from connected external devices onto disc or tape.
Steps and important notes for copying media between DVD and VCR.
Detailed procedures for copying content from VCR to DVD and vice versa.
Steps to prevent accidental editing or erasure of titles, and how to cancel protection.
Procedure to finalize recorded discs, making them playable on other DVD players.
How to enable automatic disc finalization after recordings or at disc end.
Lists playable and unplayable disc and file types, including region codes.
Factors affecting playback compatibility, including NTSC system and region restrictions.
Explains how DVD content is organized into titles, chapters, tracks, and files.
Steps for simple playback of inserted discs.
How to play specific titles from a list displayed on screen.
How to play music CDs and view photo files from CD-RW/-R.
Navigating disc menus and pausing playback.
Resuming playback from where it stopped and skipping commercials.
Functions for fast forwarding, reversing, and rapid playback of media.
Frame-by-frame playback, zooming, and slow-motion playback options.
Setting playback markers and configuring different repeat modes.
Different playback order modes and slide show for JPEG files.
Finding specific content by title, chapter, or track number.
Finding content by entering a specific time to search for.
Changing subtitle languages and selecting different audio tracks during playback.
Adjusting camera angles and reducing playback picture noise.
How to view recorded titles and access editing options.
General overview of the various disc editing functions available.
Setting the recording format (VR or Video mode) for a new DVD-RW disc.
Procedure for manually reformatting a DVD-RW disc to change its format.
Steps to add existing titles to a custom playlist.
How to delete all playlists from the disc.
Steps to remove unwanted titles from the disc.
Removing specific segments or scenes from a title.
Adding custom names to titles for better organization.
Setting and clearing chapter marks for easier navigation.
Splitting one title into two or merging two titles into one.
Preventing accidental editing or erasure of titles by applying protection.
Overview of general, playback, and display configuration options.
Overview of video, recording, and HDMI configuration options.
Option to restore all unit settings to their factory defaults.
Navigating and applying various playback settings.
Configuring parental controls and audio output options.
Configuring disc menu language, audio language, and subtitle language.
Adjusting playback display options like camera angles, still mode, and screen brightness.
Configuring video output settings for progressive scan and TV aspect ratio.
Configuring HDMI output parameters and RGB range for image quality.
Steps to reset the unit to its factory default settings.
Basic operations for playing and recording VCR tapes.
Setting timer recordings and performing index search on VCR tapes.
Additional VCR functions like time search, fast forward, rewind, and slow motion.
Common problems and solutions for power, picture, sound, and remote control issues.
Problems related to specific modes, playback, language, subtitles, and camera angles.
Troubleshooting disc tray errors, VCR tape playback, and motor rotation.
Explains common disc error messages, their causes, and solutions.
Details of what the warranty covers, including limitations and exclusions.