40
NXT90 F v2.2
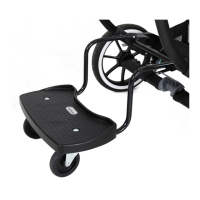
9.3 Adjust the foot-rest. Pull the grey handle on either left or right side of the footrest to adjust it.
Please Note! Maximum weight on the footrest is 3kg.
WARNING Never let your child stand on the footrest.
WARNING Always check that the seat unit is in one of the positions by pushing it back until it locks into place.
WARNING Ensure that children are kept away from all moving parts of the pram to avoid risk of injury.
Assembly of the Seat Unit Fabric
10.1 Place the seat unit fabric in the seat unit.
Thread the shoulder straps through the fabric. (see illustration)
WARNINGItisimportantthatthefabricisalwayscorrectlytted.Theseatunitshouldneverbeusedwithout
fullyttingtheseatunitfabric.
10.2 Thread the crotch strap through the seat fabric (see illustration).
10.3 Thread the side straps through the seat unit fabric.
WARNING The bumper bar should always be assembled when in use.
WARNING Alwayscheckbeforeusethatthebumperbarisrmlyinplace
WARNING Never carry the pram using the bumper bar.
10.4 Fasten all of the press studs on the seat unit.
10.5 There is a total of 13 press studs. 5 press studs on both sides and 3 on the back.
10.6 Attach the crotch strap by pilling it around the bumper bar and secure it by fastening the press stud.
10.7Attach the hood into the frame
10.8 Attach the hood in place using the press studs attached to the seat unit fabric.
WARNING Before you use the pram, check that the seat fabric is secure and that all the zips and press studs
arermlyandcorrectlyinplace.
WARNING Itisimportantthattheseatunitfabricisalwaysttedcorrectly.
WARNING Neverusethisproductwithoutfullyassemblingtheseatunitfabricsontotheframerst.
10.9 Thread the arm pads through the harness.
Removal of the Seat Unit Fabric
11.1 Open the press studs and remove the fabric from the seat.
If you only want to remove the seat fabric and not the hood, it is easier if the hood is in the extended position.
This is done by opening the upper zip on top
WARNING The hood must always be assembled when the pram is in use.
11.2 Open the press stud on the seat unit and on the footrest.
11.3 Take out the harness straps through the holes in the fabric.
11.4 Take out the crotch strap completely from the fabric remove the seat unit.
Seat Unit
11
10
 Loading...