3
GB | Wireless Weather Station
Read this manual carefully before using the product.
Specications
Clock controlled by DCF signal
Time format: 12/24 h
Indoor temperature: -5 °C to +50 °C
Outdoor temperature: -20 °C to +60 °C
Accuracy of temperature measurement: ±1 °C for 0 °C to +40 °C range, ±2 °C outside this range
Indoor and outdoor humidity: 20 to 90 % RH
Accuracy of humidity measurement: ±5 % RH in 40 % to 70 % RH range, ±8 % RH outside this range
Radio signal range: up to 30 m in an open area
Transmission frequency: 433 MHz, 10 mW e.r.p. max.
Number of sensors: max. 3
Power supply:
Main station: 2× 1.5 V AA batteries (not included)
Sensor: 2× 1.5 V AA batteries (not included)
Measurements:
main station: 51 × 140 × 104 mm
sensor: 35 × 65 × 100 mm
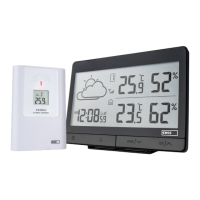
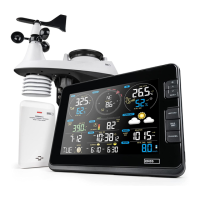
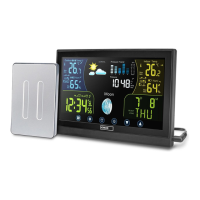
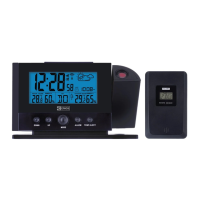
Weather Station Description – Buttons (Fig. 1)
1 – Screen
2 – Time settings
3 – Alarm settings
4 – MEM/down arrow
5 – CH/up arrow
6 – SNOOZE/LIGHT
7 – RCC – DCF signal reception
8 – SENSOR
9 – °C/°F slider
10 – RESET
11 – Battery compartment
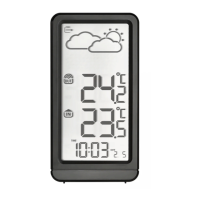
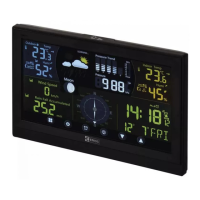
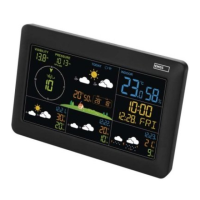
Display Description (Fig. 2)
1 – Time
2 – Weather forecast
3 – Sensor channel number
4 – Wireless communication with sensor
5 – Outdoor temperature and humidity
6 – Indoor temperature and humidity
7 – Alarm
; DCF signal reception
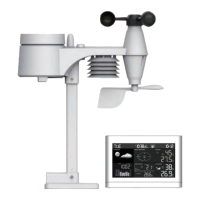
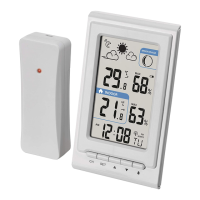
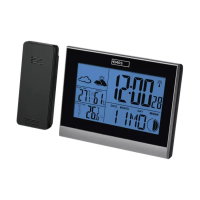
Sensor Description (Fig. 3)
1 – LED
2 – Channel number; temperature and humidity
3 – Mounting hole
4 – RESET button
5 – Channel switch (CH 1, 2, 3)
6 – Battery compartment
Note: the sensor‘s screen cycles between temperature/humidity readings every 4 seconds.
Attention
Only use 1.5 V alkaline batteries of the same type; do not use rechargeable 1.2 V batteries.
The lower voltage may cause both units to not function.
Putting the Device into Operation
1. First, insert batteries into the weather station (2× 1.5 V AA), then into the wireless sensor (2× 1.5 V AA). Make sure
the polarity is correct when inserting the batteries to avoid damaging the weather station or sensor.
2. Place the two units next to each other. The
icon will be ashing on the screen; the weather station will detect
the remote sensor signal within 5 minutes. If sensor signal is not detected, proceed again from step 1 or use a thin
object (e.g., a pencil or a paper clip) to press the RESET button on the back of the station and in the sensor‘s battery
compartment.
3. If the outdoor temperature reading disappears from the screen, press the SENSOR button on the station. The station
will start searching for the sensor signal.
4. We recommend placing the sensor on the north side of the house. The range of the sensor may decrease substantially
in areas with many obstacles. The sensor is resistant to dripping water; however, it should not be exposed to sustained
rain. Do not place the sensor on metal objects as these would reduce transmission range. Use the sensor in vertical
position only. If the
icon appears on weather station‘s screen in the outdoor temperature eld or the icon
appears on the sensor‘s screen, replace the batteries in the sensor.
5. If the station‘s screen becomes hard to read or poorly backlit, replace the batteries in the station.
Changing Sensor Channel and Connecting Additional Sensors
The station can be paired with up to 3 wireless sensors.
1. Remove the battery cover on the back of the sensor (any batteries present should also be removed) and move the
slider to the sensor channel of choice (CH 1, 2, 3). Then insert alkaline batteries (2× 1.5 V AA).
2. Press the SENSOR button on the station; the
icon will start ashing.
3. Press the button on the station to switch to the correct channel (corresponding to the sensor).