2
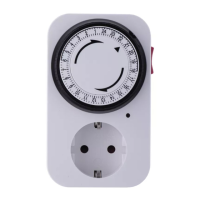
GB | Digital Timer Socket
Functions
1. The programmable digital timer switch
(hereinafter only “switch”) makes it possible
to decide in advance, when your indoor or
outdoor appliances are to switch on/o. It
helps to save energy and increase safety in
your household.
2. The random switching on/o function lets the
appliances switch on/o in irregular times, so
it is suitable for some automatic functions in
your household, but also it lets you conceal
your absence from burglars.
3. LCD display shows the selected programme
setting and real time.
4. You can set up to 10 programmes to switch
on/o.
Specications
Power supply: 230 V~, 50 Hz, 16(2)A
Max. load: 3 680 W
IP protection: IP44
Operating temperature: -10°C to +40°C
Time setting interval: 1 minute
16 combinations of days or blocks of days
Precision: ±1 minute per month
Switched phase
Backup battery: NiMH 1.2 V >100 hours
Installation
1. Plug the switch into a 230 V AC socket.
2. Let it recharge for 12 hours.
3. After recharging use a pointed object such
as pen or pencil to push the MASTER CLEAR
button to erase all stored information.
4. Now the switch is ready for use and for any
new setting.
Time display
Time can be displayed in two dierent systems.
1. 12 hour mode: digital numbers from 00:00
to 11:59 plus either the AM symbol (from
midnight to noon) or PM (from noon to
midnight).
2. 24 hour mode: digital numbers from 00:00
to 23:59 and the display does not show
AM or PM.
3. To toggle the 12 hour mode to 24 format and
back, push the buttons CLOCK and TIMER at
the same time.
Setting the time and day of the week
1. Setting the day of the week
1.1 Hold the CLOCK button and push the WEEK
button at the same time to set the day of
the week.
1.2 The order of the day (abbreviations) is dis
-
played this way:
Mo = Monday, Tu = Tuesday, We=Wednesday,
Th = Thursday, Fr=Friday, Sa = Saturday, Su=
Sunday
1.3 Push CLOCK and shortly also the WEEK button
to change the days of the week slowly. If
you hold both buttons, the days of the week
change fast. Release the buttons as soon as
the desired day of the week appears.
2. Setting the time
2.1 To set time, hold the CLOCK button and push
the HOUR button.
2.2 If you hold CLOCK and briey push HOUR,
the time will change slowly. If you hold
both buttons, time runs fast. Release both
buttons as soon as the desired hour appears
on the display.
2.3 To set minutes hold CLOCK and push MINUTE.
To set minutes, proceed the same way as
when setting hours as described in point 2.2.
3. Setting the summer time
3.1 Hold the CLOCK button and push ON/AUTO/OFF
to activate summer time. The display will au
-
tomatically increase the time by one hour and
at the same time an “S” symbol will appear.
3.2 By repeated pushing CLOCK and ON/AUTO/OFF
you can cancel the summer time. The time
and the value will lower by one hour and “S”
will disappear from the display.
Note:
In order to set the time and day of the week, the
LCD display must be in real time mode. If LCD is in
the programme setting mode, push CLOCK and the
display will go back to real time mode.
Setting the programmes
1. If LCD display shows real time (the display
reads “CLOCK”), push the TIMER button
once to activate the programme setting
mode. On the left side of the LCD display
there appears “1ON” and the “PROGRAMME”
text will appear.
1.1 “1” marks the number of the programme
group (groups of programmes are numbered
from 1 to 10).
1.2 “ON” means activated.
1.3 “OFF” means deactivated.
2. To select the programme group and the on/
o option, push the TIMER button to choose
 Loading...