Adjust the angle of inclination
In order to enable an optimal working position,
the saw chain body (8) can be inclined 3 angle:
0°, 15° and 30°.
1. Press and hold the locking device of the
inclination angle (9).
2.Set the desired angle of inclination.
3.Release the lock. Make sure that the saw chain
body clicks into place. The angle of inclination is
set.
Adjust the handle angle
To enable an optimal working position, the handle
(1) can be rotated ±45° & ±90° to the right and left.
1. Push and hold the locking button of the handle (3).
2.Set the desired angle.
3.Release the locking button on the handle. Make
sure that the handle clicks into place.
Insert / replace battery
Read the operating instructions for the battery
before inserting it.
Risk of fire and explosion due to polarity reversal
or short circuit.
- Only use original batteries or proved by Enhulk.
- Only use undamaged batteries.
Remove the battery
Read the operating instructions for the battery
before inserting it.
1. Press and hold the battery release button.
2.Pull the battery out of the battery holder.
If the battery cannot be removed easily, the
battery release button was not pressed enough.
Operating instructions
6
Assembly of chain and bar
If parts are missing or damaged, the device must
not be operated until everything has been
correctly replaced. Failure to follow this warning
could result in serious personal injury.
- Make sure that the battery pack is removed
from the device.
- Always wear protective gloves when servicing
the chain.
Mount the saw chain body
1. Release the clip on the tube and pull the inner
hexagonal pole out from the front tube about 20
cm and lock the clip again.
2.Insert the saw chain body (8) into the holder on
the inner hexagonal pole.
Make sure that the saw chain body is correctly
positioned in relation to the handle and the two
arrows on the saw chain body and the hexagonal
pole must face each other.
If two arrows do not match, the electrical
connection cannot be connected, and the
machine cannot work.
3.Tighten the screw sleeve (16) clockwise to tighten
the saw chain body to the hexagonal pole,the
saw chain body is mounted.
Mount the saw chain
1. Unscrew the SDS fastener (13) counterclockwise.
2.Remove the sprocket cover (12).
3.Place the saw chain (5) in the groove of the bar (7)
so that the alignment of the chain links
corresponds to the direction of rotation symbol
printed on the device.
4.
Place the bar & chain together on the saw chain
body (8) , fit the hole of bar into the knob and place
the saw chain around the chain sprocket (10).
5.Put on the sprocket cover, pull the bar forwards
and screw the SDS fastener clockwise until hear
“click” and the chain sprocket cover is completely
in contact with the bar.
6.Check the chain tension by below photo, if too
tight, release SDS fastener a little.
Adjust telescopic tube
1. Release the clip (17) on the tube.
2.Pull the inner hexagonal pole out from the front
tube as far as is necessary for your work or as far
as the stop.
3.Lock the clip (17).
Press the battery release button more firmly.
Insert the battery
1. To insert the battery, slide the battery into the
battery holder. You will hear a "click" when the
battery lock engages.
2.Check that the battery is firmly seated.
Long periods of time in the immediate vicinity of
the running device can lead to hearing damage.
- Wear ear protection.
- A certain amount of noise from this device cannot
be avoided. Postpone noisy work to approved and
specified times. If necessary, keep to rest periods
and limit the working time to the bare minimum.
For your personal protection and the protection
of people in the vicinity, suitable ear protection
must be worn.
Risk of injury from running saw chain.
- Keep your hands away.
- Never use the machine with a damaged cover or
protective device or without a cover or protective
device.
- Remove the replaceable battery before all
adjustment, cleaning and maintenance work on
the device.
- Wait until all rotating parts have come to a
standstill and the device has cooled down. Before
using the device, inspect the work area.
Remove hard objects such as stones, broken
glass, wire, etc. that could be thrown away,
ricocheted, or otherwise cause injury or damage
while the device is in use.
Never use this device if the correct equipment is
not attached service.
The device must not be used if it is damaged or
the safety devices are defective. Replace worn
and damaged parts.
Before each start-up, check all screw and
connections as well as protective devices for
tightness and correct fit and whether all moving
parts move easily.
It is strictly forbidden to dismantle or modify the
protective devices on the machine or to alienate
them from the intended purpose or to attach
third-party protective devices.
If the device begins to vibrate abnormally, switch
off the machine and investigate the cause
immediately. Vibrations are generally a warning
of a malfunction.
If the device is blocked, switch it off immediately
and then remove the object.
Store the device dry and protected from frost.
Keep unused power tools out of the reach of
children. Do not allow people to use the power tool
who are not familiar with it or who have not read
these instructions.
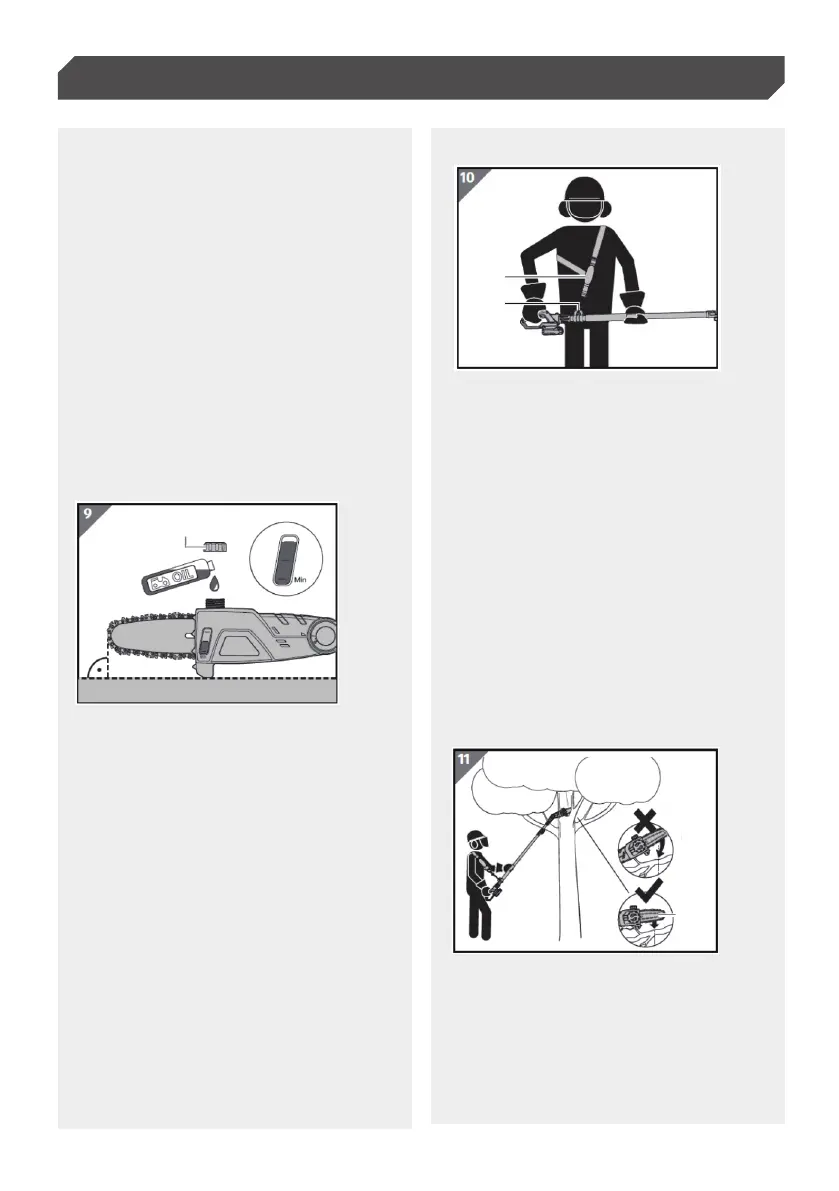
Add chain oil
Risk of damage!
Running the machine without lubrication can
damage the bar and saw chain.
- Never work without chain lubrication.
- It is therefore essential to check the oil level on the
level indicator regularly and every time you start
working with the device.
- Make sure that the container is always at least ¼
full so that there is enough oil for the respective
project.
1. Place the device on a level surface.
2.Unscrew the cap of the chain oil tank (11) in an
anti-clockwise direction.
3.Fill the chain oil into the chain oil tank until the
level indicator shows the level shown. Make sure
that no dirt gets into the oil tank. .
4.Close the oil tank by turning the lid clockwise
screw tight. The chain oil is filled.
Use a shoulder strap
When using the device, always wear the carrying
strap (21) so that you can work as fatigue-free as
possible.
1. Put the strap on so that it runs over your shoulder
and crosses your chest and back.
2. Fasten the shoulder strap with the hook of the
carrying strap (21) on the fastening eyelet for the
carrying strap (4) .
3.Adjust the strap length of the shoulder strap so
that the attachment eye of the shoulder strap is
at hip height.
4.To change the belt position on the device, slightly
unscrew the fastening screws of the fastening
eyelet of the carrying belt in an anti-clockwise
direction by Allen key (22).
- Move the fastening eyelet of the shoulder strap to
the desired position.
- Tighten the fastening screws of the fastening
eyelet in a clockwise direction.
Check the connect of the shoulder strap before
and after each use for damage and correct
function. In the event of functional difficulties or
damage, have it checked immediately by
authorized specialists and, if necessary, replaced.
Work instructions
Risk of damage!
- Hold the device with both hands, with your thumb
and fingers firmly gripping the handles. - Bring
your body and arms in a position where you can
withstand the kickback forces.
- When working on a slope, always stand above or
to the side of the branch you are sawing.
- First saw off the lower branches of the tree so that
they can fall down unhindered.
- Do not saw the bulging branches to make it easier
for the tree to heal.
- Sawing off small branches: Place the stop surface
lightly on the branch to avoid jerky movements of
the device when starting the cut. Guide the bar (7)
through the branch from top to bottom, applying
slight pressure.
- Change your work position regularly. When
changing the working position, watch out for
branches that are lying on the ground and
kicking back.
To switch on and off
Push the release button (2) completely forward
and press the on / off switch (24) to switch on the
machine; release the both to switch off the
machine.
Always make sure the cutting angle is Max 60
0
.
- Do not cut any branch above your head to
prevent branch falling on your head.
- Do not do any cut above other persons to prevent
accident.
- Do not cut in ladder.
- Do not cut near electrical wire.
Remove blockages
Risk of injury! Wear suitable gloves to avoid injury.
Unintentional switching on can lead to injuries.
- Make sure that the device is switched off.
- Disconnect the battery from the device.
Remove blockages.
1. Make sure the device is turned off.
2.Remove any jammed material from the saw chain
(5) and blade (7).
Test
Risk of injury from sharp knives.
- Use protective gloves. Before each use, check:
- The device for damage.
- The controls for damage.
- The accessories are in perfect condition.
- That the ventilation slots are free and clean.
Do not use a damaged device or accessory. Have
it checked and repaired by the manufacturer or
its customer service or a similarly qualified
person.
Cleaning and maintenance
Before and after each use, check the product and
accessories (or attachments) for wear and
damage. If required, exchange them for new ones
as described in this instruction manual.
Sprocket wheel
1. Clean the sprocket wheel.
2.Using a disposable lube gun, insert the needle
nose into the lubrication hole and inject grease
until it appears at the outside edge of the
sprocket wheel.
3.Rotate the saw chain. Repeat the lubrication
procedure until the entire sprocket wheel has
been greased.
Guide bar and saw chain
1. Disassemble the guide bar and saw chain in
reverse order from assembly.
2.Check the oiling port for clogging and clean if
necessary to ensure proper lubrication of the guide
bar and saw chain during operation. Use a soft wire
small enough to insert into the oil discharge hole.
3.Check the drive sprocket. If it is worn or damaged
due to strain, have it replaced by an authorized
service centre or a similarly qualified person.
4.Clear residue from the rails and holes on the guide
bar using a screwdriver, putty knife, wire brush or
other similar tool. This keeps the lubrication oil
passages open to provide proper lubrication to the
guide bar and saw chain.
5.Check the guide bar ‘rail’ for wear: Hold a ruler
(straight edge) against the side of the guide bar
and ‘cutter side plates’. If there is a gap between
the ruler and guide bar the guide bar ‘rail’ is
normal. If there is no gap (ruler flush against the
side of the guide bar) the guide bar ‘rail’ is worn
and needs to be replaced with a new one of the
same type.
6.Check the saw chain for possible wear and
damages. Replace it with a new one if required.
Experienced users can sharpen a dull saw chain.
7. Refit the saw chain and the guide bar as
described
above.
Transportation and Storage
Switch the product off and remove the battery
packs. Empty the lubrication oil tank.
Transportation
1. Disassemble the product and re-pack to original
package.
2.Protect the product from any heavy impact or
strong vibrations which may occur during
transportation in vehicles.
4.Secure the product to prevent it from slipping or
falling over.
Storage
1. Clean the product as described above.
2.Store the product and its accessories in a dark,
dry, frost-free, well-ventilated place.
3.Always store the product in a place that is
inaccessible to children. The ideal storage
temperature is between 10°C and 30°C.
4.We recommend using the original package for
storage or covering the product with a suitable
cloth or enclosure to protect it against dust.
11
21
4
7
 Loading...