Luna Series | IESS-PTZ308M
www.enviosecurity.com
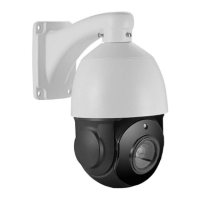
IESS-PTZ308M
8MP 4K Speed Dome Network Camera
Main Features
• 1 / 2.7” Black Light Illumination Cmos Sensor
• 8Megapixel (3840x2160)
• Zoom 30X
• Maximum IR Led Distance more than 100m
• Human Detect/Vehicle Detect/Videoanalysis
• Onvif 16.2
• H265AI/H265+ (Compatible with H265/H264
• 6 High Power IR Leds (4 pcs Wide + 2 pcs Tele)
• IP65
• DC12V/ POE IEEE802.3af/3at
Connect the camera to the router and insert the power cable (12V at least 3A). It is possible to power the camera via POE
(IEEE.802.3af/3at). Download the “Device Manager” software from the website www.enviosecurity.com and install it on your PC.
Once the software is open, press the “IP Search” button (1). Select the IP address shown by the software (2), and change the IP
address of the camera (3), taking care to enter an IP address having the same subnet as your router, enter the relevant network
mask and IP address of the gateway.
Finally, press the “Modify” button (4) to save the settings. The software will display a “modification successful” message.
Open your Internet browser (such as Chrome, Edge, Opera, Firefox etc.).
In the address bar of your browser, enter the IP address of the camera http://192.168.1.10. Allow you to download the
Enter your login credentials:
user: admin
For the complete manual visit the web page
Technical Specification
System
Embedded RTOS,dual-core 32bit DSP(NT98566),pure hard compression
,watch dog
Image Sensor
8.0M 1/2.7" Black light illumination CMOS sensor CMOS Sensor
Video compression
H.265AI/H.265+(Compatible with H.265/H.264)
Minimum
color 0.0001Lux@F1.2, black/white 0.0001Lux@F1.2
IR Distance
More than 100m
IR On/Off Control
Auto / Manual
LEDs
6 High Power IR Led (4pcs Wide + 2 pcs for Tele)
Lens Type
Motorized Varifocal
Focal Length
4.7mm-94mm (30X)
Angle of View
68,5°-4,2°
Focus Control
Automatic
Resolution
3840*2160
Video Output
Main stream: 8MP 3840*2160@15fps
;5MP 2880*1616@25fps;4MP
;2MP 1920*1080@25fps;
ub-stream: 800*448@25fps;
Record
N/D
Interface
1*RJ45 10/100M adaptive port;RTSP/FTP/DHCP/NTP/UPnP
ONVIF
16.2
Mobile Monitor
XMEYE/XMEYE PRO (iOS,Adroid)
Detect
Human Detect/Vehicle Detect/Video Analysis(Tri Wire, Intrusion area)
Noise Reduction
2D/3D
White Balance
Auto / Manual
Audio
Bidirectional
Power Supply
12V DC ±30% / POE IEEE802.3af/3at
Power Consumation
Max 10W (Leds on and rotation)
IP Protection
IP65
Housing
Metal (Alluminium)
Dimensions / Weight
222mm×136mm
1.
Warnings and precautions
Dear Customer, thank you for choosing one of our products whose correct use guarantees solutions of the highest quality
and reliability over time. This manual provides instructions for using the product.
Connect the camera to the router and insert the power cable (12V at least 3A), or with POE (IEEE.802.3af/3at)
Speed Dome cameras are equipped with a wall mounting bracket, specially designed to allow the passage of cables inside
and protect them from tampering attempts. The fixing base has a side slot for cable exit, if the cables come from outside.
The bracket must be fixed to the wall in a stable manner.