MAINTENANCE
Maintenance of the magnier is limited to cleaning of the outside housing of the optic and cleaning the lenses.
e optical system is coated with anti-reection material. When cleaning the glass surfaces, rst blow away
any dirt and dust. Fingerprints and lubricants can be wiped o with lens tissue or a so cotton cloth which is
moistened with lens cleaning uid or glass cleaner, sold in any camera store. Never clean the glass surface with
a dry cloth or paper towel; always dampen the glass surfaces prior to cleaning.
No maintenance is needed on the magnier’s surface, except to occasionally wipe o with a so cloth. Use
only a water-based cleaner such as glass cleaner, ammonia, or soap and water. Never use any solvent-type
cleaner such as alcohol or acetone.
WARNING: NEVER DISASSEMBLE YOUR MAGNIFIER! e optical cavity is purged, nitrogen lled,
and sealed to achieve fog proof performance. Disassembly will void the warranty and damage the sight.
If the switch action of the switch to Side mount begins to stick from wear, use a common spray lubricant on
the hinge portion of the mount. No other maintenance is needed on the Switch to Side Mount other than
cleaning the surface. Please follow the same guidelines when cleaning the magniers.
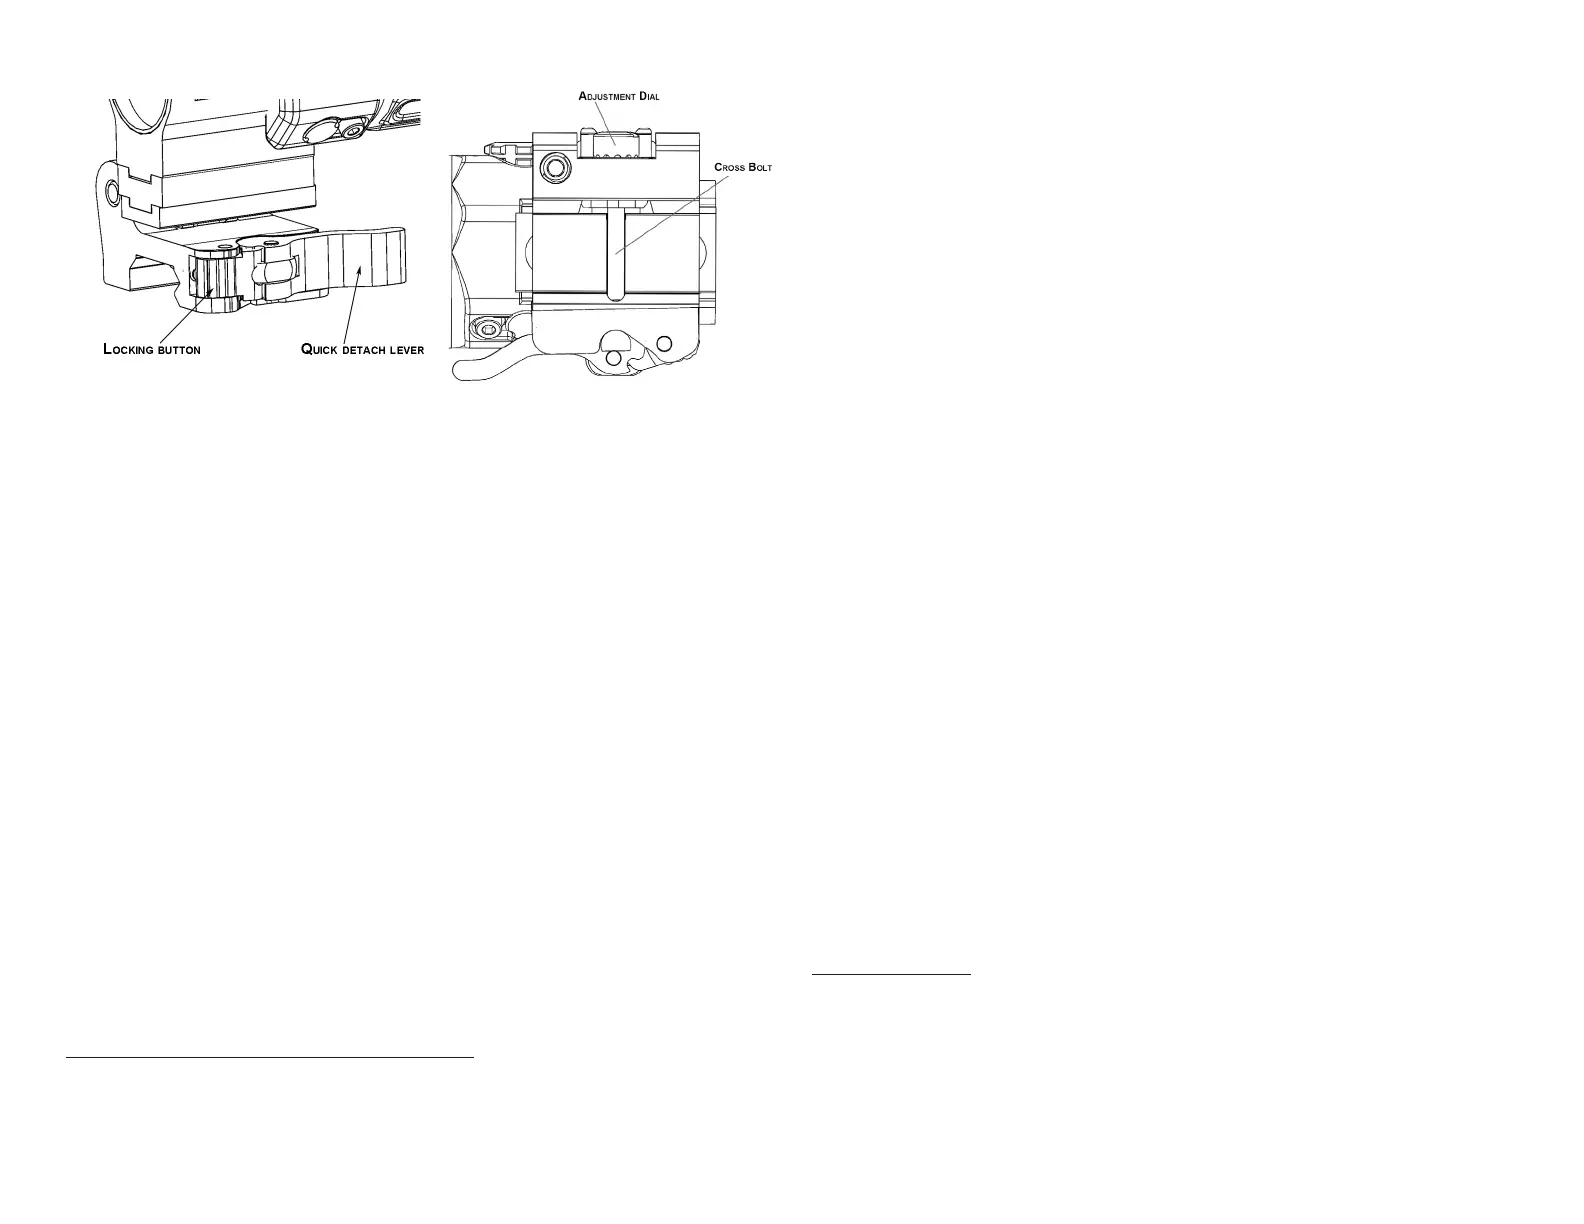
Figure 4
Figure 5
THE EOTECH PRESTIGE WARRANTY
ank you for choosing EOTECH for your new purchase. We understand your passion for shooting and your
reliance on products that will provide years of dependable use. at is why we oer a 10-year limited EOTECH
Prestige Warranty*, as described below. Should you experience a problem with your EOTECH product, we
will do the following to make it right for you.
With the EOTECH Prestige Warranty, we warrant that your Holographic Weapon Sight or Magnier product
will be free from manufacturing defects in material and workmanship (including electronics) under normal
use for a period of ten (10) years from the later of (i) customer’s proof of the rst purchase of the new product
from an authorized commercial seller of EOTECH products or from EOTECH directly, or (ii) manufacturer’s
date/serial number (as specied on the product). EOTECH will, free of charge and as determined by EO-
TECH, either repair or replace your product with a comparable product for the rst ve (5) years. From ve
(5) to ten (10) years, EOTECH will, at the customer’s request, evaluate and repair any and all defects in mate-
rial and workmanship for a seventy-nine dollar ($79.00 USD) bench fee. is warranty extends to subsequent
owners to the remaining extent of the original owner’s warranty. We do this because we want you to be as
condent in your purchase as we are in the quality of our product.
THIS WARRANTY DOES NOT APPLY TO THE FOLLOWING:
1. Theft, loss neglect, or vandalism
2. Abuse, misuse, improper installation and modification, alterations, abnormal use, or accidents not result-
ing from a defect in material and workmanship under normal use of the product.
3. Cosmetic damage that does not affect the product’s use, operation or performance.
4. Any defect or damage caused by repairs or services not performed by EOTECH.
EOTECH products to be repaired under this warranty, must have a valid return material authorization
(RMA) number; purchasers may obtain this number by submitting a Return Authorization Request Online
at www.eotechinc.com/raform.php. If you do not have access to a computer, you may call EOTECH for
assistance. Products that arrive at EOTECH without a valid Return Authorization Number will be returned
to sender without service. Once you receive the RMA number, send the product, postage prepaid, to
EOTECH. All product(s) must be fully insured and have the correct postage; EOTECH will not be responsi-
ble for improper postage or missing/damaged merchandise during shipment. International repairs may
include additional shipping and handling charges.
THE WARRANTY PROVIDED HEREIN SHALL BE THE SOLE AND EXCLUSIVE WARRANTY. THERE SHALL BE NO OTHER WARRAN-
TIES EXPRESS OR IMPLIED INCLUDING ANY IMPLIED WARRANTY OF MERCHANTABILITY OR FITNESS FOR A PARTICULAR
PURPOSE OR ANY OTHER OBLIGATION ON THE PART OF EOTECH WITH RESPECT TO THIS WARRANTY. THIS WARRANTY DOES
NOT AFFECT ANY STATUTORY WARRANTY RIGHTS THE CONSUMER MAY HAVE AGAINST THE SELLER OF THIS PRODUCT.
EOTECH SHALL HAVE NO LIABILITY FOR ANY DAMAGES OR FUTILE EXPENSES OF WHATEVER NATURE (WHETHER DIRECT;
INDIRECT; INCIDENTIAL; CONSEQUENTIAL; SPECIAL OR OTHER DAMAGES) UNDER THIS WARRANTY. THIS WARRANTY GIVES
YOU SPECIFIC LEGAL RIGHTS, AND YOU MAY ALSO HAVE OTHER RIGHTS THAT VARY FROM JURISDICTION TO JURISDICTION.
SOME JURISDICTIONS DO NOT ALLOW EXCLUSION OR LIMITATION OF INCIDENTAL OR CONSEQUENTIAL DAMAGES, OR
LIMITATIONS ON HOW LONG AN IMPLIED WARRANTY LASTS, SO THE ABOVE EXCLUSIONS OR LIMITATIONS MAY NOT APPLY
TO YOU.
* is warranty applies to new purchases of Holographic Weapon Sight or Magnier products and retroactively applies to Holographic Weapon
Sight or Magnier products sold in 2017 by an authorized commercial seller of EOTECH products or from EOTECH directly.
FACTORY CONTACTS
Product Registration....................... ..........................................................www.eotechinc.com/product-registration
Customer Service/Repair........................................................................................................................888-EOTHOLO
(734) 741-8868 x2176
Link to website to submit RA Request:....................................................http://www.EOTech-inc.com/raform.php
Technical Sales/Service...........................................................................................................................888-EOTHOLO
Shipping Address: EOTECH 1201 E. Ellsworth Rd. Ann Arbor, MI 48108 USA
INSTALLATION
To install the congured magnier onto the weapon, open the quick detach lever. To do this, use your thumb
to depress the locking button (see Figure 4). Once depressed, swing the quick detach lever open and away
from its nested position. Place the mount in the desired position behind the HWS®. Once the mount is
located in the desired position, push the magnier forward until the cross bolt of the magnier is set into the
slot located on the mount. Close the quick detach lever.
If the mount is too loose or tight for your specic rail, adjustments can be made for a proper t (see Figure
5). First, remove the magnier from the rail. Leaving the quick detach lever in its open position, turn the
unit upside down, exposing the rail interface. To loosen the adjustment, turn the dial counterclockwise. To
tighten, turn the dial clockwise. Once done, re-mount the optic to the rail. Continue incremental changes
until a desired t is achieved. CAUTION: Never make adjustments while the quick detach lever is in the
closed position.
 Loading...