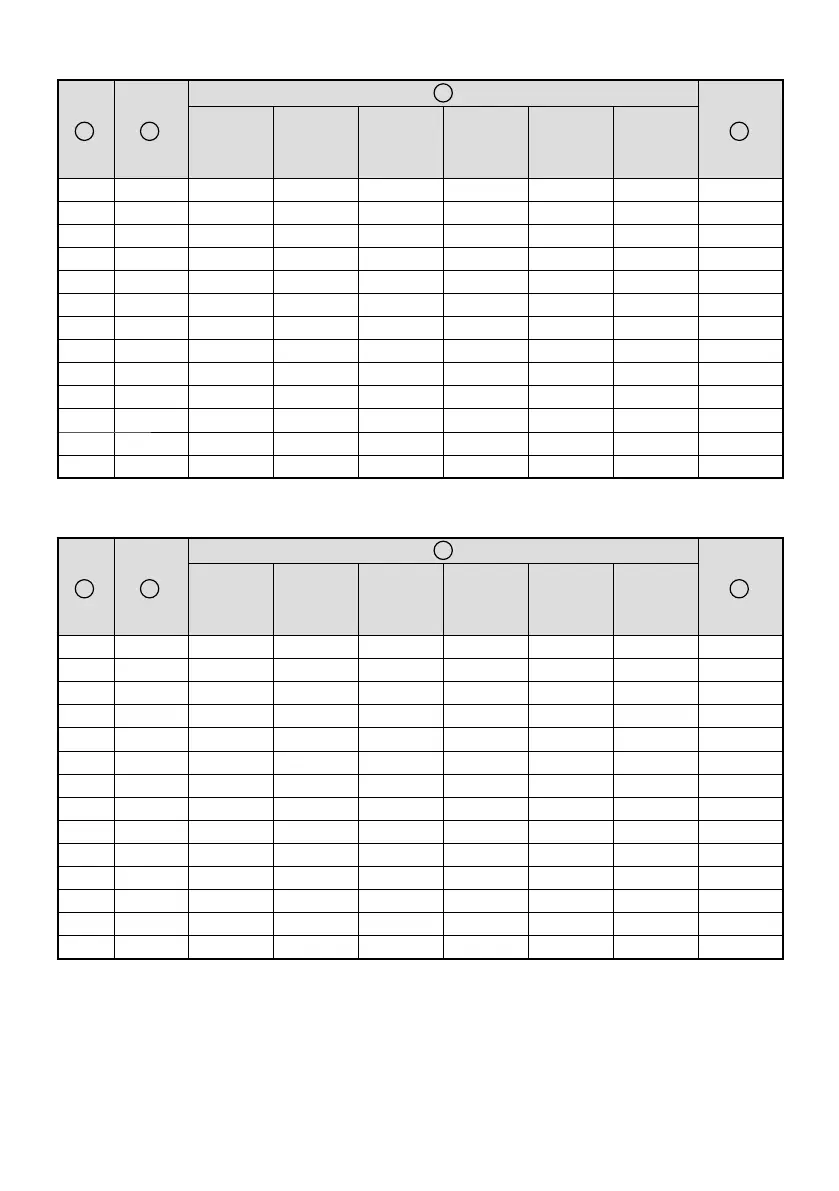
16
16:9 cm
Standard
zoom lens
ELPLS07
Short throw
zoom lens
ELPLU01
Rear
projection
wide lens
ELPLR03
Middle
throw zoom
lens
ELPLM04
Middle
throw zoom
lens
ELPLM05
Long throw
zoom lens
ELPLL06
28” 62x35 77 - 144 - 45 - - - -9 - +44
30” 66x37 83 - 154 - 48 - - - -10 - +47
37” 82x46 - - - 184 - 283 274 - 424 416 - 568 -12 - +58
40” 89x50 113 - 207 - 66 201 - 310 300 - 464 455 - 620 -13 - +63
50” 111x62 142 - 259 - 83 254 - 390 379 - 584 574 - 780 -17 - +79
60” 133x75 171 - 312 85 - 103 101 307 - 469 458 - 704 692 - 939 -20 - +95
80” 177x100 230 - 418 115 - 139 136 412 - 629 617 - 944 929 - 1259 -27 - +126
100” 221x125 289 - 523 145 - 175 171 518 - 789 775 - 1184 1166 - 1578 -33 - +158
150” 332x187 436 - 786 220 - 264 259 782 - 1188 1170 - 1784 1758 - 2376 -50 - +237
184” 407x229 - - 318 - - - +114
200” 443x249 583 - 1050 294 - 354 - 1046 - 1588 1566 - 2385 2350 - 3174 -67 - +316
250” 553x311 729 - 1313 369 - 443 - 1310 - 1987 1962 - 2985 2942 - 3972 -83 - +395
275” 609x342 803 - 1445 407 - 489 - 1444 - 2189 2162 - 3289 3242 - 4376 -92 - +434
16:10 cm
Standard
zoom lens
ELPLS07
Short throw
zoom lens
ELPLU01
Rear
projection
wide lens
ELPLR03
Middle
throw zoom
lens
ELPLM04
Middle
throw zoom
lens
ELPLM05
Long throw
zoom lens
ELPLL06
29” 62x39 78 - 145 - 45 - - - -7 - +47
30” 65x40 81 - 150 - 47 - - - -8 - +48
38” 82x51 - - - 184 - 284 274 - 424 416 - 568 -10 - +61
50” 108x67 138 - 252 - 81 247 - 379 368 - 568 558 - 758 -13 - +80
60” 130x81 167 - 304 83 - 101 98 298 - 456 445 - 685 673 - 913 -15 - +96
70” 151x94 195 - 355 97 - 118 115 350 - 534 522 - 801 788 - 1069 -18 - +112
80” 172x108 224 - 406 112 - 135 132 401 - 612 599 - 918 903 - 1224 -21 - +128
100” 215x135 281 - 509 141 - 170 166 504 - 767 753 - 1152 1134 - 1535 -26 - +160
150” 323x202 424 - 765 214 - 257 252 761 - 1156 1138 - 1736 1710 - 2311 -39 - +241
189” 407x254 - - 318 - - - +127
200” 431x269 567 - 1021 286 - 344 - 1017 - 1544 1523 - 2320 2286 - 3087 -51 - +321
250” 538x337 710 - 1278 359 - 431 - 1274 - 1933 1908 - 2904 2862 - 3864 -64 - +401
280” 603x377 795 - 1432 - - - - - -72 - +449
283” 610x381 - 407 - 489 - 1444 - 2189 2162 - 3289 3242 - 4376 -73 - +454
 Loading...