EasyManua.ls Logo

Epson EX9230 User Manual

Epson EX9230
4 pages
To Next Page IconTo Next Page
Page #1 background imageLoading...
Page #1 background image
Quick Setup
IMPORTANT: Before using this product, make sure you read these instructions
and the safety instructions in the online User’s Guide.
Note: These illustrations show the Pro EX9240, but the instructions are the
same for the EX9230 unless otherwise noted.
Contents
Make sure your projector box includes all of these parts (wireless LAN module
cover not included with Pro EX9240):
Connect the projector
Choose from the following connections. See the sections below or the online
User’s Guide for details.
Computer
Computer
HDMI 1 HDMI 2
LR
Video
USB cable
HDMI cable
VGA cable
Audio cable
HDMI port
Connect one end of an HDMI cable to one of the projector’s HDMI ports and
the other end to an HDMI port on your computer.
Computer port
Connect one end of a VGA cable to the projector’s Computer port and the
other end to your laptop or computer’s monitor port. Make sure to switch
your laptop to external display (see “Troubleshooting” on the back of this
sheet). You can also connect an audio cable.
USB port
Connect the square end of a USB cable to the projector’s USB-B (square) port.
Connect the flat end of the cable to any USB port on your computer.
Windows Vista
®
or later: After turning on the projector, follow the on-screen
instructions to install the Epson
®
USB Display software (EMP_UDSE.EXE; only
on first connection). If the software screen does not display automatically, open
My Computer, Computer, or This PC, then double-click EPSON_PJ_UD.
OS X 10.7.x or higher: After turning on the projector, the setup folder for
USB Display appears in the Finder. Double-click USB Display Installer and
follow the on-screen instructions to install the Epson USB Display software
(only on first connection).
Video device
Connect multiple video devices and use the Source Search button on the
projector or remote control to switch between them.
Computer
HDMI 1 HDMI 2
LR
Video
HDMI cable
RCA video cable
(composite video)
RCA audio cable
USB device
Connect a supported digital camera, USB flash drive, or USB storage device to
the projector’s USB-A (flat) port.
Computer
HDMI 1 HDMI 2
LR
Video
USB cable
If you connect a digital camera, USB flash drive, or USB storage device, you can
use the projector’s PC Free feature. See the online User’s Guide for details.
Turn on your equipment
1
Turn on your computer or video source.
2
Plug in the projector. The power light on the projector turns blue.
3
Open the A/V Mute slide all the way.
4
Press the power button on the projector or remote control. The
projector beeps, the Status light flashes blue, and then stays on.
Note: To shut down the projector, press the power button twice.
5
Use the arrow buttons on the remote control to highlight any of the
options on the Home screen that appears, then press to select it.
You can switch between projection sources and quickly access various
adjustment options from this screen.
6
The default language of the menu system is English. To select another
language, press the Menu button on the projector or remote control.
Select Extended and press . Select Language and press . Select your
language and press . Press the Menu button to exit the menu system.
Adjust the image
1
If you don’t see an image, press the Source Search button on the
projector or remote control to select the image source.
Note: If you still see a blank screen or have other display problems, see
the troubleshooting tips on the back of this sheet.
2
To raise the image, press the foot release button and lift the front of the
projector. Release the button to lock the foot in position.
3
To reduce or enlarge the image, turn the zoom ring.
4
To sharpen the image, turn the focus ring.
5
If your image looks like or , you may have placed the projector
off to one side of the screen at an angle. Place the projector directly in
front of the center of the screen, facing the screen squarely. If you can’t
move the projector, use the horizontal keystone slider on the projector to
correct the image shape.
6
Your projector automatically adjusts an image that looks like or ,
but if necessary you can press the or button on the projector to
correct it.
Using the remote control
Install the batteries as shown (two AA batteries).
Choose which source
to display
Turn projector
on and off
Access projector
menus
Turn off projector
display
Access the Home
screen
Navigate projector
menus
For more information on using the remote control, see the online User’s Guide.
Setting up a wireless
connection
Follow these steps to set up the projector for a wireless network connection.
To project wirelessly, you need to install the optional wireless LAN module for
the EX9230 (part number V12H005A02).
Note: You do not need the wireless LAN module for the Pro EX9240 because
the wireless functionality is built-in. Skip to “Select wireless network settings.”
Install the optional wireless LAN module (EX9230)
1
Remove the wireless LAN module cover screw.
2
Insert the wireless LAN module into the USB-A port.
3
Attach the included wireless LAN module cover and secure it using the
screw you removed.
Note: The light on the wireless LAN module turns on when the module is
installed and operating. The light flashes when the module is communicating
over the network.
Select wireless network settings
1
Press the Menu button on the remote control.
2
Select the Network menu and press .
3
Select On as the Wireless LAN Power setting.
4
Select Network Configuration and press .
EX9230/Pro EX9240
Question and Answer IconNeed help?

Do you have a question about the Epson EX9230 and is the answer not in the manual?

Epson EX9230 Specifications

General IconGeneral
BrandEpson
ModelEX9230
CategoryProjector
LanguageEnglish

Summary

Connect the projector

Computer Connection

Connects a computer via HDMI, VGA, or USB cables for display.

USB Device Connection

Connects digital cameras, USB flash drives, or storage for PC Free feature.

Video Device Connection

Connects external video sources like DVD players using HDMI or composite.

Turn on your equipment

Powering On Sequence

Steps to power on the projector and connected source devices correctly.

Source Selection

Navigating the Home screen to select the desired input source.

Language Setup

Procedure to change the projector's menu system language.

Adjust the image

Focus and Zoom Control

Adjusting the zoom and focus rings for image clarity and size.

Image Positioning

Using the foot release and keystone slider for proper image placement.

Automatic Image Correction

Using specific buttons for automatic image shape and alignment.

Setting up a wireless connection

Install Wireless LAN Module

Steps for installing the optional wireless LAN module for EX9230.

Configure Wireless Network Settings

Accessing and setting up wireless network configurations via the menu.

Using the remote control

Remote Control Functions

Overview of remote control buttons and their primary functions.

Battery Installation

Instructions for inserting AA batteries into the remote control.

Using the Epson iProjection app

App Download and Installation

Instructions to download and install the Epson iProjection app via QR code.

Connecting Mobile Devices

Steps to connect mobile devices wirelessly using the app.

Mirroring a mobile device

Screen Mirroring Setup

Enabling and configuring screen mirroring settings on the projector.

Miracast Connection

Using Miracast function on a device to search for and connect to the projector.

Troubleshooting

No Signal Issues

Resolving 'No signal' messages by checking connections.

Blank Screen Diagnosis

Checking A/V Mute, power light, and wake-up for blank screens.

Computer Connection Blank Screen

Troubleshooting blank screens when connected to a computer.

Remote Control Unresponsive

Diagnosing and fixing issues with an unresponsive remote control.

Where to get help

Online Manuals

Accessing and downloading projector manuals from the Epson website.

Internet Support

Finding software, manuals, FAQs, and support via the Epson website.

Telephone Support

Contacting Epson support services for assistance.
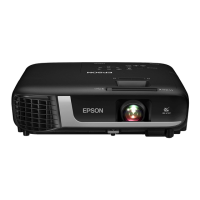
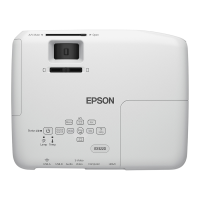
Related product manuals