1.
Peel o the backing
paper.
Backing paper
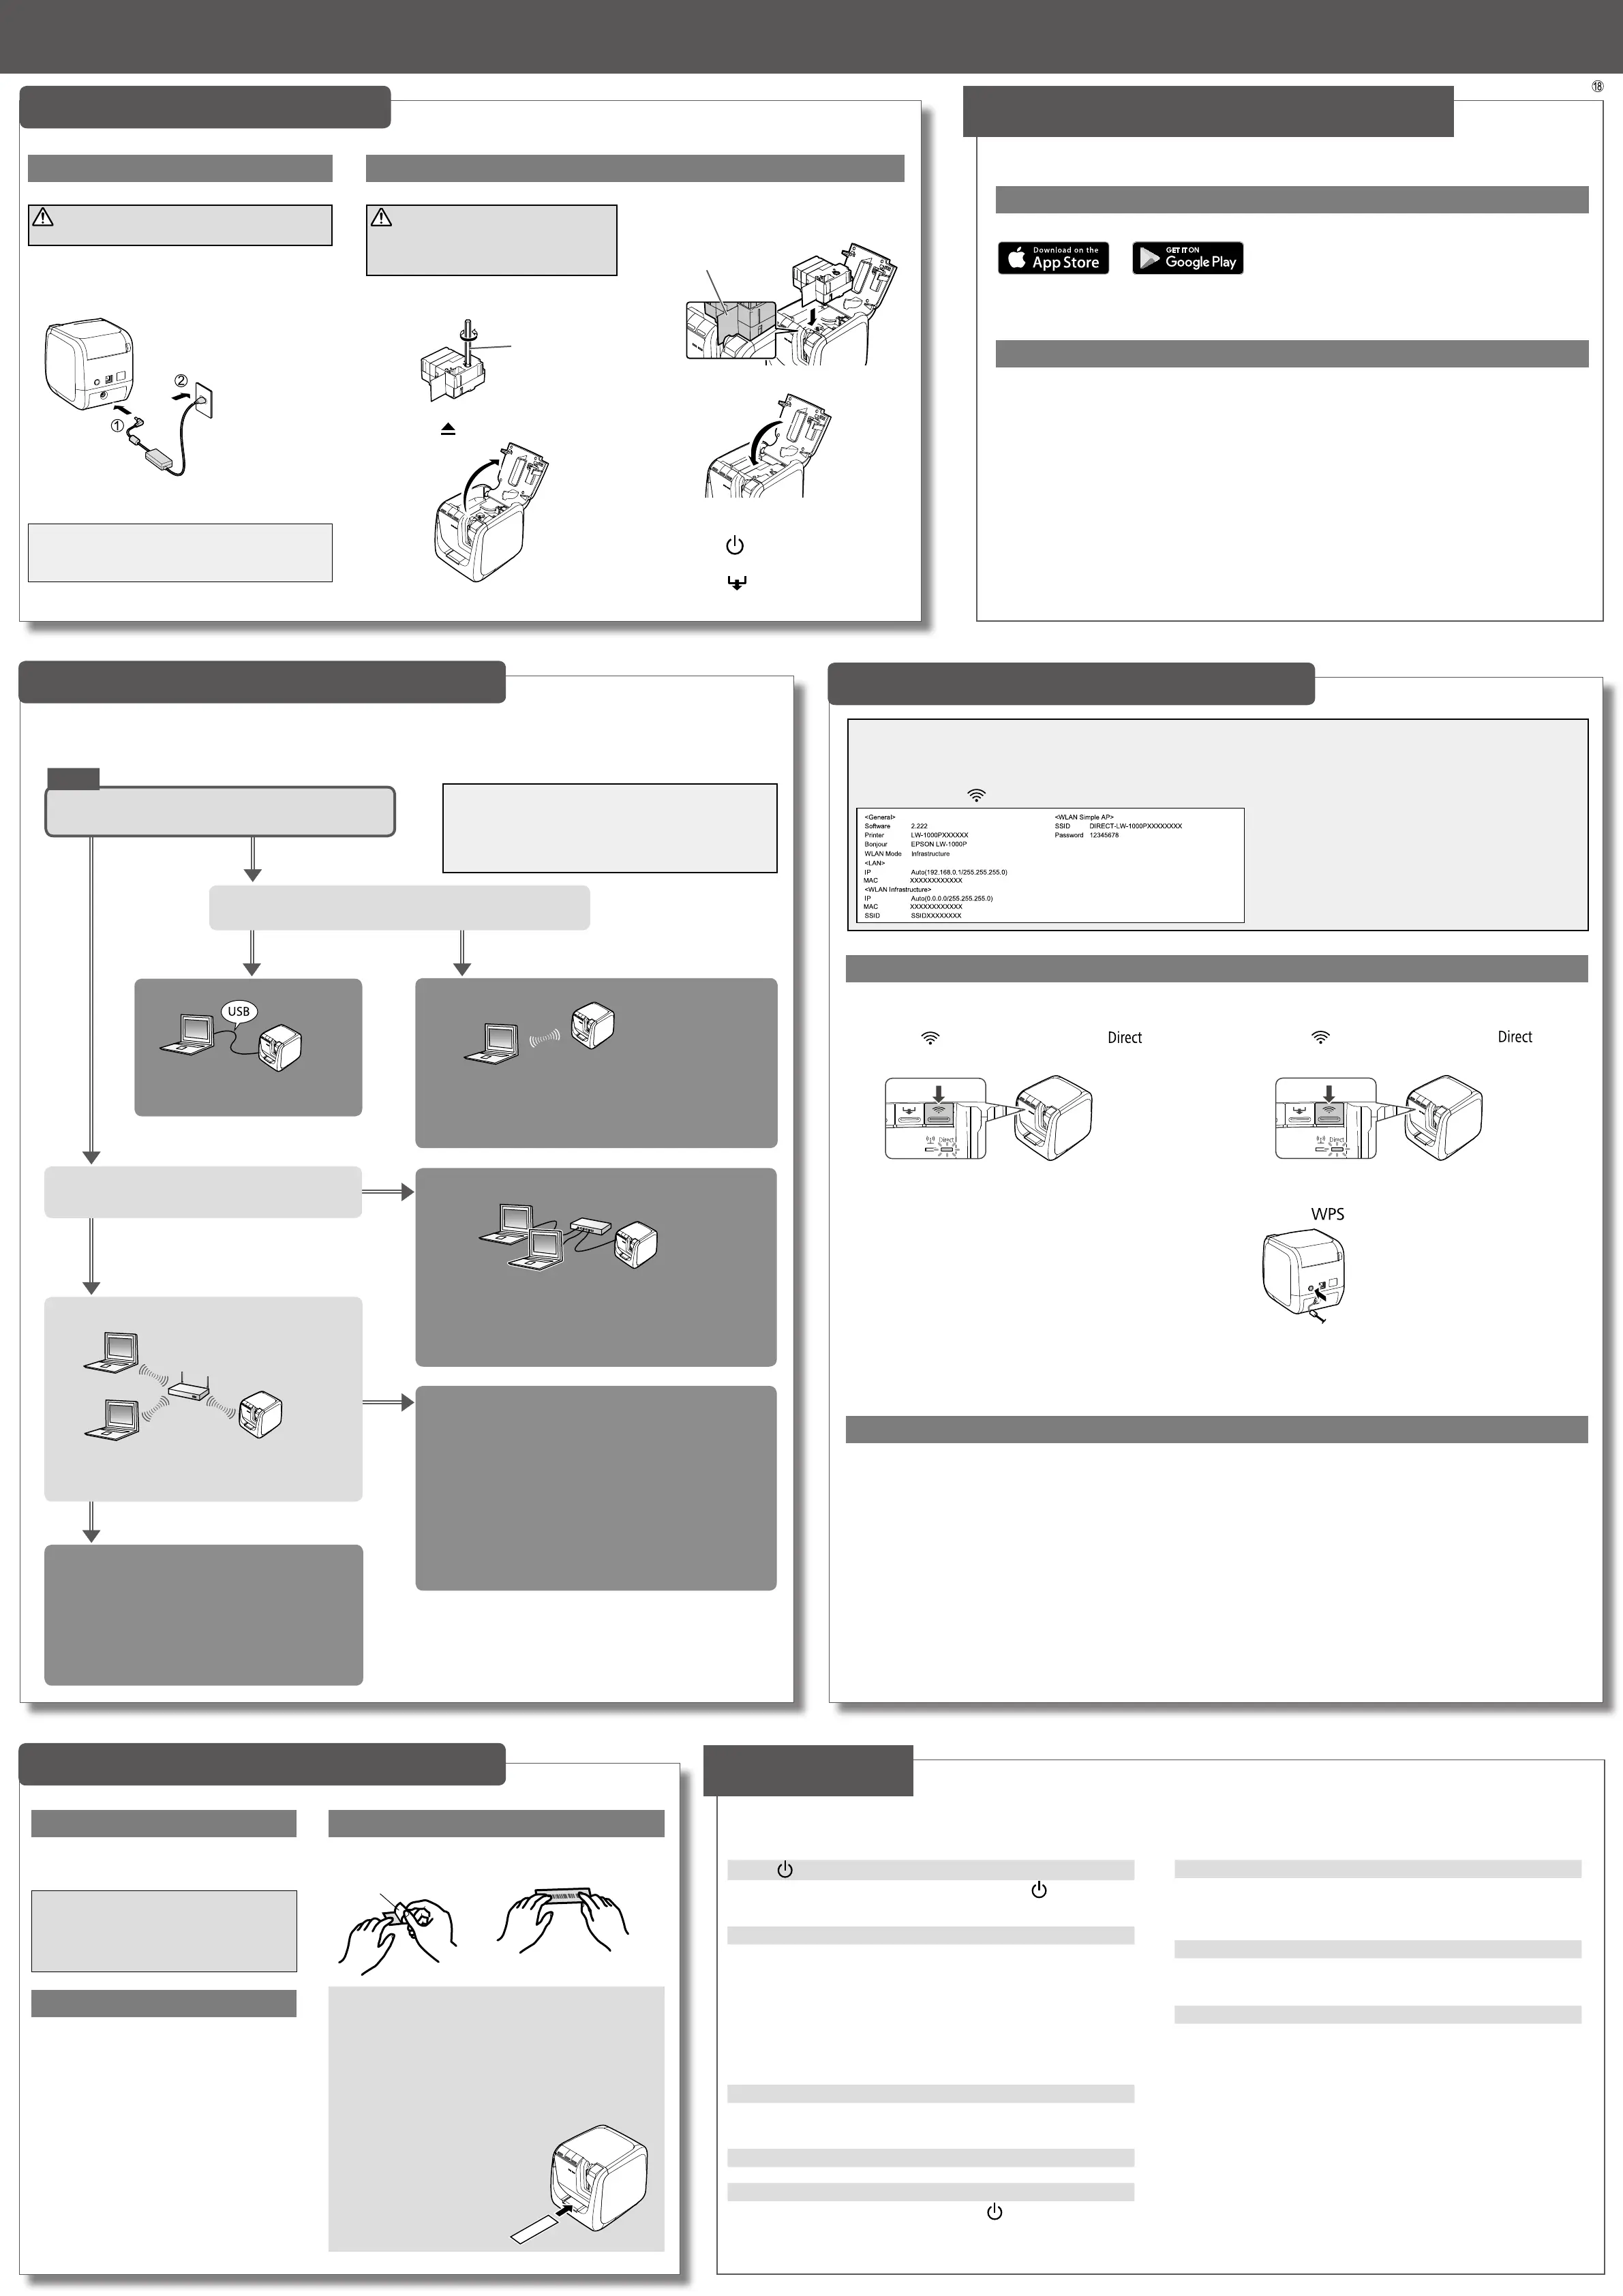
Using the Printer
CAUTION
Always perform the tape feed operation
after inserting a tape cartridge in the
printer.
1.
Remove any slack in the tape inside the
tape cartridge.
Use a pen or
a pencil.
2.
Press the button to open the top cover.
CAUTION
Always use the AC adapter provided.
1.
Connect the AC adapter provided (AST1527Z1-1) to
the printer, and plug the power plug into a power
outlet.
Create a label using software such as EPSON Label
Editor or iLabel.
MEMO
Epson has a variety of custom tapes available for
many dierent applications.
For more information, see the Supplies Catalog
provided with the printer.
s
Supplies Catalog
MEMO
If you set the tape cutting method to "Half cut", only the label
surface is cut when several labels are printed consecutively,
making it easier to peel o the labels.
See the Label Editor User's Guide for the detailed procedures.
s
Label Editor User’s Guide
Cutting rounded label corners
You can use the auto-trimmer to
round o label corners.
1.
Insert the tape in the tape
insertion slot, following the
guide.
The tape is cut to form rounded
label corners.
2.
Attach the label and rub it
rmly.
Printer Setup
Printer's button does not light.
Check that the power cable is properly connected. If the
button still does
not light, contact your place of purchase or the Epson customer support
center.
Printer does not print when print operation is directed.
• If a message is displayed on your computer screen, check the message
information.
• Check that connection cables are connected properly, that the tape
cartridge is mounted properly, and that the cover is closed properly.
• Have you selected the printer to be used? Printing will not be done
properly if another printer is selected.
• Did you restart the computer after installing the printer driver? The printer
driver may not be installed correctly if the computer was not restarted.
Reinstall the printer driver.
Text is not printed properly.
• Check that the tape cartridge is properly mounted.
• Print at a low speed. Change the setting in the printer settings of the
printer driver.
Lines appear on printed labels.
The print head is dirty. Clean the print head.
Canceling a print job
Check the printer's power in ON, then press the
button on the front of
the printer briey once.
Labels are not cut automatically
• Check if the cut setting is set to “Don’t cut” in the printer settings of the
Label Editor software.
s
Label Editor User’s Guide
• Is the cutter blade worn? Prolonged use of the cutter can wear down and
blunt the blade. Contact the Epson customer support center.
Half cut function doesn't work properly.
• Is the printer set to "Half cut" or "Don't cut"? Check the settings.
• Is the cutter blade worn? Prolonged use of the cutter can wear down and
blunt the blade. Contact the Epson customer support center.
Trimmer doesn't cut properly.
• Is the printer printing? The trimmer doesn't operate during printing.
• Was the label inserted properly in the trimmer tape insertion slot? Insert
the label into the slot following the guide.
• Is the printer clogged with tape scraps? Remove the trimmer cover, and
remove the tape scraps.
• Are you using 6 millimeter-wide tape? You cannot cut 6 millimeter-wide
tape with the trimmer.
• Is the cutter blade worn? Prolonged use of the cutter can wear down and
blunt the blade. Contact the Epson customer support center.
This section describes how to resolve printer operation and label printing problems.
See the Network Conguration Guide for how to deal with network settings or
connection problems.
Troubleshooting
Creating a Label
1. Connecting the power cable 2. Inserting the tape cartridge in the printer
1. Creating a label
When using a computer
1.
Click the Print icon.
When using a smart device
1.
Tap the Print icon.
2.
Select the LW-1000P.
2. Printing a label
3. Attaching a label
This section describes all the procedures from printer setup to printing and attaching a label.
The descriptions of computer connection and other procedures are for Windows.
If using the Mac, refer to the "Label Editor Lite for Macintosh User's Guide."
3.
Place a tape cartridge in the printer as
shown.
Pass the end of the tape
through the gap.
4.
Close the top cover.
5.
Perform the tape feed operation.
1) Press the
button to turn the printer
power ON.
2) Press the
button.
Auto power-o
The printer's power turns o automatically when the
printer has not been used for about 8 hours.
Download the Epson software necessary to create labels on your computer or mobile device, and to print them from
the printer.
The following pieces of software are necessary to use the printer from your computer.
• Printer driver /Network setting tool
• Label editing software
• User's Guide of the label editing software (as needed)
Windows
Download them from your local Epson website.
Search the software by its name "Label Editor".
U
http://www.epson.com
Mac
• Printer driver/User's Guide of the label editing software
Download them from your local Epson website.
Search the software by its name "Label Editor Lite".
U
http://www.epson.com
• Label editing software
Available on the App Store.
Search the software by its name "Label Editor Lite", then
install it.
Epson Applications (Install the following applications.)
• Epson iLabel
• Epson Datacom
Downloading Printer Driver and Software
Where to download the software
Mobile Device
Computer
Determining the computer connection method
Use the push button auto-connection function to set
the connection.
s
Network Conguration Guide
"Conguring settings for a wireless LAN using
automatic push button conguration (WPS)"
Can the computer to be connected to the printer be
connected to the Internet?
Does the computer have a wireless LAN function?
Is there a broadband router or access point, and is a
wireless LAN function supported?
Connect the printer with a USB cable.
s
Label Editor User’s Guide
The printer supports wireless LAN connection, wired LAN connection and USB cable connection.
The connection method will vary according to the environment it is installed in. Use the owchart below to carry out the connection procedure.
Connect the printer on a Wireless LAN (Infrastructure
Mode).
Does the access point have a WPS button?
Connect the printer on a Wireless LAN (Simple AP Mode).
s
Network Conguration Guide
"Setting up a wireless LAN connection (Simple AP Mode)"
Use one of the following methods to set the connection:
• Use a PIN code to set the connection
• Set the connection manually
s
Network Conguration Guide
"Wireless LAN settings using a PIN code (when
automatically acquiring the IP address from the printer)",
"Setting the IP address for the printer manually"
If a LAN cable is connected to the computer, a wired LAN
connection can be used.
s
Network Conguration Guide
"Conguring settings for a wired LAN connection"
Start
MEMO
Wireless LAN connection, wired LAN connection and USB
connection can be used at the same time in any combination.
Connecting a Mobile Device
Connecting to a printer one-to-one (Simple AP Mode)
Connecting manually
Select the SSID of the printer and connect.
1.
Press the button on the printer until the lamp
starts ashing to set the printer connection mode to Simple
AP mode.
2.
Enable Wi-Fi on the mobile device.
3.
From the network list, select the SSID of the printer and then
enter the password on the password entry screen.
Default setting upon purchase:
SSID: DIRECT-LW-1000PXXXXXXXXX
Password: 12345678
Connecting manually
Select the SSID of the access point and connect.
1.
Enable Wi-Fi on the mobile device.
2.
From the network list, select the SSID of the access point and
then enter the password on the password entry screen.
Connecting with WPS
This can be set when a mobile device supports WPS.
1.
Press the button on the printer until the lamp
starts ashing to set the printer connection mode to Simple
AP mode.
2.
Enable Wi-Fi on the mobile device and then tap the WPS
push button.
3.
Press the button on the printer.
Connecting to a printer connected to the network
Connecting with WPS
This can be set when a mobile device supports WPS.
1.
Enable Wi-Fi on the mobile device and then tap the WPS
push button.
2.
Press the WPS button on the access point.
MEMO
• For details of how to operate a particular mobile device, read the instruction manual for each device.
• For the SSID, password, etc. of the access point, read the instruction manual for each device or contact the network administrator.
• Checking the printer setting contents
When you press the
button on the printer for 3 seconds or more, a label is printed indicating the current settings.
Yes No
No Yes
Yes
No
No
Yes
 Loading...