Do you have a question about the Epson RS-232 and is the answer not in the manual?
Unpack projector and video processor, choose location, and connect HDMI cable.
Connect RS-232, plug in power, and turn on the video processor.
Set video processor output resolution to 720p 60Hz via Setup Mode.
Remove lens cap and turn on the projector using its power switch and remote.
Adjust focus, zoom, position using lens shift dials, and invert/keystone image.
Select HDMI input, set Color Mode to Natural, and Aspect Ratio to Through.
Follow user manual for further adjustments; color calibration requires a laptop.
This document describes the setup and initial configuration of an Epson PowerLite Pro Cinema projector and an accompanying HQV Video Processor. The guide is designed to help users quickly get their home theater system up and running, focusing on the essential steps for connection, basic image adjustment, and remote control operation.
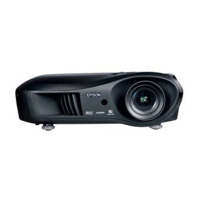
The Epson PowerLite Pro Cinema projector is a high-performance display device designed for home theater environments, capable of projecting large, high-quality images onto a screen. It works in conjunction with an HQV Video Processor, which is responsible for enhancing video signals before they reach the projector, ensuring optimal image quality, color accuracy, and motion handling. The video processor acts as an intermediary between various video sources (such as DVD players, Blu-ray players, or set-top boxes) and the projector, providing advanced video processing capabilities that improve the overall viewing experience. The system is designed to deliver a cinematic experience with sharp details, vibrant colors, and smooth motion.
The setup process begins with unpacking both the projector and the video processor. A crucial initial step involves attaching the serial number sticker from the video processor to its User Manual for future reference. The user then needs to select an appropriate location for the projector, taking into account factors like projection distance and screen size, as detailed in the projector's User's Guide.
Connecting the two main components is straightforward: an HDMI cable is used to link the video processor's output to the projector's HDMI input. For enhanced control, an optional 9-pin, null-modem RS-232 cable can be connected between the video processor and the projector. This allows the video processor to power the projector on or off, integrating the system's control.
Once the physical connections are made, the power cords for both devices are plugged in. It's important to ensure that batteries are installed in both the video processor's and the projector's remote controls, as these are essential for initial setup and ongoing operation. The video processor is powered on first using its rear power switch.
Upon powering on the video processor, the front display should show "Output=720P 60Hz." If it doesn't, the user can enter Setup Mode by pressing the POWER button on the video processor's remote. Within Setup Mode, the Menu button allows access to output resolution settings, where the user can adjust the "OUT = xxx" setting to "OUT = 720p 60 Hz" using the directional buttons. After setting the resolution, pressing the POWER button again returns the video processor to On Mode.
Before operating the projector, the protective lens pad and lens cap must be removed. The projector is then powered on using its rear power switch, followed by pressing the "On" button on its remote control.
Image adjustment is a key aspect of setting up the projector. The projector features focus and zoom rings on the lens, which allow the user to sharpen the image and adjust its size to fit the screen. For precise image positioning, the projector includes lens shift dials. These dials enable horizontal and vertical adjustments of the projected image without having to physically move or tilt the projector itself. A caution is provided against manually moving the lens, as this can damage the projector; all lens adjustments should be made using the dedicated dials.
For ceiling-mounted installations, the image needs to be inverted. This is done through the projector's menu: Settings > Projection > Front/Ceiling. If the projector is tilted up or down towards the screen, keystone adjustment is necessary to correct any trapezoidal distortion. This feature is accessed via the Menu: Settings > Keystone, and the directional buttons are used to make the adjustments.
Selecting the correct input source on the projector is crucial. The HDMI button on the projector's remote control is pressed to select HDMI as the input. Further image fine-tuning involves adjusting the Color Mode and Aspect Ratio. The Color Mode button allows the user to select "Natural" using the directional buttons, followed by pressing Select. Similarly, the Aspect button is used to choose "Through," ensuring the original aspect ratio of the content is maintained, again followed by pressing Select.
The guide emphasizes that any additional adjustments should be made by following the instructions in the video processor's User Manual. It also notes that the video processor is ISF-certified, meaning final color calibrations require connecting it to a laptop computer and using a specific software utility, as detailed in the video processor's Service Manual.
For users wishing to program a universal remote control, information on projector IR control codes can be found on the Epson support website.
While the document primarily focuses on initial setup, it implicitly touches upon maintenance through its instructions. For instance, the emphasis on using lens shift dials rather than manually moving the lens highlights a best practice for preventing damage, which is a form of preventative maintenance. The instruction to remove the lens cap and pad before operation also implies that these should be replaced when the projector is not in use to protect the lens from dust and scratches.
The mention of the video processor being ISF-certified and requiring a laptop for final color calibrations suggests that professional calibration might be part of the ongoing maintenance to ensure optimal image quality over time. Although not explicitly stated as "maintenance," keeping the firmware updated (if applicable) and recalibrating the system periodically would fall under maintaining peak performance.
The guide's emphasis on consulting the User Manuals for both the projector and the video processor for additional adjustments and the Service Manual for advanced calibration implies that these resources contain detailed information on troubleshooting, care, and potentially routine maintenance tasks that are beyond the scope of this quick setup guide. Proper handling of the devices, such as ensuring batteries are installed and power cords are correctly connected, also contributes to the longevity and reliable operation of the system.
| Data Bits | 8 |
|---|---|
| Stop Bits | 1 |
| Function | Projector Control |
| Connector Type | DB-9 |
| Baud Rate | 9600 bps (Typical), 4800 bps, 19200 bps, 38400 bps |
| Interface Type | RS-232 |