Using the Online Reference Guide
Follow these steps to access the online
Reference Guide
.
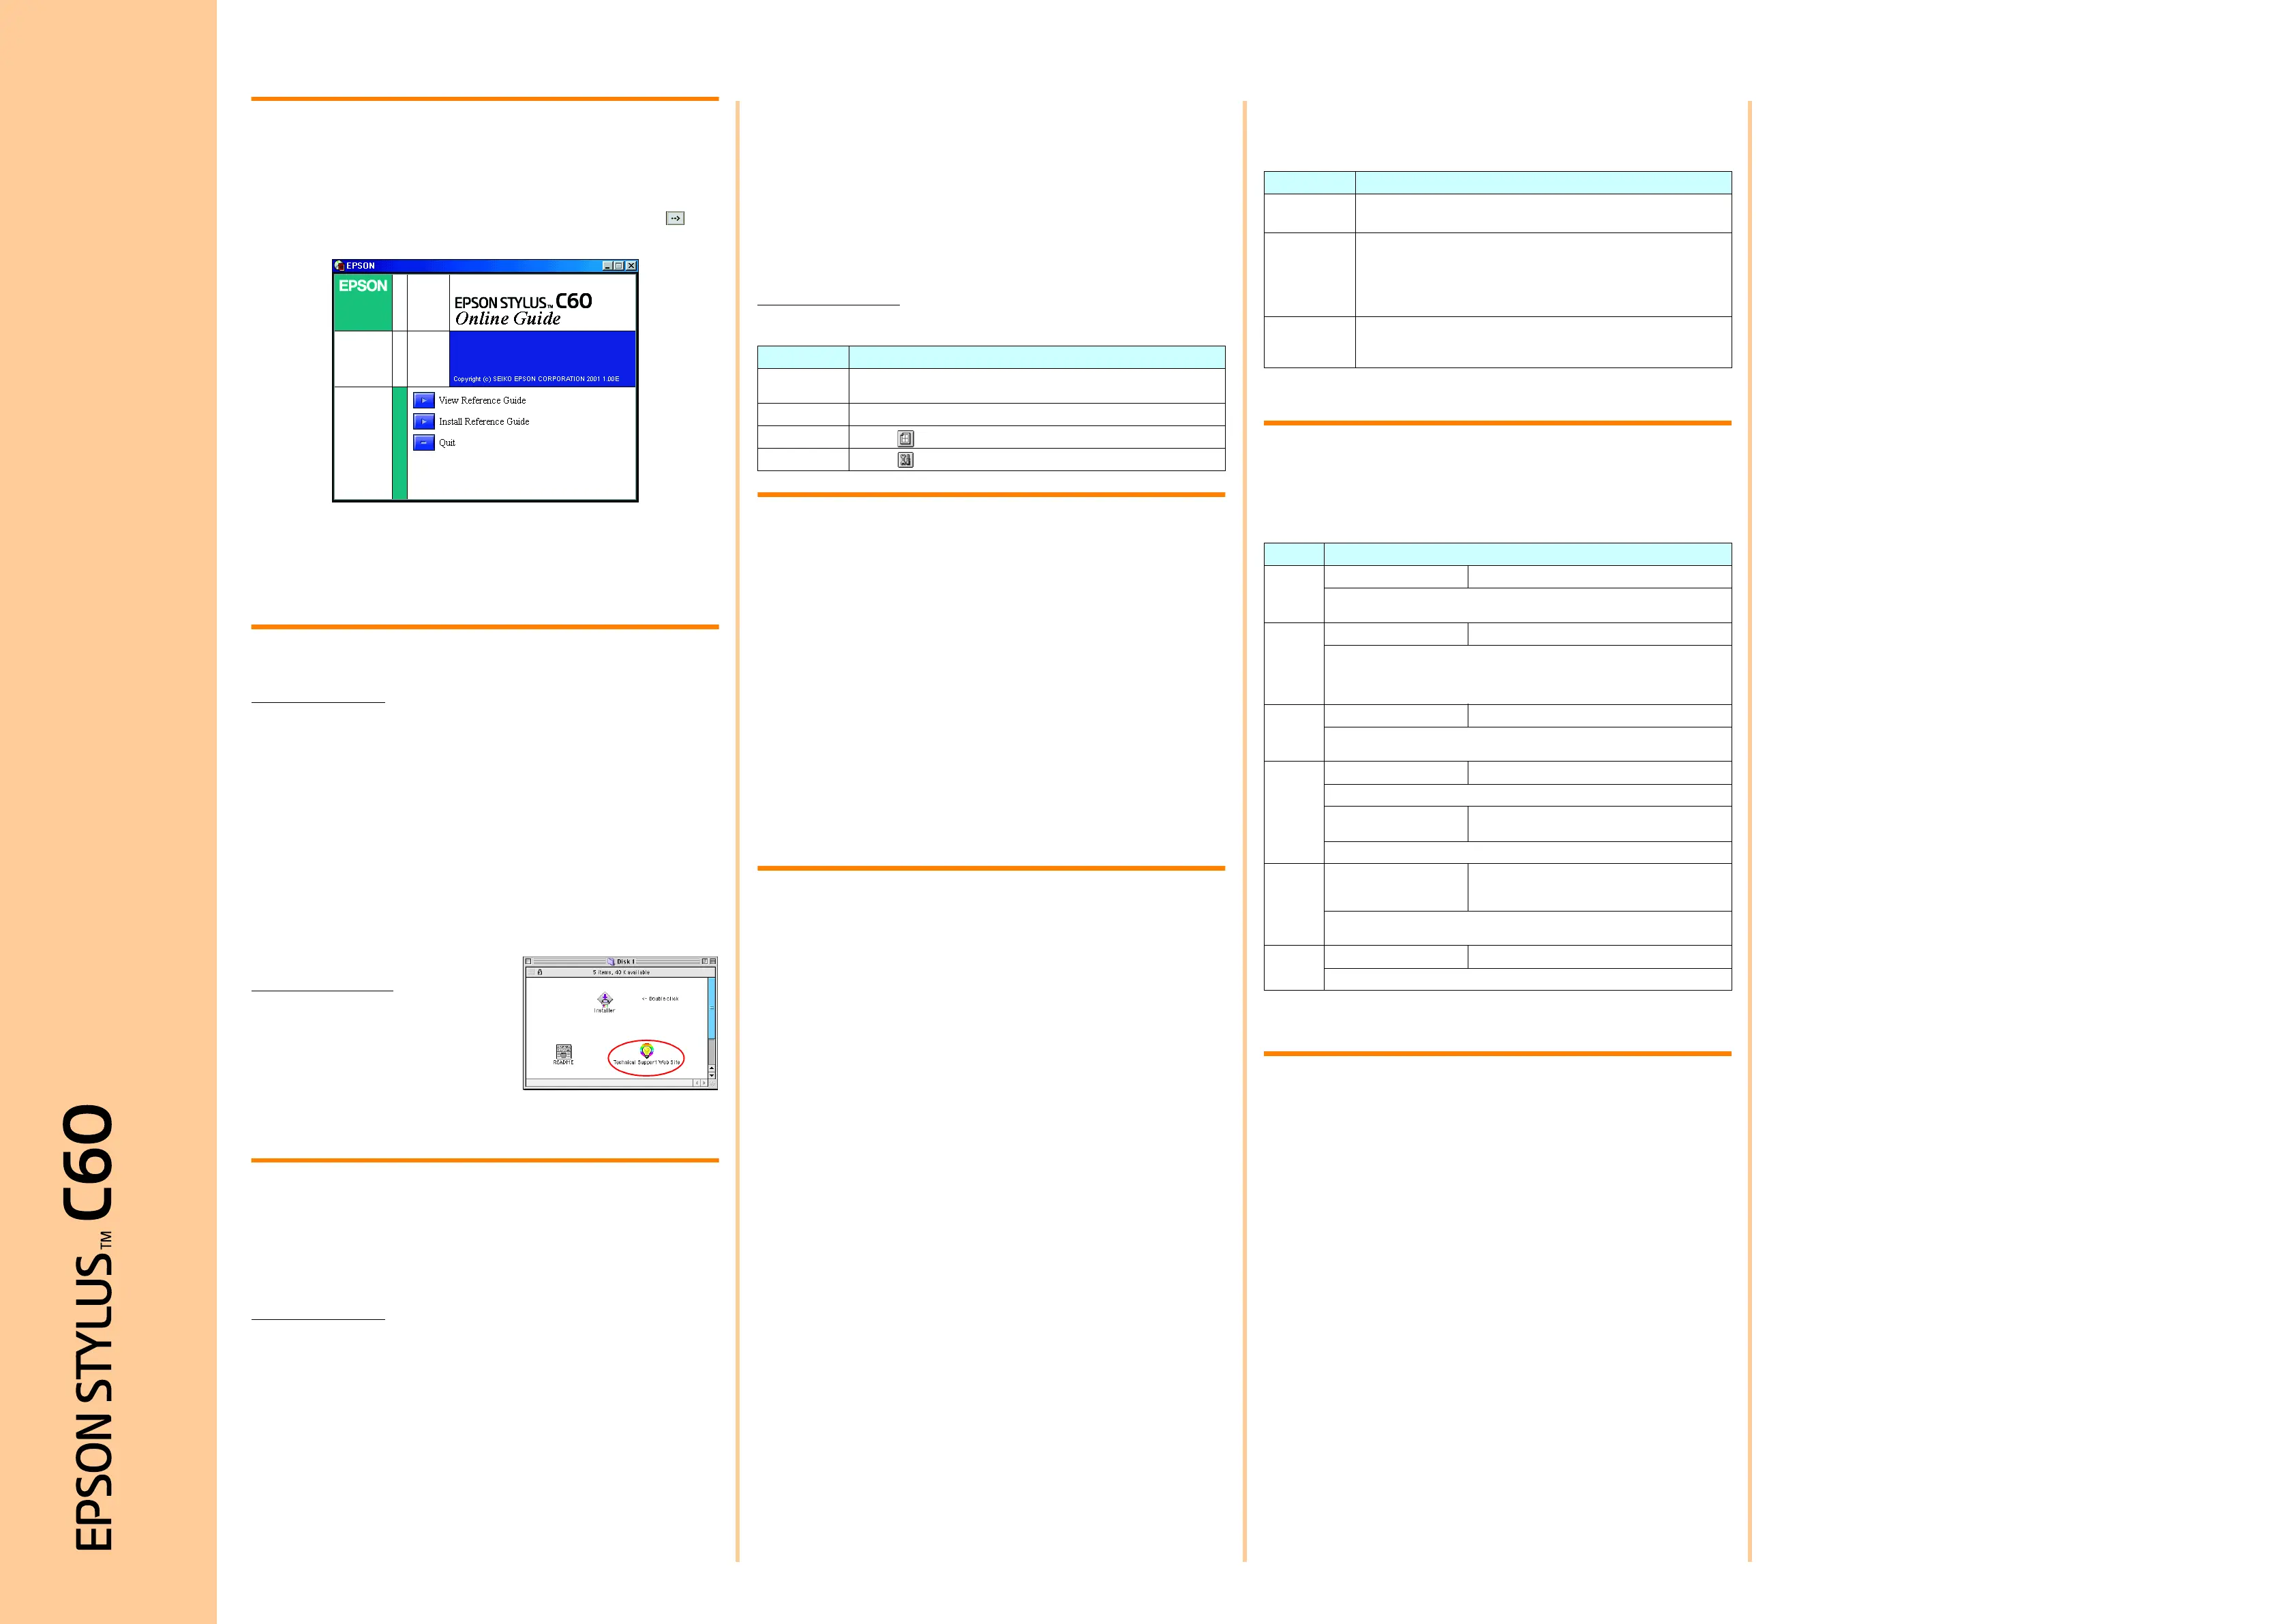
1. Insert the printer software CD in the CD-ROM drive.
2. For Windows, select Online Guide
Online Guide Online Guide
Online Guide in the Installer dialog box and click . For
Macintosh, double-click the Online Guide
Online GuideOnline Guide
Online Guide.
3. To view the guide from the CD, click View Reference Guide
View Reference GuideView Reference Guide
View Reference Guide.
To install the guide, click Install Reference Guide
Install Reference GuideInstall Reference Guide
Install Reference Guide and follow the on-screen
instructions. When installation is complete, an ES C60 Guide
ES C60 GuideES C60 Guide
ES C60 Guide icon (Windows) or
a View Reference Guide
View Reference GuideView Reference Guide
View Reference Guide icon (Macintosh) appears in the EPSON folder.
Double-click the icon to open the guide.
Online Problem solving
For Windows users
The Problem Solver and EPSON 掇 Technical Support Web Site provide you with tips
to help solve any problems you may encounter when using your printer. Access the
Problem Solver or Technical Support in one of following ways:
❏ From the Windows Start menu
Click Start
StartStart
Start, point to Programs
ProgramsPrograms
Programs and then to Epson
EpsonEpson
Epson, then click ES C60 Problem Solver
ES C60 Problem SolverES C60 Problem Solver
ES C60 Problem Solver.
❏ From Status Monitor 3
Click Technical Support
Technical SupportTechnical Support
Technical Support in the Status Monitor 3 dialog box.
❏ From your printer software
Click Technical Support
Technical SupportTechnical Support
Technical Support on the Main menu of the printer software.
For further information on the customer support services available in your area, see the
online
Reference Guide
.
For Macintosh users
EPSON 掇 Technical Support Web Site provides
help with problems that cannot be solved using
the troubleshooting information in your printer
documentation. To access Technical Support,
insert the CD in the CD-ROM drive and
double-click the Technical Support Web Site
Technical Support Web SiteTechnical Support Web Site
Technical Support Web Site
icon in the Install Software
Install Software Install Software
Install Software folder. For further information on the customer support
services available in your area, see the online
Reference Guide
.
Accessing the Printer Software
The printer software includes a printer driver and utilities. The printer driver lets you
choose from a wide variety of settings to get the best results from your printer. The
printer utilities help you check the printer and keep it in top operating condition. Access
the printer software as explained in this section.
For Windows users
There are three ways to access the printer software.
From Windows applications
1. From the File
File File
File menu of your application, click Print
PrintPrint
Print. The Print dialog box appears.
2. Select your printer, then click Properties
PropertiesProperties
Properties, Printer
PrinterPrinter
Printer, Setup
SetupSetup
Setup or Options
OptionsOptions
Options to access the
printer software. (Depending on your application, you need to click a combination
of these buttons.
Note:
Note:Note:
Note:
When you access the printer software from a Windows application, the settings that you
make apply only to the application you are using.
From the Start menu
1. Click Start
StartStart
Start, point to Settings
SettingsSettings
Settings, then click Printers
PrintersPrinters
Printers.
2. Select your printer, then click Properties
PropertiesProperties
Properties on the File
FileFile
File menu. If you are Windows
2000 user, select your printer, then click Printing Preferences
Printing PreferencesPrinting Preferences
Printing Preferences on the File
FileFile
File menu.
From the taskbar
1. Right-click the printer icon on the taskbar.
2. Select Printer Settings
Printer SettingsPrinter Settings
Printer Settings.
For Macintosh users
You can access the various printer software dialog boxes as described below.
Printing on Special Media
You can print on a wide variety of special media 舡 ncluding ink jet paper, photo quality
glossy film, photo paper, transparencies, index cards, and adhesive sheets 胊 nd several
sizes of envelopes.
❏ Read the instructions in the media package first.
c
Caution:
Caution:Caution:
Caution:
Cleaning sheets packaged with EPSON special media should not be used
with this printer. The cleaning function performed by these sheets is not
necessary with this type of printer, and the sheets could jam in the printer.
❏ Load the media printable side up in the sheet feeder. See the instructions packed
with the media to determine which side is the printable side.The loading capacity
varies by model. For more details on using special media, see 涑 aper Handling
in the online
Reference Guide
.
❏ Make sure that the paper stack fits under the tabs inside the edge guide, and does
not exceed the loading limit indicated by the arrow mark on the left edge guide.
Replacing Ink Cartridges
You can replace an ink cartridge by using the Status Monitor utility installed on your
computer, or by using the printer's control panel. To replace an ink cartridge or check
ink levels using the Status Monitor utility, refer to 浞 sing the Status Monitor in the
online
Reference Guide
. To replace an ink cartridge using the printer's control panel,
follow the steps in this section.
Note:
Note:Note:
Note:
❏
You cannot continue printing with one ink cartridge empty, even if the other
cartridge still contains ink. Before printing, replace the empty cartridge.
❏
In addition to the ink used during document printing, ink is consumed during the
print head cleaning operation, during the self-cleaning cycle which is performed
when the printer is turned on, and during ink charging when the ink cartridge is
installed in the printer.
1. Make sure that the printer is on, but not printing. Then open the printer cover.
2. Press the
e
ink cartridge replacement button. The print head moves to the ink
replacement position.
c
Caution:
Caution:Caution:
Caution:
Do not move the print head by hand, as this may damage the printer. Always
press the
e
ink cartridge replacement button to move it.
3. Install the new ink cartridges (Black: T028, Color: T029) as explained on the reverse
side of this sheet in the . Install the ink cartridges section.
Note:
Note:Note:
Note:
Dispose of the used cartridge properly. Do not take it apart or try to refill it.
Panel Operation
See the online
Reference Guide
for details.
Error Indicators
You can identity many common problems using lights on the printer 掇 control panel.
Use the following table of panel light patterns to diagnose the problem, then follow the
recommended corrective measures.
O
= on,
N
= off,
F
= flashing
* EPSON Status Monitor 3 is for Windows; EPSON StatusMonitor is for Macintosh.
Safety Instructions
Read all of the instructions in this section when setting up and using your printer.
When choosing a place for the printer
❏ Avoid places subject to rapid changes in temperature and humidity. Also, keep the
printer away from direct sunlight, strong light, or heat sources.
❏ Avoid places subject to dust, shocks, and vibrations.
❏ Leave enough room around the printer to allow for sufficient ventilation.
❏ Place the printer near a wall outlet where the plug can be easily unplugged.
❏ Place the printer on a flat, stable surface that extends beyond the printer base in all
directions. The printer will not operate properly if it is tilted at an angle.
When choosing a power source
❏ Use only the type of power source indicated on the printer 掇 label.
❏ Do not use a damaged or frayed power cord.
❏ If you use an extension cord with the printer, make sure that the total ampere rating
of the devices plugged into the extension cord does not exceed the cord 掇 ampere
rating. Also, make sure that the total ampere rating of all devices plugged into the
wall outlet does not exceed the wall outlet 掇 ampere rating.
❏ If you plan to use the printer in Germany, the building installation must be protected
by a 10 or 16 amp circuit breaker to provide adequate short-circuit protection and
over-current protection for this printer.
When handling ink cartridges
❏ Do not open the ink cartridge packages until just before you install them.
❏ Keep ink cartridges out of the reach of children. Do not allow children to drink
from or otherwise handle the cartridges.
❏ Be careful when you handle used ink cartridges, as there may be some ink remaining
around the ink supply port. If ink gets on your skin, wash the area thoroughly with
soap and water. If ink gets into your eyes, flush them immediately with water. If
discomfort or vision problems remain after a thorough flushing, see a doctor
immediately.
❏ Do not shake the ink cartridges; this can cause leakage.
❏ You must remove the yellow tape seals from the cartridges before installing them;
otherwise, the cartridges will become unusable.
❏ Do not remove the blue portion of the tape seal from the top of the cartridges.
❏ Do not remove the tape seals from the bottom of the cartridges.
❏ Do not touch the green IC chip on the side of the cartridge. this may affect normal
operation and printing.
❏ The IC chip on this ink cartridge retains a variety of cartridge related-information,
such as the amount of ink remaining, so that a cartridge may be removed and
reinserted freely. However, each time the cartridge is inserted, some ink is
consumed because the printer automatically performs a reliability check.
When using the printer
❏ Do not put your hand inside the printer or touch the ink cartridges during printing.
❏ Do not block or cover the openings in the printer 掇 cabinet.
❏ Do not attempt to service the printer yourself.
❏ Unplug the printer and refer servicing to qualified service personnel under the
following conditions:
The power cord or plug is damaged; liquid has entered the printer; the printer has
been dropped or the cabinet damaged; the printer does not operate normally or
exhibits a distinct change in performance.
❏ Do not insert objects through the slots in the printer 掇 cabinet.
❏ Take care not to spill liquid on the printer.
Dialog Box
Dialog BoxDialog Box
Dialog Box How to Access
How to AccessHow to Access
How to Access
Print Click Print
PrintPrint
Print on the File menu of your application or click Options
OptionsOptions
Options in the Page Setup
dialog box.
Page Setup Click Page Setup
Page SetupPage Setup
Page Setup on the File menu of your application.
Layout Click the Layout icon button in the Print dialog box.
Utility Click the Utility icon button in the Print or Page Setup dialog box.
Button
ButtonButton
Button Function
FunctionFunction
Function
P
power
Turns the printer on and off.
Clears the printer 掇 memory if pressed twice while the power is on.
b
maintenance
Loads or ejects paper if pressed and released within three seconds.
Resumes printing if pressed and released after a paper out error.
Performs print head cleaning if pressed for three seconds when the
b
error light is off.
Moves the print head to the ink cartridge replacement position and charges ink to the
printer when ink is out.
e
ink cartridge
replacement
Moves the print head to the ink cartridge replacement position and charges ink to the
printer.
Lights
LightsLights
Lights Problem and Solution
Problem and SolutionProblem and Solution
Problem and Solution
O b
Paper out
Paper outPaper out
Paper out No paper is loaded in the printer.
Check EPSON Status Monitor 3* or EPSON StatusMonitor*. Load paper in the sheet feeder,
then press the
b maintenance button. The printer resumes printing and the light goes out.
O b
Paper jam
Paper jamPaper jam
Paper jam Paper has jammed in the printer.
Check EPSON Status Monitor 3* or EPSON StatusMonitor*. Press the
bmaintenance button
to eject the jammed paper. If the error does not clear, open the printer cover and remove all of
the paper inside, including any torn pieces.Then reload the paper in the sheet feeder and press
the
b maintenance button to resume printing.
F b
Ink low
Ink lowInk low
Ink low The black or color ink cartridge is nearly empty.
Obtain a replacement black or color ink cartridge. To determine which cartridge is nearly empty,
check the ink level using EPSON Status Monitor 3* or EPSON StatusMonitor*.
O b
Ink out
Ink outInk out
Ink out The black or color ink cartridge is empty or is not installed.
Replace the black or color ink cartridge with a new one.
Wrong cartridge
Wrong cartridgeWrong cartridge
Wrong cartridge The installed black or color ink cartridge cannot be used by
this printer.
Use the appropriate black or color ink cartridge.
N P
O b
Carriage error
Carriage errorCarriage error
Carriage error The print head carriage is obstructed by jammed paper or
other foreign material and cannot return to the home
position.
Turn off the printer. Open the printer cover and remove any paper from the paper path by
hand.Then, turn the printer back on. If the error does not clear, contact your dealer.
F P
F b
Unknown printer error
Unknown printer errorUnknown printer error
Unknown printer error An unknown printer error has occurred.
Turn off the printer and contact your dealer.
Quick
Guide
Keep this sheet handy for quick reference.
C
CC
Cu
uu
us
ss
st
tt
to
oo
om
mm
me
ee
er
rr
r
S
SS
Su
uu
up
pp
pp
pp
po
oo
or
rr
rt
tt
t:
::
: The United Kingdom and the Republic of Ireland (www.epson.co.uk); Australia (www.epson.com.au);
Singapore (www.epson.com.sg); Hong Kong (www.epson.com.hk); Malaysia (www.epson.com.my); India (www.epson.co.in);
Philippines (Phone: (632) 813-6552)
C
CC
Co
oo
ol
ll
lo
oo
or
rr
r
I
II
In
nn
nk
kk
k
J
JJ
Je
ee
et
tt
t
P
PP
Pr
rr
ri
ii
in
nn
nt
tt
te
ee
er
rr
r
English
Copyright 2001 by SEIKO EPSON CORPORATION, Nagano, Japan. Printed in XXXX
 Loading...