4107165 Rev.0
1-B C
4107165 Rev.0
1-B M
4107165 Rev.0
1-B Y
4107165 Rev.0
1-B K
continue
Consulte estas fuentes para más información:
Look here for answers:
Guía de referencia rápida • Quick Guide
Incluye información sobre cómo utilizar la Stylus CX.
Basic steps for using the Epson Stylus CX.
Manual del usuario en formato electrónico • On-screen User’s Guide
Haga clic en el icono de escritorio para acceder información sobre
el producto.
Click the desktop shortcut for easy access to Epson Stylus CX information.
Ayuda electrónica del software • On-screen help with your software
Haga clic en Ayuda o en ? cuando utilice el software.
Select Help or ? when you’re using your software.
Soporte técnico de Epson • Epson Technical Support
• Internet
http://www.latin.epson.com
• Soporte telefónico • Telephone Services
Argentina (54-11) 5167-0300
Chile (56-2) 230-9500
Colombia (57-1) 523-5000
Costa Rica (50-6) 210-9555
(800) 377-6627
México
México D.F. (52 55) 1323-2052
Resto del país (01-800) 087-1080
Perú (51-1) 418-0210
Venezuela (58-212) 240-1111
¿Preguntas?
Any Questions?
6
Instale el software
Install Software
El software funciona con Windows
®
98SE, Me, 2000, XP y XP Professional
x64 Edition y Macintosh
®
OS X 10.2.x a 10.4.x (incluyendo los procesadores
Intel
®
Core
™
Duo o Solo).
Your software works with Windows
®
98SE, Me, 2000, XP, XP Professional
x64 Edition, and Macintosh
®
OS X 10.2.8 and 10.4.x (including Intel
®
Core
™
Duo or Solo).
Windows
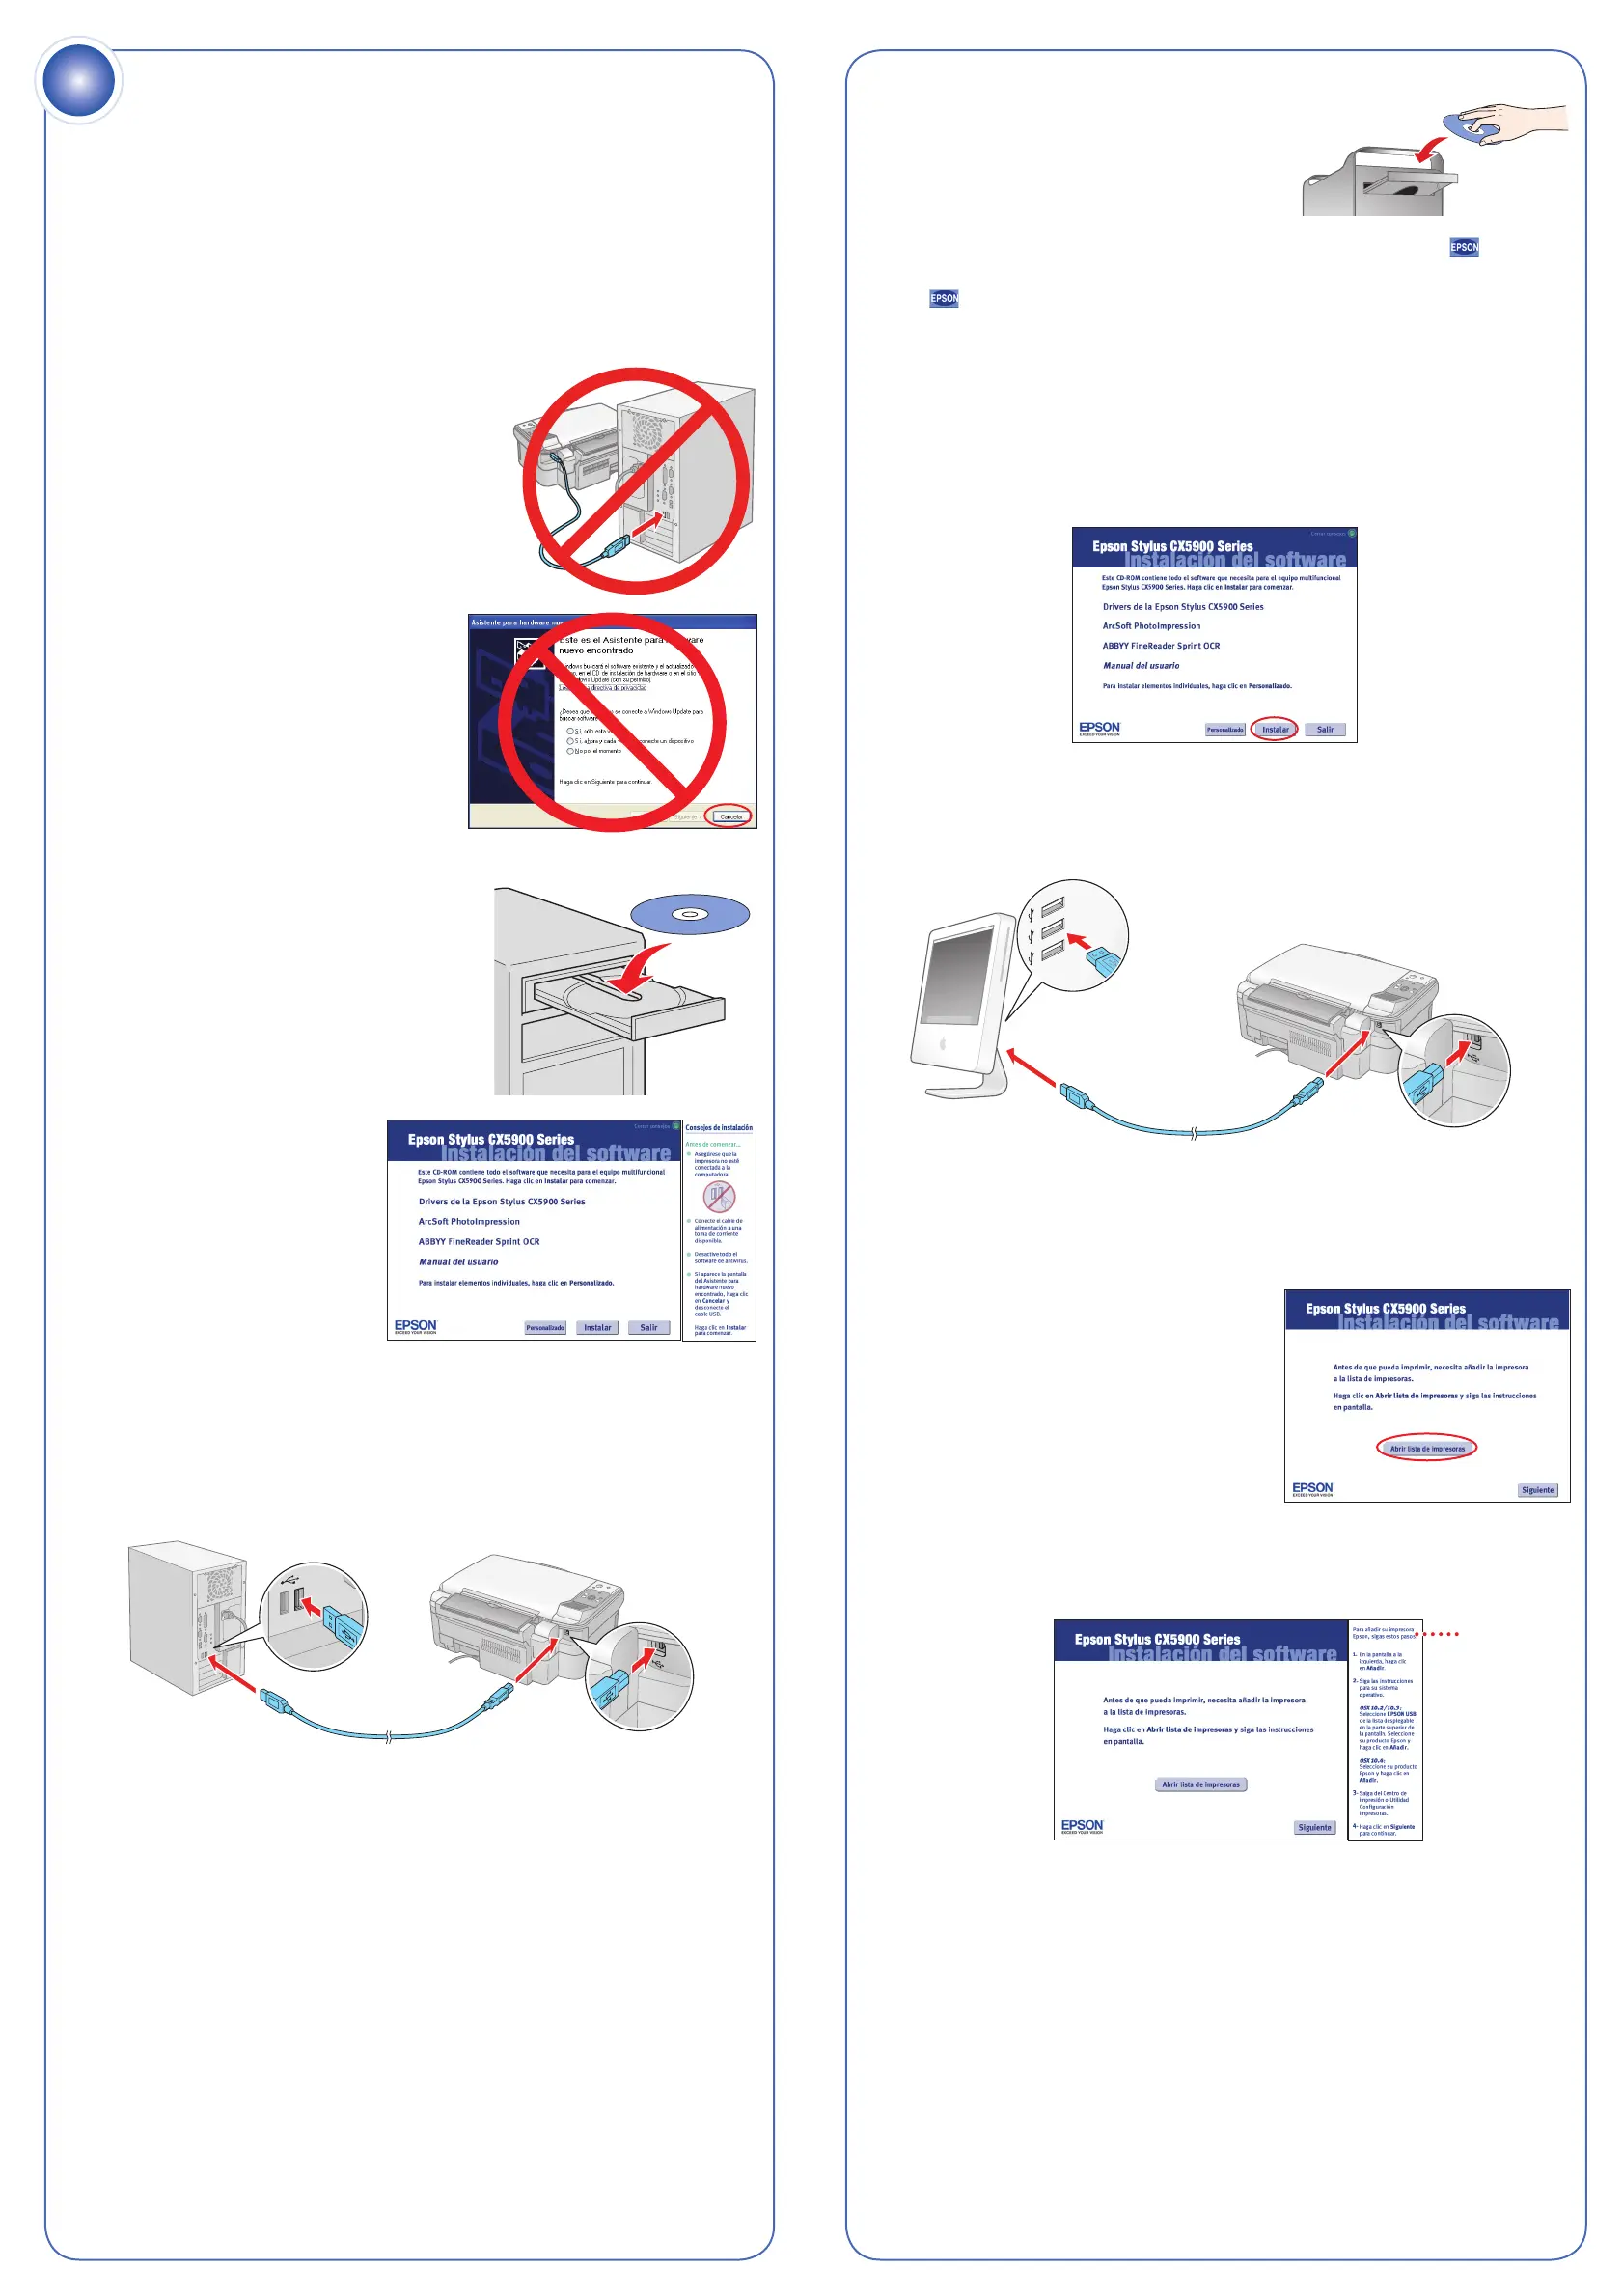
1 Verifique que la Stylus CX NO ESTÉ
CONECTADA a la computadora.
Make sure the Epson Stylus CX is NOT
CONNECTED to your computer.
Nota: si ve una pantalla como esta,
haga clic en Cancelar y desconecte
el cable USB. No puede instalar el
software de esta manera.
Note: If you see a screen like this,
click Cancel and disconnect the
USB cable. You can’t install your
software that way.
2 Coloque el CD de la Stylus CX en la
unidad de CD-ROM.
Insert the Epson Stylus CX CD.
3 Seleccione Español.
Select English.
4 Haga clic en Instalar y
siga las instrucciones que
aparezcan en pantalla. La
instalación del software se
tarda varios minutos.
Click Install and follow the
on-screen instructions.
Software installation takes
several minutes.
5 Haga clic en Aceptar.
Click Agree.
6 Cuando el sistema se lo indique, conecte el cable USB. Utilice
cualquier puerto USB disponible.
When prompted, connect the USB cable. Use any open USB
port on your computer.
Nota: si la instalación no continúa después de unos momentos,
verifique que la Stylus CX está encendida y conectada.
Note: If installation doesn’t continue after a moment, make sure you
securely connected and turned on the Epson Stylus CX.
7 Cuando termine, retire el CD y reinicie su computadora.
When you’re done, remove the CD and restart your computer.
Está listo para hacer fotocopias, imprimir y escanear. Consulte la Guía de
referencia rápida o el Manual del usuario de la impresora.
You’re ready to copy, print, and scan! See the Quick Guide or your on-screen
User’s Guide.
Macintosh
1 Coloque el CD de la Stylus CX en la
unidad de CD-ROM.
Insert the Epson Stylus CX CD.
2 Haga clic en el icono de CD Epson y haga clic en el icono .
Open the Epson CD-ROM desktop icon and double-click the
Epson icon.
3 Seleccione Español.
Select English.
4 Haga clic en Instalar y siga las instrucciones que aparezcan en
pantalla. Haga clic en Salir para continuar con la instalación. La
instalación del software se tarda varios minutos.
Click Install and follow the on-screen instructions. Click Quit to
continue the installation. Software installation takes several minutes.
5 Cuando el sistema se lo indique, conecte el cable USB. Utilice
cualquier puerto USB disponible.
When prompted, connect the USB cable. Use any open USB port on
your computer.
Nota: si la instalación no continúa después de unos momentos,
verifique que la Stylus CX esté encendida y conectada.
Note: If installation doesn’t continue after a moment, make sure you
securely connected and turned on the Epson Stylus CX.
6 Cuando vea esta pantalla, haga clic en
Abrir lista de impresoras.
When you see this screen, click Open
the Printer List.
7 Después siga las instrucciones que aparecen a la derecha de la
pantalla para agregar la impresora a la lista.
Then follow the tips to the right to add the printer.
8 Si es necesario, haga clic en Siguiente una vez más.
Click Next again, if necessary.
9 Siga las instrucciones que aparezcan en pantalla para instalar el resto
del software y para imprimir una hoja de prueba.
Follow the on-screen instructions to install the rest of the software and
print a test page.
10 Retire el CD y reinicie la Macintosh.
Eject the CD and restart your Macintosh.
Está listo para hacer fotocopias, imprimir y escanear. Consulte la Guía de
referencia rápida o el Manual del usuario de la impresora.
You’re ready to copy, print, and scan! See the Quick Guide or your on-screen
User’s Guide.
Panel de control
Control panel
Epson y Epson Stylus son marcas registradas y “Exceed You Vision” es marca comercial de Seiko
Epson Corporation. DURABrite es marca registrada de Epson America, Inc.
Aviso general: los otros nombres de productos utilizados en el presente se utilizan con fines de
identificación solamente y pertenecen a sus respectivos propietarios. Epson niega todo y cualquier
derecho sobre dichas marcas.
Epson and Epson Stylus are registered trademarks and Exceed You Vision is a trademark of Seiko
Epson Corporation. DURABrite is a registered trademark of Epson America, Inc.
General Notice: Other product names used herein are for identification purposes only and may be
trademarks of their respective owners. Epson disclaims any and all rights in those marks.
© 2006 Epson America, Inc. 7/06
Impreso en XXXXXX
Printed in XXXXXX
XX.XX-XX XXX CPD-22259
Para los mejores resultados, utilice tinta y papel Epson auténticos.
Adquiéralos en tiendas locales o comuníquese con Epson para localizar un
distribuidor.
For the best prints and copies, use genuine Epson ink and paper. Get them
from your local store or contact Epson for dealer referral.
Premium Glossy Photo Paper
Papel de alto gramaje de un acabado
altamente brillante que le ayudará a
obtener bellísimas fotografías en una
distinta variedad de tamaños, con o sin
márgenes.
Epson ofrece una selección de excelentes
papeles. Consulte el listado includo en la
Guía de referencia rápida.
Premium Glossy Photo Paper
Heavyweight paper with a high gloss finish
for beautiful photographs in a variety of
sizes, with borders or borderless.
Other fine Epson papers are available.
See your Quick Guide for details.
Papel y tinta Epson
Epson Paper and Ink
T073120
Negro
Black
T073320
Magenta
T073420
Amarillo
Yellow
T073220
Cian
Cyan
Luz Encender
On light
Indicador Error
Error light
Ventanilla de copiado,
muestra el número de
copias.
Copies window displays
the number of copies.
Botones Iniciar
Start Color button
Oprima este botón para
imprimir datos contenidos
en una tarjeta de memoria.
Press this button to print
from a memory card.
Oprima este botón para
seleccionar el tipo de papel.
Press this button to select
your paper type.
Oprima este botón para
seleccionar el tipo de papel.
Press this button to select
your paper size.
Oprima este botón para
reducir o ampliar la copia de
acuerdo al tamaño del papel
que elegió.
Press this button to reduce
or enlarge your copy to the
selected paper size.
Oprima este botón para
seleccionar el número
de copias.
Press this button to
select the number of
copies you want.
Luz Encender
On light
Botón Iniciar
Start button
Pantalla del visor
fotográfico
Photo viewer screen
Oprima este botón para
copiar documentos.
Press this button to
copy documents.
Oprima este botón para
acceder a las utilidades,
limpiar el cabezal de
impresión, etc.
Press this button to
access utilities, clean
your print head, etc.
Oprima este botón
para copiar fotos.
Press this button
to copy photos.
Oprima este botón
para imprmir datos
contenidos en una
tarjeta de memoria.
Press this button to
print from a memory
card.
CX5900
CX4900
Consejos
Tips

 Loading...