9 Oprima el botón OK para cargar la tinta. La carga tarda
aproximadamente 2 minutos.
Press the OK button to charge the ink. Charging takes about 2 minutes.
Precaución: no apague la impresora TX300F mientras esté cargando la tinta
o desperdiciará tinta.
Caution: Don’t turn off the TX300F while it is charging or you’ll waste ink.
3 Pulse el botón o para seleccionar
Language (Idioma), luego oprima el botón OK.
Press or to select Language,
then press OK.
4 Pulse el botón o para seleccionar Español,
luego oprima el botón OK.
Press or to select English, then press OK.
Seleccione su país/Select your country:
1 Pulse el botón o para seleccionar País/Región, luego oprima el
botón OK.
Press or to select Country/Region, then press OK.
2 Pulse el botón o para selecciónar su País, luego oprima
el botón OK. (Si no aparece su país, seleccione USA).
Press or to select your Country, then press OK. (If your country
does not appear, select USA.)
3 Si cambia la región, confirme su selección
en la próxima pantalla presionando la tecla 1
(para indicar que sí) en el teclado numérico.
If you change the region, confirm your selection at the next screen by
pressing the 1 key (for yes) on the numeric keypad.
Introduzca la fecha y la hora/Enter the date and time:
1 Pulse el botón o para seleccionar Horario de verano, luego oprima
el botón OK.
Press or to select Daylight Saving Time, then press OK.
2 Pulse el botón o para seleccionar Verano,
si en su región se utiliza el Horario de verano y
actualmente está vigente. (El Horario de verano
está en vigencia durante la primavera y todo el verano). De lo contrario,
seleccione Invierno para desactivar este ajuste.
Press or to select Summer, if your region uses Daylight Saving
Time and it’s currently in effect. (DST is effective from spring to summer.)
Otherwise select Winter to turn off the setting.
3 Oprima el botón OK.
Press OK.
4 Pulse el botón o para seleccionar Fecha/hor,
luego oprima el botón OK.
Press or to select Date/Time, then press OK.
5 Pulse el botón o para seleccionar el
formato de la fecha, luego oprima el botón OK.
Press or to select the type of date display,
then press OK.
6 Utilice el teclado numérico para cambiar la fecha,
luego oprima el botón OK.
Use the numeric keypad to change the date, then press OK.
7 Pulse el botón o para seleccionar un
formato de 12 horas o 24 horas, luego oprima
el botón OK.
Press or to select a 12-hour or 24-hour display, then press OK.
8 Utilice el teclado numérico para fijar la hora.
Use the numeric keypad to set the time.
9 Si seleccionó 12h, pulse el botón o para
seleccionar AM o PM.
If you selected 12h, Press or to select AM or PM.
10 Oprima el botón OK.
Press OK.
Cuando termine de seleccionar los ajustes que desea, pulse el
botón Ajustes para salir.
When you’re finished choosing your settings, press Ajustes (Menu)
to exit.
Si falta alguna pieza, comuníquese con Epson como se indica al dorso de
este póster, en la sección “¿Preguntas?”.
If anything is missing, contact Epson as described on the back in “Any
questions?”.
Precaución: no saque los cartuchos de tinta de su envoltorio hasta que esté listo
para instalarlos. Los cartuchos están embalados herméticamente para garantizar su
fiabilidad.
Caution: Do not open the ink cartridge package until you are ready to install the ink.
Cartridges are vacuum packed to maintain reliability.
Desembale la impresora
Unpack
1
Guía de instalación
Start Here
Lea esta instrucciones antes de utilizar la impresora.
Please read these instructions before using the printer.
Instale los cartuchos
Install ink cartridges
4
1 Conecte el cable
de alimentación.
Connect the power cable.
Precaución: no conecte la
impresora a la computadora todavía.
Caution: Do not connect to your
computer yet.
2 Pulse el botón Encender .
Press the On button.
Encienda la TX300F
Turn on the TX300F
2
Precaución: mantenga los cartuchos fuera del alcance de los niños y no ingiera
la tinta.
Nota: los cartuchos de tinta incluidos tienen un menor rendimiento debido al
proceso de inicialización. Este proceso se realiza sólo la primera vez que enciende el
producto y garantiza un mejor rendimiento.
No cargue papel antes de instalar los cartuchos de tinta.
Caution: Keep ink cartridges out of the reach of children and don’t drink the ink.
Note: The ink cartridges that came with your printer have a lower yield due to the
ink charging process. This process is carried out the first time you turn on the printer
and guarantees better performace.
Don’t load paper before installing the ink cartridges.
1 Levante la unidad del escáner.
Open the scanner.
2 Abra la tapa del compartimiento de cartuchos.
Open the cartridge cover.
3 Agite los cartuchos de tinta, luego
desembálelos.
Shake the ink cartridges, then
unpack them.
4 Retire la cinta amarilla de cada cartucho.
Remove only the yellow tape from each
cartridge.
Precaución: no retire ninguna otra
etiqueta de los cartuchos.
Caution: Don’t remove any other seals
from the cartridges.
5 Instale los cartuchos en el soporte
que corresponde a su color.
Insert the cartridges in the holder
for each color.
6 Empuje cada cartucho hacia abajo hasta que se
encaje en su lugar.
Press each cartridge down until it clicks.
7 Cierre la tapa del compartimiento de cartuchos
y presiónela hacia abajo hasta que escuche un
clic.
Close the ink cartridge cover and press it down
until it clicks.
8 Baje la unidad del escáner.
Close the scanner.
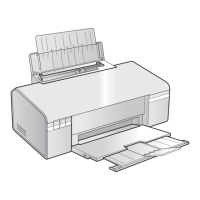
Cargue papel
Load paper
5
1 Abra el soporte del papel y extiéndalo
hacia arriba.
Open the paper support and pull up
the extension.
2 Abra la bandeja del
papel, extiéndala y
levante el parador
de papel.
Open the output tray,
pull out the extension,
and raise the paper
stopper.
3 Deslice la guía lateral hacia la
izquierda mientras sostiene
el protector del alimentador
hacia adelante.
Slide the edge guide to the
left while holding the feeder
guard forward.
4 Cargue el papel con la cara
imprimible hacia arriba, contra la
guía lateral derecha y detrás de
la lengüeta.
Load paper against the right
edge guide and behind the tab,
with the printable side face up.
Nota: no cargue el papel en posición horizontal;
siempre cárguelo en posición vertical.
Note: Don’t load the paper sideways; always
load it short edge first.
5 Deslice la guía lateral hacia
el papel.
Slide the edge guide over.
Seleccione los ajustes
Choose your settings
3
Seleccione su idioma/Select your language:
1 Pulse el botón Ajustes para entrar en modo de configuración.
Press Ajustes (Menu) to enter the setup mode.
2 Pulse el botón o para seleccionar Maintenance (Mantenimiento),
luego oprima el botón OK.
Press or to select Maintenance, then press OK.

 Loading...