Epson Stylus Photo PX650/TX650/TX659/PX660/PX660 Premium/Artisan 635 Revision C
Epson Stylus Photo PX660/PX660 Premium/Artisan 635 Disassembly/assembly 154
Confidential
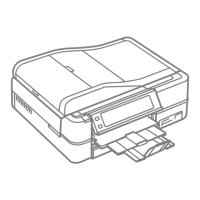
2. Remove the screws (x6) that secure the Printer Mechanism and lift the Printer
Mechanism upward to remove it.
Figure 8-19. Removing the Printer Mechanism (3)
When installing the Printer Mechanism, put the ferrite core of
the CR Motor Cable in the groove of the Lower Housing, and
secure it with acetate tape. (See Figure 8-18.)
Tighten the screws in the order given in Fig. 8-19.
C.B.P.(P2). 3x8 (6.1±1 Kgfcm)
Before installing the Printer Mechanism, make sure that the
Stacker Assy operates properly with the switching of the
Stacker Lever. If it does not operate properly, check the phases
of the Stacker Lever on the left side of the Lower Housing, the
Combination Gear 14.4,45.6, and the Link Stacker, and install
them to be aligned correctly.
Figure 8-20. Phase Adjustment of the Stacker Assy
A D J U S T M E N T
R E Q U I R E D
After removing/replacing the Printer Mechanism, make the
specified adjustments. (See "8.3 Adjustment" (p.157).)
After replacing the Printer Mechanism, be sure to perform the
required lubrication. (See Chapter 6 "MAINTENANCE".)
Link Stacker
Stacker Lever
Combination Gear 14.4,45.6
Align the phases
ASF position
CDR position
Stacker Lever
 Loading...