21
03
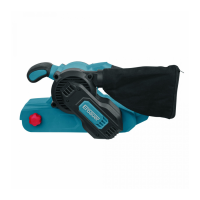
Dust bag
1. Attach the dust bag (12) to the dust extraction outlet (7) (Fig. E).
2. To remove the dust bag (12), just pull it out.
WARNING! Attach the dust bag or a dust extraction device when using
this product to sand wood in order to keep the working area clean! Wear
a dust mask when operating this product! Dust can be harmful to health!
Especially dust and chips of wood that has been treated, e.g. with a wood
preservative or stain!
WARNING! Do not use dust bag or a dust extraction device when sanding
metal! The hot metal particles could cause residual wood dust, the bag
itself or the lter of dust extraction device to catch re!
04
Vacuum cleaner
Alternatively a suitable vacuum cleaner (Ø35mm port) can be connected to the dust
extraction adapter (11) and then to the dust extraction outlet (7) as shown in Fig. G.
02
Sanding belt
Choosing the right sanding belt
Sanding belts are available with different grain sizes (grit). The grain size is indicated
with a number on the reverse of the sanding belt, the higher the number the ner is the
grain size.
Grain size Class Application
40-60 Coarse Removal of paint and varnish, preparation of rough surfaces.
80-120 Medium For face sanding and planning small irregularities.
180-240 Fine Finishing, cleaning plaster and water stain from wood.
Changing/Attaching: (Fig. A, B)
1. Pull the clamping lever for sanding belt (10) outward completely. The sanding
belt (9) is now loose and can be removed by applying even pulling force from both
sides. (Fig. A)
2. Attach a new sanding belt with even pressing force at both sides. Pay attention
that the direction of the arrows on the inside of the sanding belt (9) corresponds
with the rotation direction of the belt sander. The sanding belt (9) should align with
the metal guiding base as shown in Fig. B.
3. Press clamping lever for sanding belt (10) back to its initial position and the sanding
belt should be correctly tensioned now.
Adjustment of belt run (Fig. C, D)
After correct assembly of the sanding belt (9), the belt run should be automatically
centred upon switching on and during the sanding application. If it is not centred, the
belt run should be readjusted.
1. Put the machine upside down on a at and stable work bench and switch on the
machine at low speed.
2. Turn the adjustment knob for belt run (6) as instructed in Fig. C and D until the
sanding belt (9) runs in a correct position like shown in Fig. B.
950W BeltSander MNL_EBS950_TPS_GB_V1_V20518_20180607.indd 21 6/7/18 10:23 AM