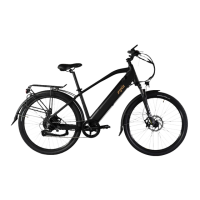
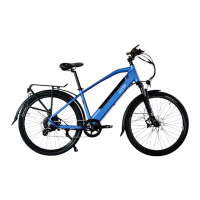
The Espin e-bike is an "effortlessly electric" bicycle designed for ease of assembly, operation, and maintenance. This quick start guide provides comprehensive instructions for setting up and caring for your Espin bike, with specific details for models like the Nero, Nesta, Sport, and Flow.
Function Description:
The Espin e-bike is a pedal-assist electric bicycle equipped with a motor and battery to provide assistance while pedaling. It features a Pedal Assist System (PAS) with multiple levels, a throttle for instantaneous power, and a display to monitor speed, distance, battery level, and other settings. The bike is designed for various terrains, with adjustable suspension and gearing for optimal riding experience.
Important Technical Specifications:
- Motor: The Nero model comes with a 750W motor.
- Battery: The Nero model features a 14.4Ah battery. Espin batteries are rated to maintain their charge capacity for at least 500 charge/discharge cycles.
- Brakes: Zoom HB-875E hydraulic disc brakes are used, compatible with Shimano M06 disc brake pads and mineral oil.
- Shifter and Derailleur: S-Ride components are used, compatible with Shimano Altus parts.
- Spokes: All spokes are 13 gauge, thicker than normal bicycle spokes.
- Frame: All Espin frames are made of 6061 aluminum.
- Tires: The Nero and Nesta models come with 26" x 4.0" and 20" x 4.0" tires respectively. Recommended tire pressures are 20PSI for paved surfaces, 15PSI for hard dirt trails, and 10PSI for snow, sand, or soft dirt/mud. All Espin bikes use tires with Schrader valve inner tubes.
- Controller: The bike's computer, located inside the frame above the bottom bracket, manages all electronic functions.
- Display Settings (Default/Recommended):
- P1 (Display brightness): 5
- P2 (Automatic shutdown time): 5 minutes
- P3 (Speed unit): 1 (for mph)
- P4 (PAS switching): 0 (for manual PAS switching)
- A05 (Password for advanced settings): 1801
- A1 (Battery voltage): 48
- A2 (Assistance gear selection): 5 (set to 5 to turn off)
- A3 (Max speed limiter): 41 (25mph/41kph for Class 3, 20mph/32kph for Class 2)
- A4 (Current limiter): 24
- A5 (Wheel diameter): 28 (change only if installing a significantly different tire size)
- A6 (Number of speed measuring magnets): 01
- A7 (Number of PAS magnets): 03
- A8 (Throttle 6km): 0
- A9 (PAS orientation): 0
Usage Features:
- Assembly: The guide provides detailed steps for unpacking, installing the front wheel, handlebar, pedals, saddle, front fender, front rack, and front light. It emphasizes not placing the box on its side to prevent damage and not flipping the bike upside down during front wheel installation.
- Battery Management: The battery can be removed for charging or charged while installed. It features overcharge protection, allowing safe overnight charging. The charge level can be checked via an indicator on the battery. To maximize battery life, it's recommended to warm up a cold battery to room temperature before charging and to charge it once a month if not used for several months.
- Handlebar and Stem Adjustment: Instructions are provided for rotating the stem and adjusting the handlebar angle for ergonomic riding.
- Suspension Fork Adjustment: The suspension fork includes a lockout lever (open for suspension, closed for locked-out suspension) and a rebound adjuster (PRELOAD cap) to control the speed at which the fork returns after compression.
- Gearing and PAS Operation: The shifter allows for smooth gear changes while pedaling. The toggle switch on the handlebar controls PAS levels (0-5), turns lights on/off, activates walk mode, and enables the USB charger. The throttle provides immediate power. Both brake levers have integrated motor cutoff switches to instantly stop the motor.
- Safety Checks: Before the first ride, users are instructed to check the tightness of all bolts on the stem, faceplate, seatpost collar, saddle, front wheel axle, pedals, fender, light, and rack. All electronic plugs, including the motor cable and handlebar plugs, should be securely aligned.
- Test Ride: A guided test ride at slow speeds is recommended to check brakes, shifting, pedal assist, throttle, and lights.
Maintenance Features:
- Tire Pressure: Check tire pressures weekly. Recommended pressures are printed on the tire sidewalls or specified in the manual for models like Nero and Nesta.
- Chain Care: Keep the chain clean and lubricated. Tri-Flow is recommended for chain and derailleur joints. Isopropyl alcohol or Clean Streak can be used for cleaning.
- Component Wear: Tires, brake pads, chain, cassette, shifting cable/housing, and brake fluid/cable housing are typical wear items that may need replacement annually with daily use. Other components like chainring, derailleur pulleys, spokes, suspension fork, saddle, handlebar grips, and bearings are expected to last at least 5 years.
- Brake Bleeding: If hydraulic disc brakes lose stopping power or feel squishy, a brake bleed may be necessary. Only mineral oil should be used, and oil/grease must be kept off brake rotors and pads.
- Cleaning: The bike can be washed like a regular bicycle. Turn off the power at the display and battery. Use a hose on a mist or shower setting, avoiding jet spray on bearings or electrical components. Wipe dry with a soft cloth or paper towels.
- Error Codes: The display may show error codes (e.g., 21-Current Error, 22-Throttle Error, 23-Motor Error, 24-Motor Hall Error, 25-Brake Error, 30-Controller Error) indicating loose plugs or other issues. The manual provides solutions for these codes, emphasizing checking wire connections and ensuring proper plug alignment. Plugs are round, water-resistant, and have arrows for alignment. The motor plug is under the non-drive side chain stay, and the controller is in a compartment between the pedals.
- Display Settings Adjustment: Users can adjust certain display settings (P1, P2, P3, A3) through the parameter menu accessed by double-tapping the M button. Advanced settings require a password (1801). The power output of individual PAS levels can also be adjusted.