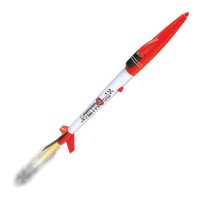
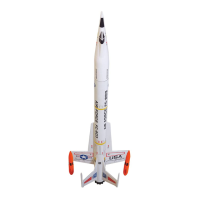
The Estes Astrocam® is a model rocket equipped with a removable rocket camera, designed for capturing aerial video and still images during flight. This device combines the thrill of model rocket launches with the ability to record the experience from a unique perspective.
Function Description
The Astrocam® rocket is assembled from various components including a body tube, nose cone, fins, engine mount, shock cord, parachute, and a self-stick decal for aesthetic finishing. The core functionality revolves around the integrated camera, which is housed within the nose cone. Users can launch the rocket, and the camera will record video or capture still images during its ascent and descent, providing a visual record of the flight. The rocket utilizes Estes engines (A8-3, B4-4, B6-4, C6-5) for propulsion and a standard recovery system involving a shock cord and parachute for safe landing.
Important Technical Specifications
Rocket Specifications:
- Estimated Weight: 1.5 oz. (42.6 g)
- Engines Supported: Estes A8-3, B4-4, B6-4, C6-5
- Recovery System: Parachute and shock cord
Camera Specifications (Astrocam® Rocket Camera):
- Video Format: .AVI
- Video Resolution: 1920 x 1080, 16:9
- Picture Format: .JPG
- Picture Resolution: 2560 x 1440
- Frame Rate: 30 fps
- Memory Card: 16GB (pre-installed), supports up to 128GB
- Recording Time (16GB card): Approximately 90 minutes
- Battery Charge Life: 40 minutes
- USB Interface: USB 2.0
- Charging Time: 2-3 hours (via computer USB port or 5V USB charger)
Usage Features
Rocket Assembly:
The assembly process involves several steps:
- Engine Mount Fin Can Unit Assembly: Fins are inserted into slots on the engine mount fin can unit and slid forward until they stop. An engine retainer cap is then screwed onto the unit.
- Body Tube & Shock Cord Mount Attachment: The body tube is slid over the fin can unit, aligning slots and notches. A shock cord mount/anchor is inserted through a square hole in the body tube and slid down until it snaps into place.
- Shock Cord Installation: A double knot is tied in one end of the shock cord, and the unknotted end is threaded through the shock cord mount. The knot should rest snugly in the mount.
- Parachute & Shock Cord Attachment: A single string is attached to the top of the nose cone with a double knot. A small loop is made on the opposite end of this string with another double knot. The main shock cord is then attached to the bottom of the nose cone with a double knot.
- Decal Application: Self-stick decals are applied to the body tube for decoration.
Engine Preparation:
- Engines should only be prepared at the launch site.
- A starter and plug are inserted into the engine. The starter tip must touch the propellant.
- Launch lugs must be centered between the engine retainer cap ridges when tightening the cap.
Camera Operation:
- Memory Card: The 16GB memory card is pre-installed. To eject or reinsert, a paperclip or pen is used to gently press down until a click is felt.
- Inserting Camera: The camera is inserted into the nose cone USB end first, pushed firmly until seated. A rubber band is then stretched across hooks on the nose cone to secure the camera.
- Turning Camera On/Off: Press the ON/OFF button for two seconds. A blue LED light will stay on when the camera is on. To turn off, press for two seconds; the blue LED will blink three times before powering off.
- Beginning Filming: Press the ON/OFF button once; the blue LED light will begin blinking.
- Stopping Recording: Press the ON/OFF button once; the blue LED light will stay on.
- Still Picture Usage: To take a photo, turn the camera on, then quickly press the ON/OFF button twice. The blue LED will blink to indicate a photo has been taken.
- Viewing Recorded Video: Remove the cap from the camera body, insert the USB connector into a computer port. Transfer the .AVI file to a local hard disk drive and open it with Windows Media Player for optimal performance. Additional software may be required.
- Setting Date and Time: When new or using a new memory card, turn the camera on for two seconds, then off for two seconds. This creates necessary files. Insert the camera into a computer, open the
time.txt document, change the date and time to the current values (year/month/day format), save, and exit. Turn the camera on and off again to apply the changes.
Launch Procedure:
- Pre-Launch Check: Inspect the rocket for damage (body, nose cone, fins, engine mount, recovery system, launch lug). Repair any damage before launch.
- Launch Site: Choose a large field (500 ft. [152 m] square) free of dry weeds and brown grass, with little or no wind and good visibility.
- Recovery Wadding: Push 3-4 squares of Estes recovery wadding down towards the end of the body tube.
- Parachute Insertion: Loosely wrap shroud lines and insert the parachute into the body tube. Pull the single string from the top tight down the groove on the bottom of the nose cone and hold with a thumb while inserting into the body tube. Ensure wadding and parachute slide easily.
- Masking Tape: Apply a 5-inch (12.7 cm) strip of masking tape around the body tube, 5 inches from the bottom.
- Launch Pad Setup: Place the rocket on the Porta-Pad II® Launch Pad. Fully extend the launch controller wire.
- Countdown and Launch: Ensure the camera is turned on and recording. Insert the key into the Electron Beam® Launch Controller, push down hard until the bulb lights, and then press the launch button until LIFTOFF!
- Misfires: If a misfire occurs, remove the key, wait one minute, then disconnect micro-clips and remove the engine. Replace the starter, ensuring it touches the propellant, and re-insert the plug.
Maintenance Features
- Engine Preparation: Engines should be prepared only when outside at the launch site. If a prepared engine is not used, the starter should be removed before storing the engine.
- Camera Charging: The camera battery should be charged before first use and whenever the "Low Battery" indicator is observed. Charging takes 2-3 hours.
- Memory Card Management: The 16GB memory card provides approximately 90 minutes of recording. Users should manage their memory card space by transferring videos to a computer and potentially deleting old files to ensure sufficient space for new recordings. The camera supports memory cards up to 128GB for extended recording capacity.
- Rocket Inspection: Regular pre-launch checks are crucial to identify and repair any damage to the rocket's components (body, nose cone, fins, engine mount, recovery system, launch lug) to ensure safe and successful flights.
- FCC Compliance: The device complies with FCC rules, and any changes or modifications not expressly approved by the party responsible for compliance could void the user's authority to operate the equipment.
- Recovery System: Ensure the recovery wadding and parachute slide easily into the body tube to prevent damage and ensure proper deployment. If too tight, redo the packing.