8
n HOW TO ASSEMBLY AND ADJUST THE HANLEBARS (Fig.4a) Fix the 2 handlebar tubes (6) to the support (1) with the screw
(7), the spacer (13), 2 washers (8) 1 nut (9) into the holes (A). Perform the same proceeding with the holes (B) inserting the screw (7), the handle
(10), the spacer (13), 2 washers thickness 4 mm.(12) and the other handle (10) in the order as shown in the picture. The handlebars can be adjusted
in height. Unscrew the 2 handles (10) and insert the screw (7) into the hole which is most suitable to your job needs. The standard adjustment is on
operator’s body’s sides height.
n THROTTLE ASSEMBLY (Fig. 5) The throttle cable is already assembled both on the engine and inside the throttle device (3). Such
device should be tightened to hole (A) of the handlebar using the screw (2) and locking it with the nut (1). Carefully check the handle (4) to freely turn.
n FITTING THE BELT TIGHTENER CONTROL CABLE (Fig. 6-7) The control wire is already tted to the belt tightener spring, but
this must be connected to the control lever (2) tted on the handlebar. FORWARD MOVEMENT t the end (4) of wire (5) in the lower hole (3) of lever
(2). Pass the wire (5) complete with register (7) in the through hole of prong (6). In the case of motor hoes with REVERSE GEAR, t the end (10) in
hole (11) of the reverse gear lever (1). Pass the wire (8) complete with register (9) in the through hole of prong (12). FOR MODEL Z3: terminal (4) has
to be inserted into the lever internal hole (2) as shown in the picture 7.
n SETTING THE CONTROLS (Fig. 6) Important! The cutter must only start turning after the relevant controls have been set. This setting can
be performed by adjusting the wire register. Furthermore, the lever that controls hoeing start (2) must only start the cutter after completing half its travel.
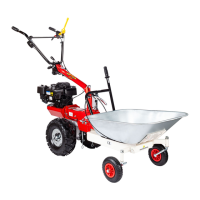
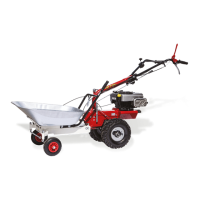
n SETTING THE DREWBAR (Fig. 2) To achieve correct hoeing and correct forward movement of the motor hoe, the height of the drewbar
(1) can be adjusted by loosening the handle (2) so as to keep the machine in horizontal working position. Once adjustment has been made, tighten
the handle (2).
n SETTING THE HANDLEBAR (Fig. 4a) The handlebars can be height-adjusted. Loosen the knobs (10) and (11) and t the through screw
(7) in the holes that best suit your working requirements. For side-adjustable version only: the handlebars can be turned to the right or left by lifting
the lever shown in (Fig. 11 part 1). If the lever device (1) seems not to be working , please unscrew or screw up the nut (2) which is placed under rhe
handlebar support (Fig. 10).
n INSTRUCTIONS ATTENTION ! Before switching the engine on, carefully check if the motor-hoe is in perfect good repair. IMPORTANT:
at the rst use of the machine it is absolutely necessary to verify that inside the chassis to be present the lubrication oil. Do no start the
unit/machine on before having done such control. When you have nished the assembly, switch the motor hoe on and check , bringing
the accelerator to stop position , the engine to shut completely down.
- Engine instructions: Carefully read the istructions booklet anclosed to the relevant engine.
- Check if the air lter is clean.
- Fill the tank in as per the fuel described in the engine specications and using a lter lling funnel.
- Do not change the calibration of the speeds control rotation device of the engine in order not to over-speed it.
- Starting the motor Open the fuel cock (for motors that feature such cock) and position the accelerator lever (Fig. 8 part 1) on the handlebar on
START. For cold starting, refer to the motor booklet. Grip the start handle and give a strong pull.
- Forward speed (g. 6) : grip the handlebars and press the safety device (13) which is preventing the accidental tines connection. Pull the forward
UK