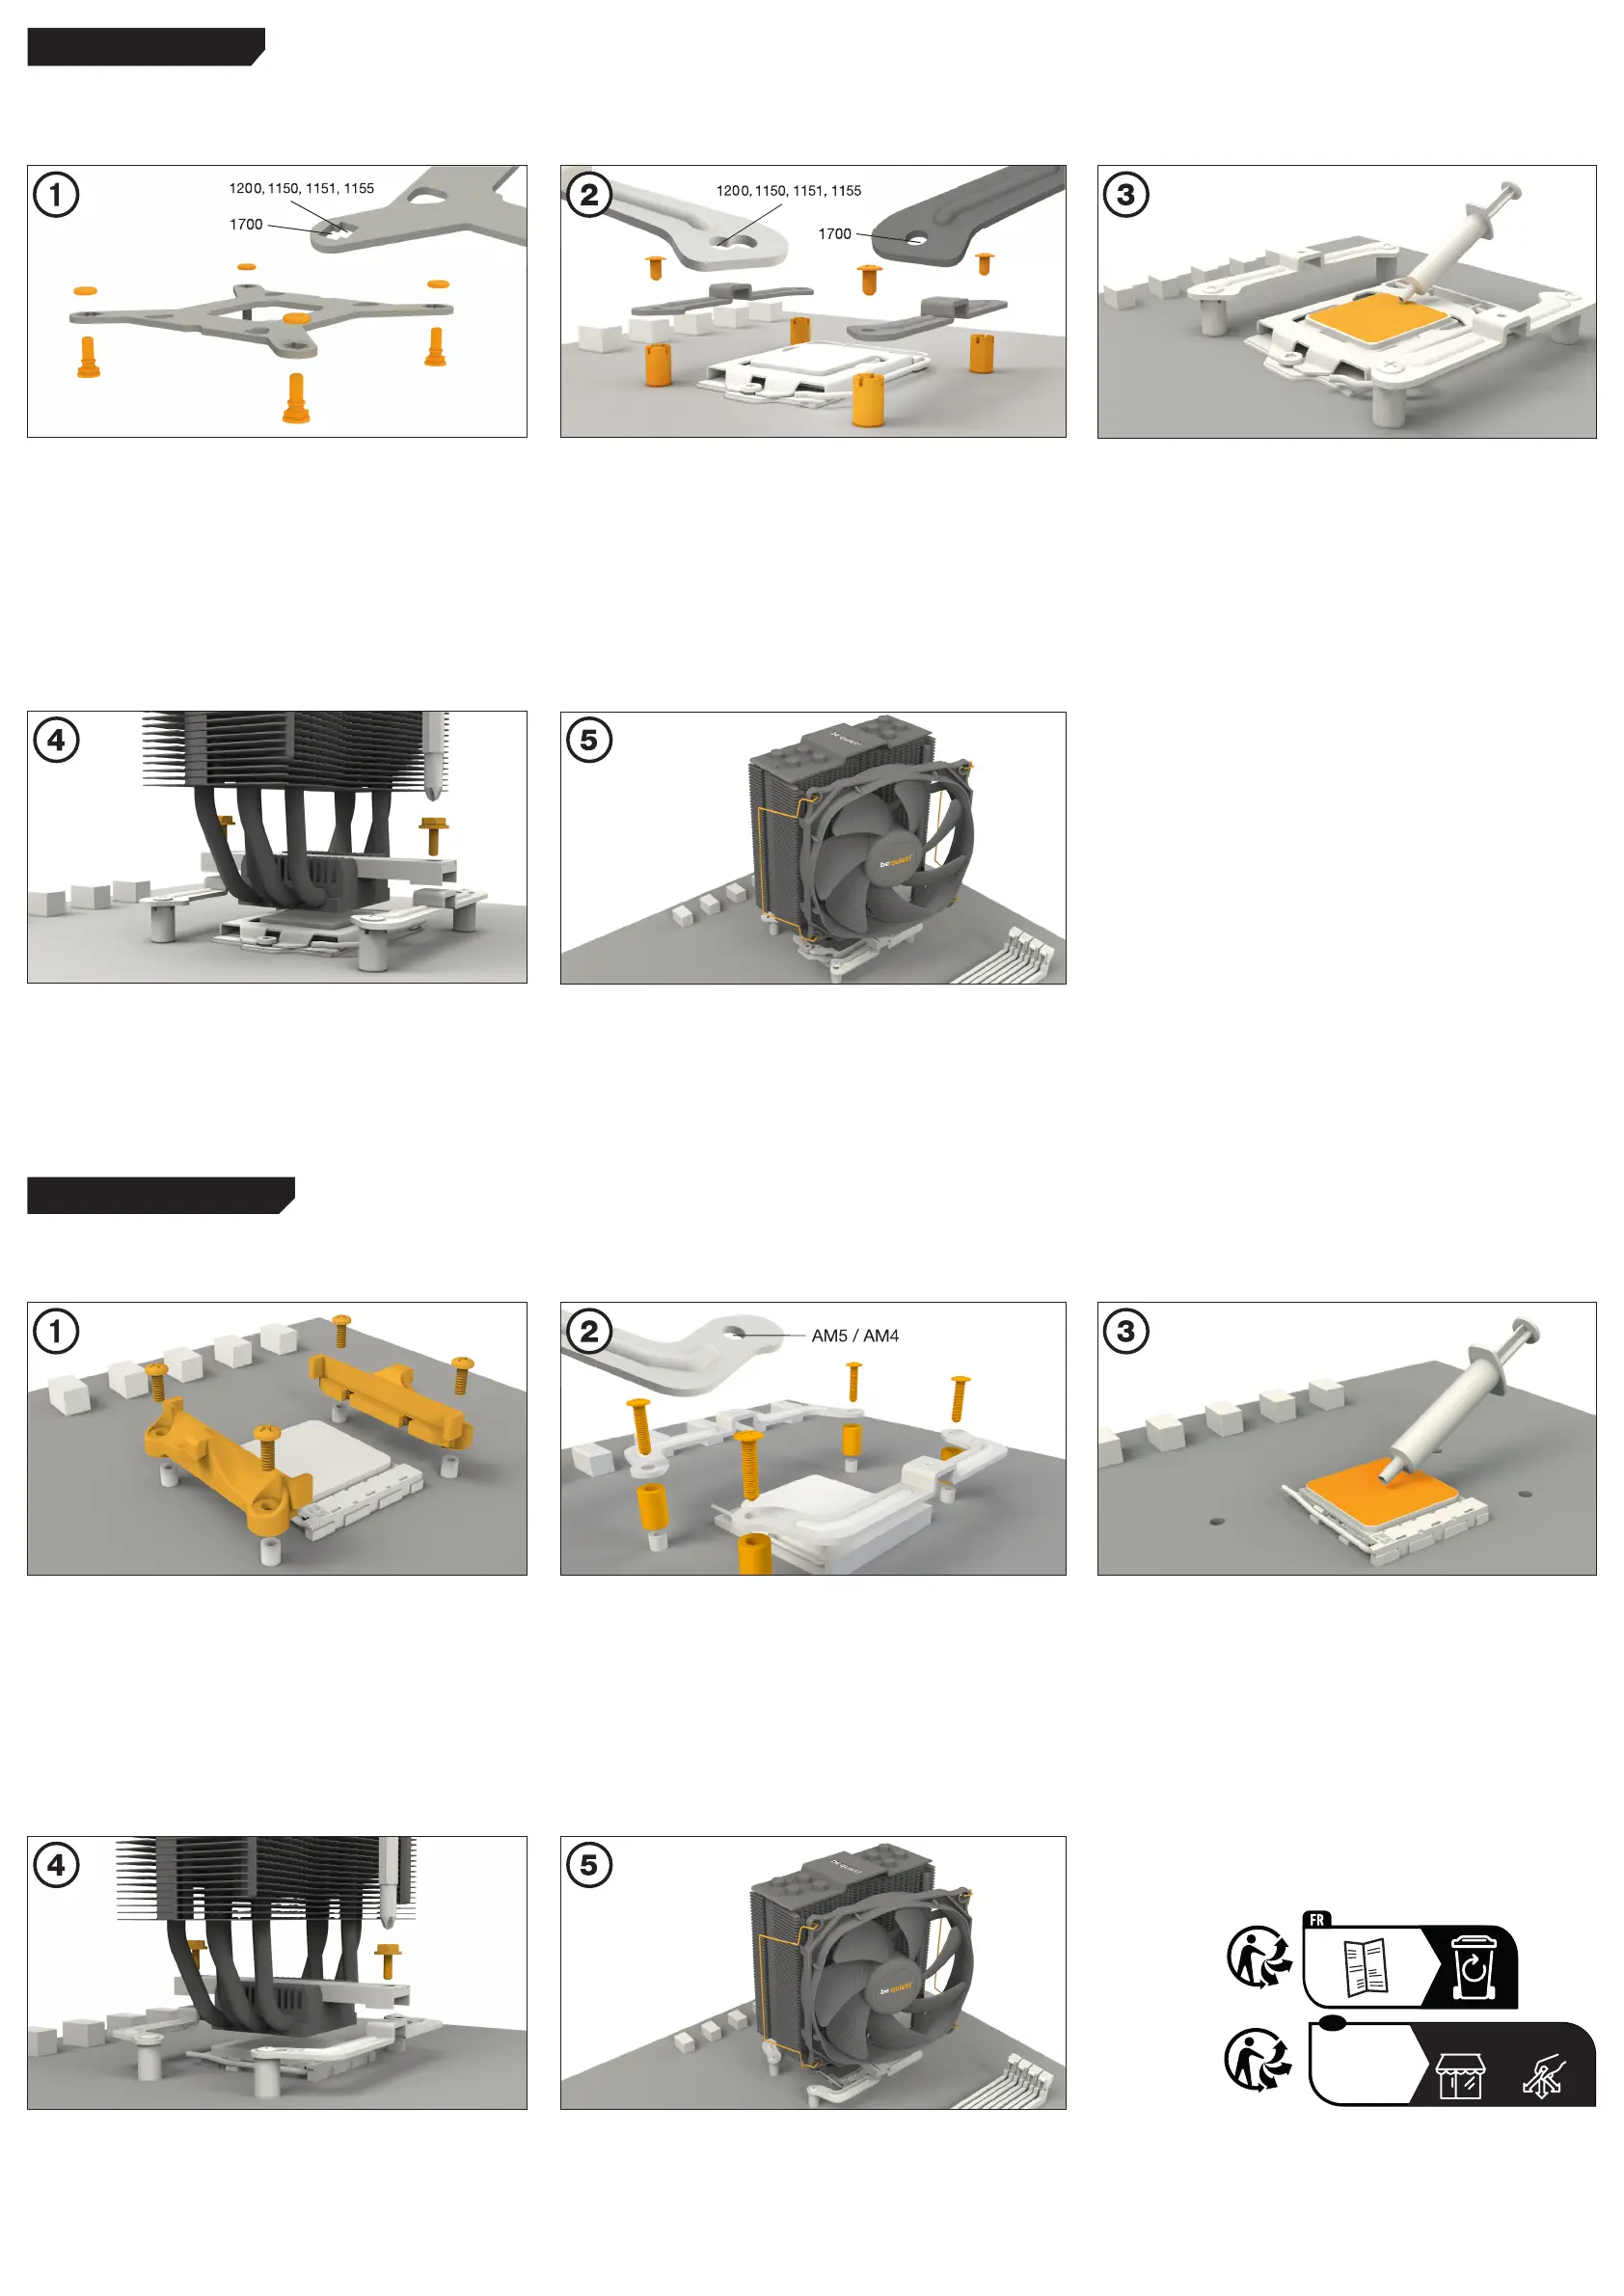
Intel: LGA 1700 / 1200 / 1150 / 1151 / 1155
Installation of the mounting brackets
Screw the Intel spacer nut B onto the
previously positioned Intel backplate.
Then position, depending on your
socket, the Intel mounting brackets or
Intel mounting brackets LGA 1700 over
the Intel spacer nut B and affix these
with the mounting bracket fastening
screws. You can use any cross-tip
screwdriver for this.
Mount the 120mm fan onto the cooler
unit using the fan clips. Connect the
fan to the motherboard’s PWM signal.
When dismantling the 120mm fan push
the notches of the fan clips away from
the fan.
Installation der Montagebrücken
Schrauben Sie die Intel Gewindebolzen
A auf die zuvor platzierte Intel Back-
plate. Dann positionieren Sie abhängig
von Ihrem Sockel die Intel Montage-
brücken oder Intel Montagebrücken
LGA 1700 auf den Intel Gewinde-
bolzen B, um sie dann mit den Befesti-
gungsschrauben für die Montagebrücken
zu fixieren. Hierzu können Sie einen
üblichen Kreuzschlitz-Schraubendreher
nutzen.
Befestigung der Backplate
Positionieren Sie die Intel Backplate-
Schrauben in den Aussparungen auf der
Rückseite der Intel Backplate. Achten
Sie dabei auf die speziell für die jeweilige
Buchse gebohrten Löcher.
Verwenden Sie zur Befestigung der
Backplate-Schrauben auf der Intel-
Backplate die O-Ringe. Sobald die
Intel-Backplate für den jeweiligen Intel-
Sockel zusammengebaut ist, positionieren
Sie es unter dem Mainboard. Achten Sie
dabei darauf, dass die Intel Backplate-
Schrauben genau in den Mainboard-
löchern positioniert sind.
Befestigen Sie den 120mm Lüfter mit
Hilfe der Lüfter-klammern am Kühler.
Anschließend verbinden Sie den Lüfter
mit dem CPU-Lüfteranschluss des
Mainboards.
Zur Demontage des 120mm Lüfters
drücken Sie die Kerben der Lüfter-
klammern vom Lüfter weg.
Mounting the CPU cooler
First remove the protective foil from the
underside of the cooler. Spread the ther-
mal paste on the surface of the CPU.The
amount supplied is sufficient for one or
two applications.
Caution: The thermal paste supplied
is not suitable for human consumption.
If swallowed, drink lots of water and
urgently seek medical attention. Keep
it out of the reach of children. Avoid
contact with skin and eyes.
Montage des CPU-Kühlers
Entfernen Sie zunächst die Schutzfolie
von der Unterseite des Kühlers. Tragen
Sie die Wärmeleitpaste auf die CPU-
Oberfläche auf. Der Inhalt reicht für ca.
1 – 2 Anwendungen.
Vorsicht: Die mitgelieferte Wärmeleit-
paste ist nicht zum Verzehr geeignet.
Bei Verzehr ausreichend Wasser trinken
und umgehend einen Arzt aufsuchen.
Außerhalb der Reichweite von Kindern
aufbewahren. Vermeiden Sie Haut- und
Augenkontakt.
Position the cooler mounting bridge
centrally on the cooler. Next place the
cooler unit onto the CPU. Insert the
mounting bridge fastening screws from
above into the cooler mounting bridge
and then screw these alter-nately tight.
You can use any cross-tip screwdriver
for this.
Legen Sie die Kühler-Montagebrücke
mittig auf den Kühler . Anschließend
platzieren Sie den Kühler auf der CPU.
Stecken Sie die Befesti-gungsschrauben
der Kühler Montage-brücke von oben
auf die Kühler-Montagebrücke und
schrauben Sie diese abwechselnd
fest. Hierzu können Sie einen üblichen
Kreuzschlitz-Schraubendreher nutzen.
Place the four AMD spacer nuts onto
the backplate bolts protruding through
the front side and affix both long AMD
mounting brackets with the AMD
backplate screws.
Assembly of the cooler mounting
frame
To permit mounting of the cooler please
remove both the plastic retainers of the
AMD retention module. The factory-
fitted backplate affixed to the rear side
of the motherboard will be needed for
subsequent installation of the cooler.
Position the cooler mounting bridge
centrally on the cooler. Next place the
cooler unit onto the CPU. Insert the
mounting bridge fastening screws from
above into the cooler mounting bridge
and then screw these alternately tight.
You can use any cross-tip screwdriver
for this.
Mount the 120mm fan onto the cooler
unit using the fan clips. Connect the fan
to the motherboard’s PWM signal.
When dismantling the 120mm, push
the notches of the fan clips away from
the fan..
Platzieren Sie über die Vorderseite
die vier AMD Abstandsbolzen auf die
Bolzen der Backplate und fixieren die
beiden langen AMD Montagebrücken
mit Hilfe der AMD Backplate-
Schrauben.
Legen Sie die Kühler-Montagebrücke
mittig auf den Kühler. Anschließend
platzieren Sie den Kühler auf der CPU.
Stecken Sie die Befestigungsschrauben
der Kühler Montagebrücke von oben
auf die Kühler-Montagebrücke und
schrauben Sie diese abwechselnd
fest. Hierzu können Sie einen üblichen
Kreuzschlitz-Schraubendreher nutzen.
Befestigen Sie den 120mm Lüfter mit
Hilfe der Lüfterklammern am Kühler.
Anschließend verbinden Sie den Lüfter
mit dem CPU-Lüfteranschluss des
Mainboards.
Zur Demontage des 120mm Lüfters
drücken Sie die Kerben der Lüfter-
klammern vom Lüfter weg.
Mounting the CPU cooler
First remove the protective foil from
the underside of the cooler. Spread the
thermal paste on the surface of the CPU.
The amount supplied is sufficient for one
or two applications.
Caution: The thermal paste supplied
is not suitable for human consumption.
If swallowed, drink lots of water and
urgently seek medical attention. Keep
it out of the reach of children. Avoid
contact with skin and eyes.
Montage des CPU-Kühlers
Entfernen Sie zunächst die Schutzfolie
von der Unterseite des Kühlers. Tragen
Sie die Wärmeleitpaste auf die CPU-
Oberfläche auf. Der Inhalt reicht für ca.
1 – 2 Anwendungen.
Vorsicht: Die mitgelieferte Wärmeleit-
paste ist nicht zum Verzehr geeignet.
Bei Verzehr ausreichend Wasser trinken
und umgehend einen Arzt aufsuchen.
Außerhalb der Reichweite von Kindern
aufbewahren. Vermeiden Sie Haut- und
Augenkontakt.
Aufbau des Kühlerbefestigungs-
rahmens
Bitte entfernen Sie zur Kühlermontage
die beiden Künststoffhalterungen des
AMD-Retentionmoduls. Die werkseitig
auf der Mainboard-Rückseite befestigte
Backplate wird für die weitere Installation
des Kühlers benötigt.
AMD: AM5 / AM4
The following parts are needed for this:
1x Dark Rock Slim CPU cooler (1), 1x Silent Wings 3 120mm fan (2), 1x Intel backplate (3), 2x Intel mounting brackets (4), 2x Intel
mounting brackets LGA 1700 (5), 1x cooler mounting bridge (7), 4x Intel spacer nut B (9), 4x mounting bracket fastening screws (11),
2x mounting bridge fastening screws (12), 4x Intel backplate screws (13), 4x O-rings (15), 1x thermal paste (16), 2x fan clips (17)
Mounting the backplate
Position the Intel backplate screws in
the notches situated on the rear side of
the Intel backplate. Pay attention in so
doing to align with the holes drilled for
each socket.
For fixing the backplate screws onto the
Intel backplate use the O-rings. Once
assembly of the Intel backplate for the
respective Intel socket is complete,
position it under the motherboard. Make
sure that the backplate screws are
precisely positioned inside the mother-
board holes.
The following parts are needed for this:
1x Dark Rock Slim CPU cooler (1), 1x Silent Wings 3 120mm fan (2), 2x long AMD mounting brackets (6) 1x cooler mounting bridge (7),
4x AMD spacer nuts (10), 2x mounting bridge fastening screws (12), 4x AMD backplate screws (14), 1x thermal paste (16),
2x fan clips (17)
Es werden folgende Bauteile benötigt:
1x Dark Rock Slim CPU-Kühler (1), 1x Silent Wings 3 120mm Lüfter (2), 2x lange AMD Montagebrücken (6), 1x Kühler-Montage-
brücke (7), 4x AMD Abstandsbolzen (10), 2x Befestigungsschrauben für die Kühler-Montagebrücke (12), 4x AMD Backplate-
Schrauben (14), 1x Wärmeleitpaste (16), 2x Lüfterklammern (17)
Es werden folgende Bauteile benötigt:
1x Dark Rock Slim CPU-Kühler (1), 1x Silent Wings 3 120mm Lüfter (2), 1x Intel Backplate (3), 2x Intel Montagebrücken (4), 2x Intel
Montagebrücken LGA 1700 (5), 1x Kühler-Montagebrücke (7), 4x Intel Gewindebolzen B (9), 4x Befestigungsschrauben für die
Montagebrücke (11), 2x Befestigungsschrauben der Kühler-Montagebrücke (12), 4x Intel Backplate-Schrauben (13), 4x O-Ringe
(15), 1x Wärmeleitpaste (16), 2x Lüfterklammern (17)
FR
Cet appareil
se recycle
À DÉPOSER
EN MAGASIN
À DÉPOSER
EN DÉCHÈTERIE
OU
Points de collecte sur www.quefairedemesdechets.fr
 Loading...