www.evolutionbuild.com
6
www.evolutionbuild.com
7
SPECIFICATIONS
GB
CAUTION! Always unplug the disc cutter before changing
blades, servicing, cleaning or adjusting the saw.
Model 305mm (12”) Electric Disc Cutter Specifications
Motor (230V or 110V 50Hz) (Watts): 2400
RPM No Load (min
-1
): 5000
Weight: 9.4Kg
Blade Dimensions
Maximum Diameter: 12” / 305mm
Bore Diameter: 20 or 22.2mm
Thickness: 1/8” / 3.2mm
Your Evolution Power Tools disc cutter is shipped complete.
Remove all contents from the box and inspect to ensure no
damage was incurred during shipping, and that the items
listed below are included.
DESCRIPTION QTY
INSTRUCTION MANUAL 1
SPANNER 1
305MM DIAMOND BLADE 1
CAUTION! ALWAYS DISCONNECT THE DISC CUTTER FROM
POWER SOURCE BEFORE MAKING ADJUSTMENTS.
Install the blade as detailed in the “INSTALLING/
REMOVING DIAMOND WHEEL” section.
PRIOR TO OPERATION
1. Power source
Ensure that the power source to be utilized conforms to the
power requirements specified on the product nameplate.
2. Power switch
Ensure that the power switch is in the OFF position. If
the plug is connected to a power receptacle while the
power switch is in the ON position, the power tool will
start operating immediately, which could cause a serious
accident.
3. Extension cord
When the work area is removed from the power source,
use an extension cord of sufficient thickness and rated
capacity. The extension cord should be kept as short as
practicable.
4. Checking and installing the diamond wheel
Check the diamond wheel is a specified one and is not
cracked, broken or bent. Check the diamond wheel is
installed securely. For installation, refer to “Installing/
removing diamond wheel”.
5.Check that the knob used to secure the wheel guard
is tight. Make sure that the knob that secures the wheel
guard is adequately tight.
If this knob is loose, it may result in injury to the operator.
(Fig. 4)
INSTALLING DUST COLLECTION HOSE
When cutting a material which generates cutting dust, use
the dust collection hose as follows:
(1) Remove the rubber cab and install the accessory hose.
(Fig. 1)
(2) Install the dust collector hose for the power tool in the
accessory hose. (Fig. 1)
CAUTION
• Donotusethedustcollectionhosewhencuttingmetal.
• Alwaysinstallarubbercaponthedustcollection
adapter when the dust collection hose is not used.
INSTALLING/REMOVING DIAMOND WHEEL
1. Installation
(1) Wipe the cutting dust from the spindle and wash¬ers.
(2) Make sure the rotation direction of the diamond wheel
conforms to the direction indicated on the wheel guard and
install the diamond wheel as shown in Fig. 2 and 3.
• Installthewheelwasher(A)ontheinnersidewhenthe
hole diameter of the diamond wheel is 22.2 mm.
• Installthewheelwasher(B)ontheinnersidewhenthe
hole diameter of the diamond wheel is 20.0 mm.
(3) Press the lock pin and secure the spindle. Tighten the
bolt adequately with the provided wrench. (Fig. 5 and 6)
(4) Rotate the wheel by hand to ensure the spindle lock has
released.
NOTE
•Alwaysusetheprovidedwrenchtosecurethebolt.
•Becarefulbecausethebolttightenstotheleft
(counterclockwise direction) to prevent it from being
loosened during cutting. (Fig. 6)
2. Removal
Remove the bolt with the provided wrench and remove the
diamond wheel. (Fig. 6)
CUTTING
1. Wheel guard adjustment (Fig. 4)
Adjust the wheel guard angle with the knob so dust and
debris from the material or sparks do not contact the
operator during the cutting operation.
ASSEMBLY
GB
OPERATION
GB
2. Cutting Procedures.
(1) Place this tool on the material to be cut and align the
premarked line and the diamond wheel.
The cutting can be performed smoothly if you cut straight
ahead on the scribed line in the initial cut.
(2) Turn on the switch when the diamond wheel is not
touching the material to be cut.
CAUTION
•Alwayscheckthediamondwheelbeforestartingwork.
Never use a diamond wheel which is cracked, broken or
bent.
•Donotapplywaterorcoolanttothediamondwheel.
•Startcuttingonlywhendiamondwheelreachesits
maximum speed.
•Ifthediamondwheelseizesorthereisanyabnor¬mal
noise, immediately turn the power off.
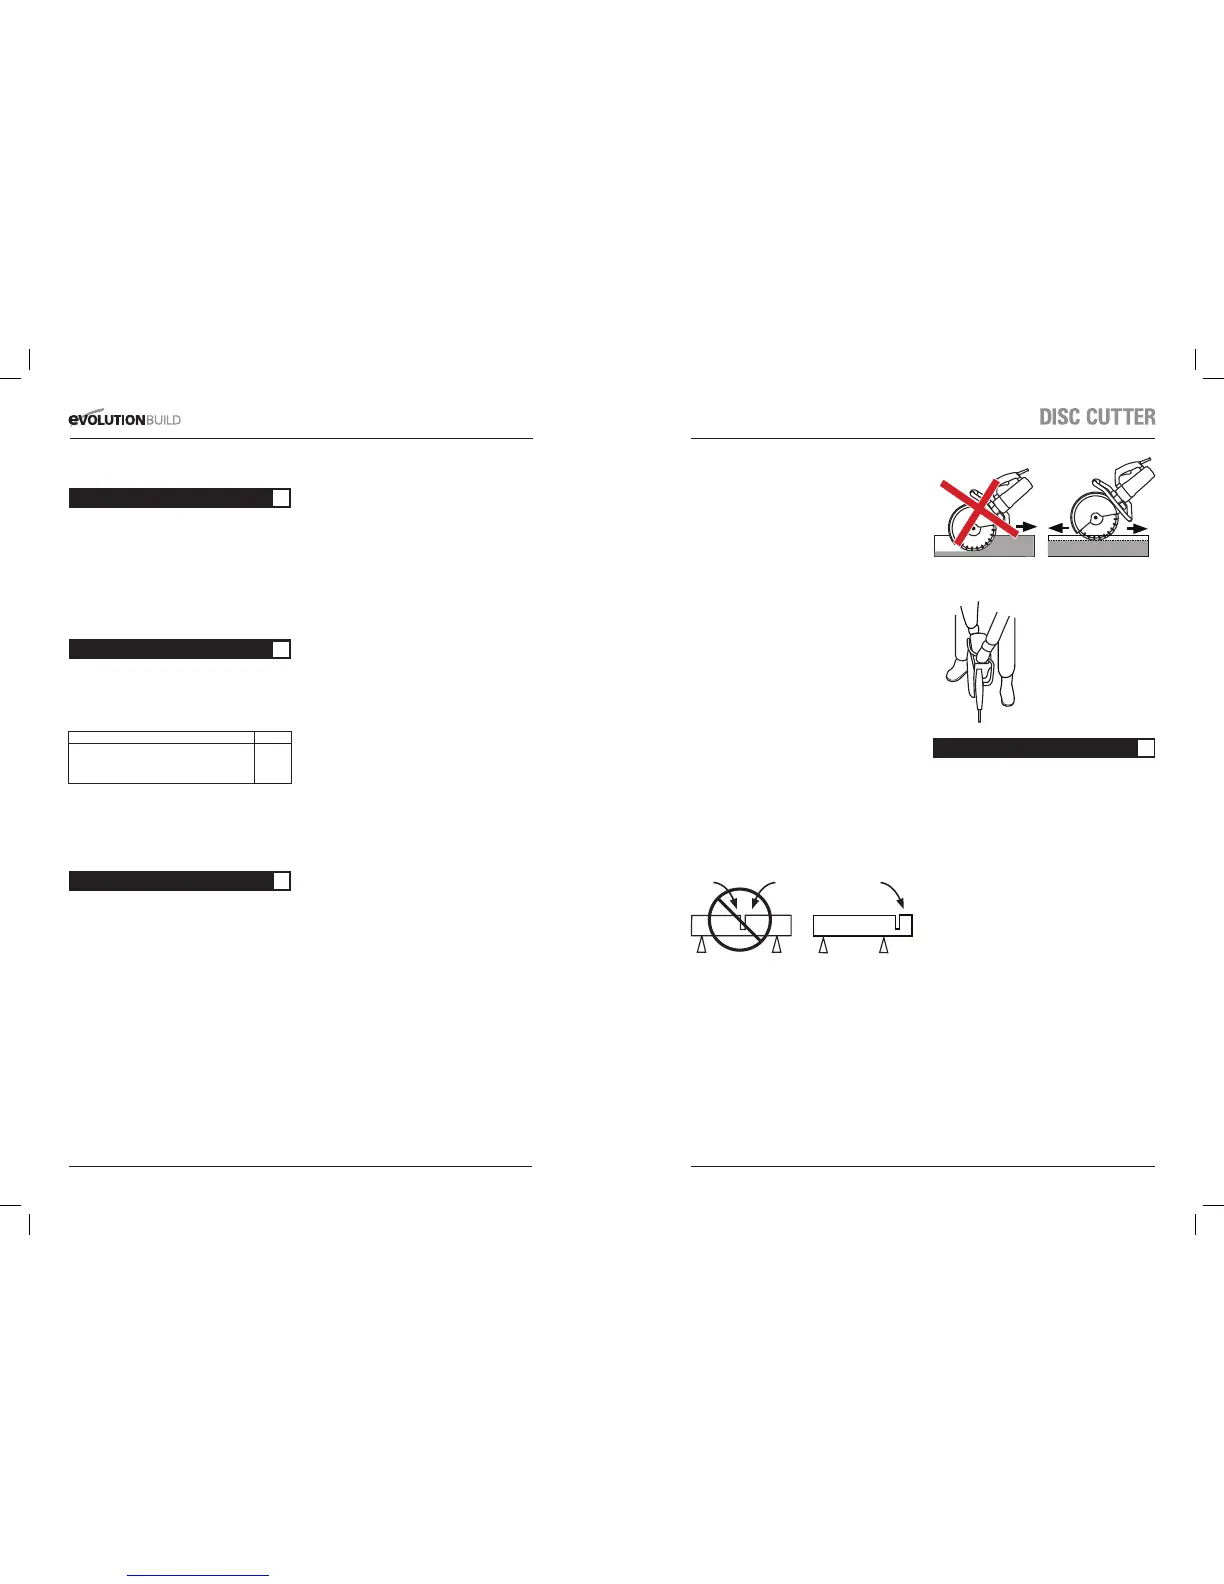
•Neverusethediamondwheeltocutzigzagorcurved
lines. Never use the side surface of the diamond wheel.
Never use to perform inclination cutting.
•Ifexcessiveforceisappliedtothediamondwheelto
make it align with the premarked line during cutting, this
might not only overload the motor and cause burn damage
but may also overheat the diamond wheel and shorten the
service life.
•Takecarenottoallowthepowercordtocomeinto
contact with the diamond wheel during operation.
•Whentheworkiscompleted,turnthepoweroffand
disconnect the power plug from the receptacle.
•Supporttheworkpieceinsuchawaythatitispossible
to predict what will happen, and so that the cut remains
open while cutting.
•Checkthatthebladeisnotincontactwithanythingwhen
the machine is started.
•Alwayscutatthemaximumspeed.
•Startcuttingsmoothly,allowingthemachinetowork
without forcing or pressing the blade.
•Movethebladeslowlyforwardsandbackwardsto
achieve a small contact area between the blade and the
material to be cut. This reduces the temperature of the
blade and ensures effective cutting.
•Feeddownthemachineinlinewiththeblade.Pressure
from the side can damage the blade and is very dangerous.
1. Inspection the diamond wheel
A worn diamond wheel overloads the motor and reduces
working efficiency. Replace with a new one.
2. Inspecting the mounting screws
Regularly inspect all mounting screws and ensure that they
are properly tightened. Should any of the screws be lose,
retighten them immediately. Failure to do so could result in
serious hazard.
3. Maintenance of the motor
Exercise due care to ensure the winding does not become
damaged and/or wet with oil or water.
4. Keep tool clean and free from debris
Avoid using cleaning products, which include benzene,
trichloroethelene, chloride, or ammonia as these can
damage plastic parts.
5. In case of electrical or mechaniclal malfunction,
immediately switch off the tool and disconnect the plug.
6. Excessive sparking may indicate the presence of dirt in
the motor or won out carbon brushes. Check for wear and
replace when they reach 1/4” (6mm).
7. For all other service take machine to your local dealr or at
Evolution Power Tools USA, Iowa, if bought in the USA.
MAINTENANCE SECTION
GB
 Loading...