Do you have a question about the Evolveo StrongPhone Z6 and is the answer not in the manual?
Press this button to enter the standby menu. Function displayed in the bottom left corner of the screen.
Press this button to go to the contact list. Go back to previous menu or delete written information.
Press to start a call or answer an incoming call. Access call history in standby mode.
Used for switching phone on/off, returning to standby, ending calls, and locking the keyboard.
Navigate menus up, down, left, right. Middle button confirms actions or enters menus.
Includes Flashlight (Button 0), Power Bank (Button 9), and SOS alarm activation (SOS button).
Instructions for correctly and safely inserting the battery into your phone.
Dialing numbers, answering, rejecting calls, and adjusting volume during a call.
Configure emergency contacts, SMS content, and alarm sound for SOS.
Configure PIN lock for SIM and phone security. Set password for phone unlock.
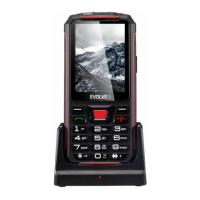
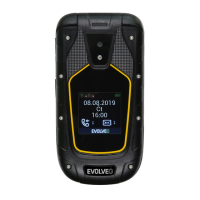
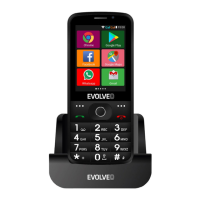
The EVOLVEO StrongPhone Z6 is a durable mobile phone designed for resilience and functionality. Its key features include a large 2.8" display, impact resistance, and IP68 waterproof rating, making it suitable for demanding environments. The phone supports two SIM cards, offers a power bank function, and is equipped with a large 4,000 mAh battery.
The phone's interface includes a handset, display, and various buttons for navigation and control. The Left function button (3) allows access to the standby menu, displaying the selected function in the bottom left corner of the screen. The Right PFT function button (12) navigates to the contact list, returns to the previous menu, and deletes entered information.
The Call button (5) initiates calls to selected numbers and answers incoming calls. In standby mode, it provides access to call history. The End call button (11) is used to switch off the phone by holding it down, or to switch it back on. A short press returns to standby mode, ends calls, and on the main screen, turns off the display and locks the keyboard.
Navigation is managed by the Navigation button (4), which allows movement up, down, left, and right within menus. On the home screen, it provides quick access to customizable functions. The middle button confirms actions or enters menus. Alphanumeric buttons (6) are used for dialing numbers in standby mode and typing letters and numbers in edit mode. The *** button (7)**, when pressed twice in standby mode, inserts the "+" symbol for international calls, and in text writing mode, inserts special characters. Button 0 (8) activates/deactivates the flashlight with a long press, while Button 9 (9) turns the power bank function on/off with a long press. The Tlačítko # (10) switches character input modes in text and changes profiles with a long press. The Tlačítko SOS (18) activates the SOS alarm with a long press.
Inserting the Battery: To insert the battery, remove the four screws on the battery cover, align the battery correctly, replace the cover, ensure the rubber seal is fitted, and tighten the screws.
Inserting SIM and MicroSD Cards: Remove the four screws and battery cover, then the battery. Insert SIM card(s) and/or a MicroSD card into the designated slots. Verify the rubber seal is correctly fitted and tighten the screws.
Charging the Battery: Connect the charger to the USB connector. Charging begins automatically, and the battery level is indicated on the phone screen.
Switching On/Off: Press and hold the end call button (11) for 3 seconds to switch the phone on or off.
Unlocking/Locking the Keypad: To wake the phone, press the left function key (3) or the end call key (11). Then press LFT (3) followed by the * button (7) to unlock. To lock the keypad, briefly press the end call button (11). Automatic keypad lock can be configured in Menu/Settings/Phone settings/Show properties/Automatic keypad lock.
Call Management: Dial numbers using the keypad and press the green button (5). Answer incoming calls with the green button (5) and reject them with the red button (11). Adjust call volume using the Up/Down navigation button (4).
Messages: The phone supports sending and receiving SMS text messages. Access the messaging menu via the Left navigation button (4) or LFT (3)/Menu/Messages. From here, you can write, view, reply to, forward, delete, and manage message concepts and settings.
Telephone Directory: This menu allows editing contacts, adding new entries, moving, copying, or deleting existing contacts. Speed dials for numbers 2-9 can also be set. Access via PFT (12) Names or LFT (3)/Menu/Phone List. To add a contact, go to Phonebook → Add new entry, select storage (SIM or Phone), enter name and number, then save via LFT (3)/Option → Save or Cancel, or directly with the navigation button (4).
Speed Dial Settings: Assign contacts to buttons 2-9 for faster dialing. Navigate to Phonebook/Option/Directory Settings/Speed Dial/Status/Disabled, then select Set up numbers/Modify to assign contacts.
Call History: View missed, called, received, and all calls via LFT (3)/Menu/Call History. Options include View, Call, Send text message, Save to contacts, Add to blocked, and Delete.
Call Settings: Access settings for each SIM card via LFT (3), including call waiting and forwarding, answer mode, and blocked numbers.
Profiles: The phone offers profiles like Main, Silent, Meeting, and Outside, allowing customization for different environments. Access via LFT (3)/Menu/Settings/Profiles/Main/Option/Activate. Customize settings such as:
Phone Settings:
Restore Factory Settings: The default password is 1234. Restoring factory settings will erase all stored data.
Multimedia: The phone supports various multimedia content (photos, music, videos).
FM Radio: The phone has an integrated FM radio.
File Management: Manage files (view, copy, move) including pictures, videos, music, and apps on your phone or microSD card. Access via LFT (3)/Menu/File Management.
Camera: Access via LFT (3)/Menu/Photo. The camera supports shooting photos by pressing the navigation button. A microSD card is required for storage.
Organizer: Access via LFT (3)/Menu/Organiser.
Clean the device with a soft, lint-free cloth. Do not use detergents or solvents.
The warranty does NOT cover:
Repairs and servicing should only be carried out at an authorized EVOLVEO service point (www.evolveo.com) to avoid damaging the phone and voiding the warranty.
The crossed-out container symbol indicates that in EU countries, electrical and electronic equipment, batteries, and accumulators must be disposed of separately as waste at the end of their useful life. Do not dispose of these products in unsorted municipal waste.
| Dimensions | 176.6 x 86.2 x 14.7 mm (6.95 x 3.40 x 0.58 in) |
|---|---|
| Weight | 289 g (10.19 oz) |
| Type | IPS LCD |
| Operating System | Android 13 |
| Loudspeaker | Yes |
| 3.5mm jack | Yes |
| Radio | FM radio |
| Battery | Li-Po 5000 mAh, non-removable |
| SIM | Dual SIM (dual stand-by) |
| WLAN | Wi-Fi 802.11 b/g/n |
| Bluetooth | 5.0, A2DP, LE |
| GPS | Yes |
| USB | microUSB 2.0 |
| Sensors | Accelerometer, proximity |
| Protection | IP68 dust/water resistant (up to 1.5m for 30 min) |
| Display | IPS LCD |
| Expandable Storage | microSD |
| Water Resistance | IP68 dust/water resistant (up to 1.5m for 30 min) |