EX CEL DRY ER, INC 1 . 8 0 0 . 2 5 5 . 9 2 3 5 EX CEL DRY ER. COM ADM IN@ EX CEL DRY ER. COM
3 5 7 CHESTNUT STREET, EAST L ONG M EADOW , M A 0 1 0 2 8
02/2016 3
READ AND SAVE THESE INSTRUCTIONS
W ARNING : TO REDUCE THE RISK OF F IRE, EL ECTRIC SHOCK OR INJ URY TO P ERSONS,
OB SERVE THE F OL L OW ING :
A. Us e t h i s u n i t o n l y i n t h e m a n n e r i n t e n d e d b y t h e m a n u f a c t u r e r .
B . B e f o r e s e r v i c i n g o r c l e a n i n g u n i t , s w i t c h p o w e r o f f a t s e r v i c e p a n e l a n d l o c k t h e s e r v i c e
d i s c o n n e c t i n g m e a n s t o p r e v e n t p o w e r f r o m b e i n g s w i t c h e d o n a c c i d e n t a l l y . W h e n t h e
s e r v i c e d i s c o n n e c t i n g m e a n s c a n n o t b e l o c k e d , s e c u r e l y f a s t e n a p r o m i n e n t w a r n i n g d e v i c e ,
s u c h a s a t a g , t o t h e s e r v i c e p a n e l .
CL EANING / M AINTENANCE
OUTSIDE GentlywashCover(includingairinletholes)usingasoftclothorspongeandamildsoapordetergentwith
lukewarmwatertoloosendirtandgrime.
INSIDE Excelrecommendsinspectingtheinsideofthedryerandcleaningasrequiredatleastonceperyear,orif
performancediminishes.Heavierusage,oranenvironmentthatcontainsexcessivelint,dustorotherparticles,
requiresmorefrequentcleaning.Lintontheairinlet,thePre-Filters(DryerorHEPAifsoequipped),orother
internalpartsofdryerwillreduceefciencyandshortenthelifeoftheworkingparts.
Toclean,shutoffpowertodryeratserviceconnection.RemoveCoverbyunscrewingthe2Tamper-ProofBolts
from sideofCoverwiththespecialTamper-ProofWrenchprovidedwitheachdryer.Useasmall,softbrushto
gentlycleanallparts.IfyourunitcontainsadryerPre-lterorHEPAFiltrationSystem,unclipthePre-Filter,rinse
thePre-Filterwithwateranddry.Re-install. DO NOT CL EAN THE HEP A F IL TER OR AL L OW IT TO COM E INTO
CONTACT W ITH W ATER.
TROUB L ESHOOTING
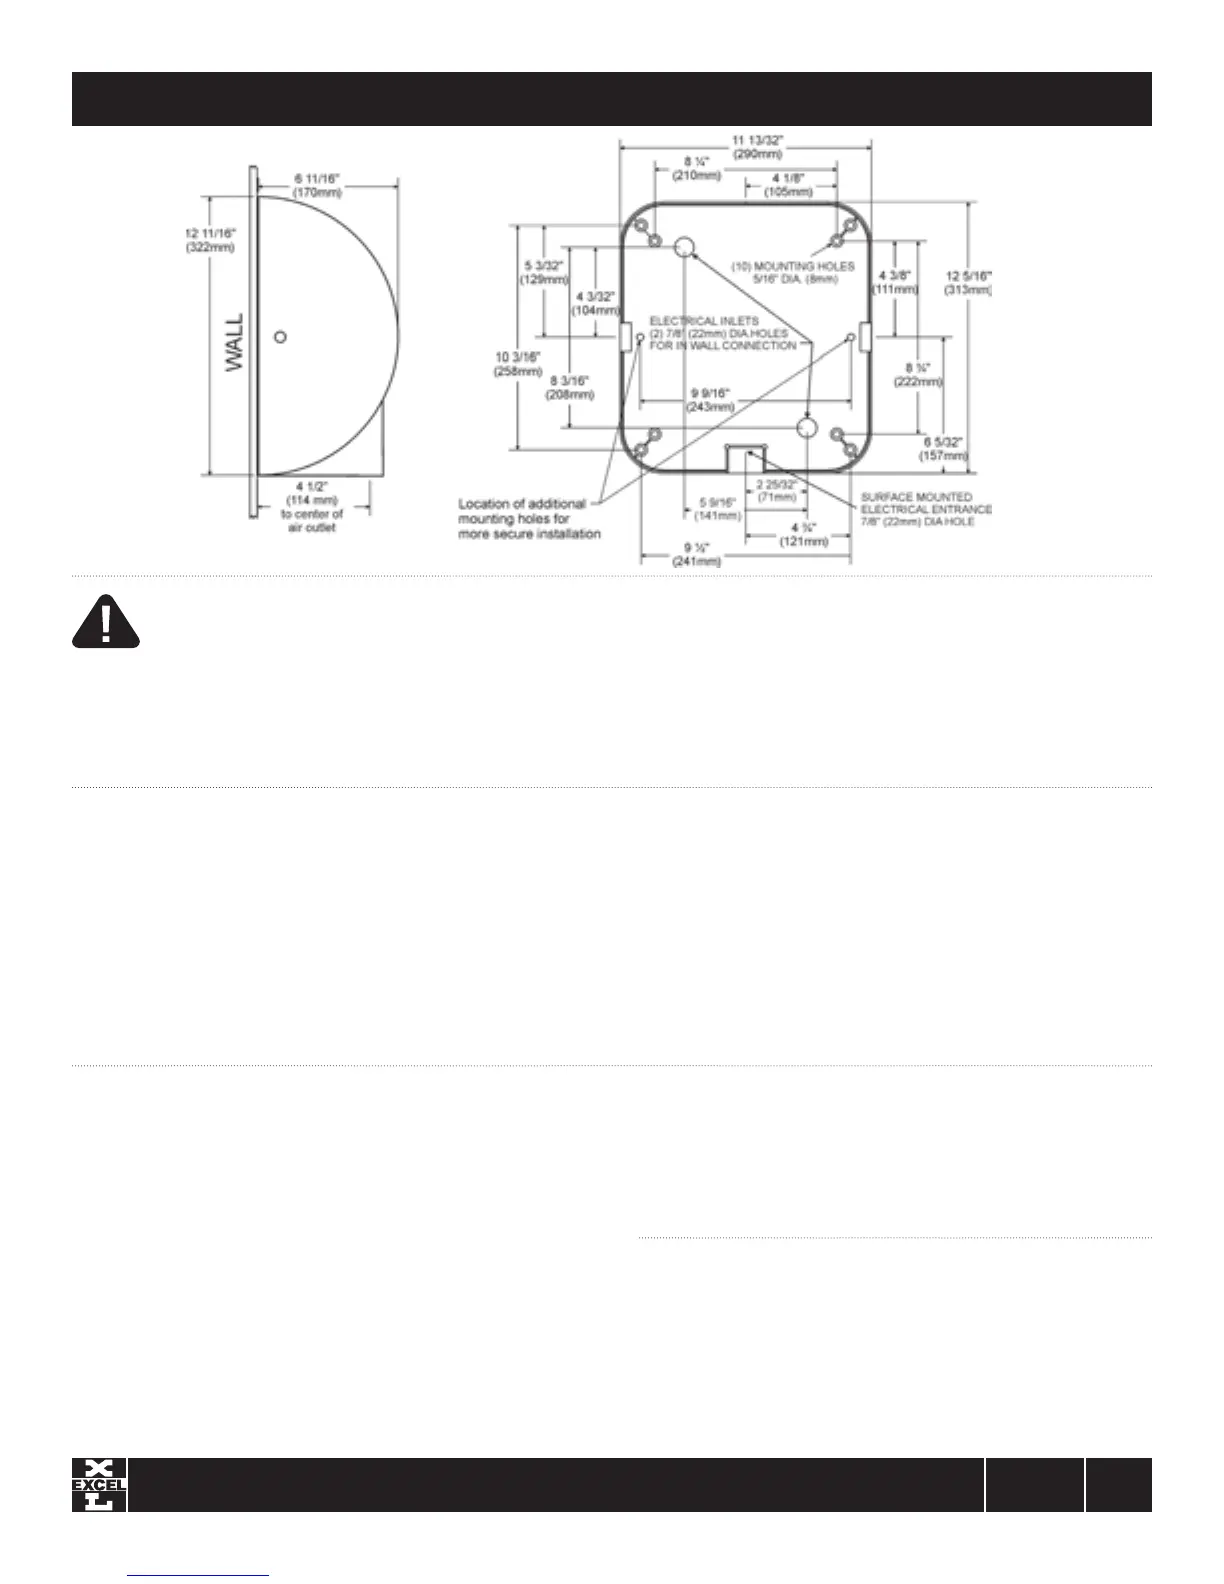
SIDEVIEW
FRONTVIEW
FACINGWALL
Dryer does not turn on
1.
Checkpowertotheunitandconnections.Verifydryerisreceivingthe correct
voltage at the TerminalBlock (check dryer label).
2. CheckREDserviceLEDlightnexttoairoutletonbottomofdryerfor
L i g h t i s ON–PlacehandsunderSensor.Iflightstayson,thenreplaceSensor.
Iflightgoesoff,checktomakesurewiringiscorrect.IfOK,checkwire
connectingtoMotor.IfbothareOK,replaceMotor.
L i g h t i s OF F –Checkforloose,disconnectedorimproperwiring(Seewiring
schematicinsidedryerCover),orreplaceControlAssembly.
L i g h t i s F L ASHING –SeeerrorcodesinCODEchart
SENSOR RANG E ADJ USTM ENT: If dryer will not turn on, stays on, or stops
working, it may be mounted too close to a counter or object and has gone into
lockout. If relocating appliance is not possible, adjust the range of the Sensor.
Turn off power to dryer then turn the range adjustment on the Control Assembly
counterclockwise towards L (-) low to decrease Sensor range.
Dryer does not shut off
1. May be mounted too close to a counter or object (adjust Sensor range).
2. Checkforloose,disconnectedorimproperwiringatControlAssembly(referto
wiringschematicafxedtoblowerhousing).
3. ReplaceControlAssembly.
Dryer does not always turn on, or turns on by itself
1. May be mounted too close to counter or object (adjust Sensor range).
2. CheckforforeignmaterialonOpticalSensornexttoAirOutlet.
3. CheckforloosewiresonControlAssembly.
4. ReplaceControlAssembly.
READ AND SAVE THESE INSTRUCTIONS
 Loading...