EasyManua.ls Logo

Fab Fours VI-COWL User Manual

Fab Fours VI-COWL
19 pages
To Next Page IconTo Next Page
Page #1 background imageLoading...
Page #1 background image
Installation Instructions
VI-COWL
Product Number: VC2900
2010 - 2018 DODGE 2500
Copyright 2009 Fab Fours, Inc. Page 1 of 19 VC2900_Installation_Manual_REV_A
! IMPORTANT SAFETY GUIDE
Your safety and the safety of others is very important.
In order to help you make informed decisions about safety, we have provided the
following warnings, safety precautions, installation instructions, and other important
information to alert you to potential hazards that could hurt you or others.
Please do a job safety analysis before each task to identify potential hazards for your
situation and remove/protect against them.
Use own good judgment and take your time.
Check packaged materials immediately upon arrival to ensure that all listed parts are
included and undamaged.
Read and understand all warnings, safety precautions, and instructions before installing
this product.
SENSORS’ FIELD OF VIEW WILL BE ALTERED WITH USE OF THE
REPLACEMENT BUMPER.
WARNINGS
FAILURE TO OBSERVE THE FOLLOWING WARNINGS AND
INSTRUCTIONS PROVIDED IN THIS MANUAL COULD LEAD TO
SEVERE INJURY AND/OR DEATH.
FOR PROFFESIONAL INSTALLATION ONLY. CARELESS
INSTALLATION AND/OR OPERATION CAN RESULT IN SERIOUS
INJURY, DEATH, AND/OR EQUIPMENT DAMAGE. ALL LIABILITY FOR
INSTALLATION AND USE RESTS WITH THE USER OR CONSUMER.
FAB FOURS, INC. ONLY APPROVES INSTALLING THIS PRODUCT
ACCORDING TO THESE WRITTEN INSTRUCTIONS WITH THE
HARDWARE PROVIDED. FAILURE TO INSTALL ACCORDING TO
THESE INSTRUCTIONS WILL INVALIDATE THE WARRANTY. THIS
INCLUDES, BUT IS NOT LIMITED TO, USING ALTERNATIVE
INSTALLATION METHODS, HARDWARE, OR MATERIALS.
THIS PRODUCT IS FOR OFFROAD USE ONLY.
Question and Answer IconNeed help?

Do you have a question about the Fab Fours VI-COWL and is the answer not in the manual?

Fab Fours VI-COWL Specifications

General IconGeneral
BrandFab Fours
ModelVI-COWL
CategoryAutomobile Accessories
LanguageEnglish

Summary

! IMPORTANT SAFETY GUIDE

WARNINGS

SAFETY PRECAUTIONS

Overview

Tools Required

Provided Material

Factory Vehicle Prep

Apply Blue tape for seam marking

Apply tape to hood/fender seams, mark line, and cut along seam.

Loosen hood nuts

Loosen the four nuts securing the hood to the upper hood hinge bracket.

Disconnect electrical and washer lines

Disconnect any vehicle electrical connections and washer fluid lines.

Remove hood bolts

Support the hood and remove the hood bolts to detach the hood.

Wiper cowl modification

Trim cowl ends for bracket clearance

Trim both ends of the cowl so ViCowl brackets clear it in the down position.

Fab Fours hood hinge installation

Position driver side bracket

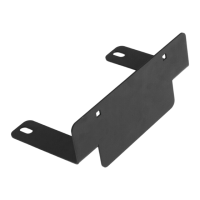
Position the driver side bracket as pictured in the diagram.

Loosely install factory bolts

Loosely install the two factory bolts into the bracket.

Install outer 5/16" bolt, washers, and nut

Install the outer 5/16"-18 bolt, lock washer, and flat washer.

Tighten 5/16" bolt

Fully tighten the 5/16"-18 bolt.

Repeat for passenger side bracket

Repeat the same procedure for the passenger side bracket.

Check wiper clearance and adjust if needed

Check wiper clearance and adjust bracket position if necessary.

Do not fully tighten lower bracket bolts yet

Do not fully tighten lower bracket bolts until hood is reinstalled.

Hood Installment

Lift hood onto bracket and hand tighten nuts

Lift hood onto bracket and hand tighten the four factory nuts.

Align upper arm with factory paint marks

Align upper arm with factory paint marks for bracket positioning.

Lower hood and check gap

Lower hood slowly and check for uniform hood gap.

Adjust as needed

Make necessary adjustments to the hood alignment.

ViCowl Pre-Assembly

Chase weld nuts with taps

Chase all projection weld nuts with taps to clean debris.

ViCowl Installation

Install ViCowl arms to visor loosely

Loosely attach ViCowl arms to the visor using provided hardware.

Install edge seal with adhesive

Apply edge seal with adhesive onto the leading edge of the cowl.

Trim edge seal

Trim the edge seal for a proper fit and finish.

ViCowl Installation

Lift upper ViCowl assembly into position

Lift and position the upper ViCowl assembly onto the vehicle.

Loosely install ½"-16 hex bolt

Loosely install the ½"-16 hex bolt and associated hardware.

Tighten ViCowl arms to hinge brackets

Check fit and fully tighten both ViCowl arms to the hinge brackets.

Mark Rivnut hole locations

Accurately mark the locations for the Rivnut holes.

Remove ViCowl for Rivnut installation

Remove the upper ViCowl assembly to prepare for Rivnut installation.

ViCowl Installation

Drill pilot holes with 1/8" bit

Drill pilot holes perpendicularly to the marked locations.

Step up drilling to ¼" bit

Increase drill bit size to 1/4" for pilot holes.

Final drill holes with 17/32" bit

Final drill out holes using the 17/32" drill bit.

Insert nutsert with expendable tool

Insert the nutsert into the hole using the provided tool.

Secure nutsert tool with wrench and socket

Use a wrench and socket to secure the nutsert tool.

Tighten bolt into nutsert

Tighten the bolt into the nutsert until snug, do not overtighten.

Repeat nutsert installation for remaining holes

Repeat the nutsert installation steps for all remaining holes.

Reinstall upper ViCowl

Reinstall the upper ViCowl assembly onto the vehicle.

ViCowl Installation

Install 5/16"-18 bolts and washers

Install 5/16"-18 bolts, rubber bonded washers, and blue Locktight.

Fully tighten ViCowl arms to hood brackets

Fully tighten all hardware securing the ViCowl arms to the hood brackets.

Lift and lower ViCowl cowl onto mounting surface

Lift and slowly lower the ViCowl cowl onto its mounting surface.

Hand tighten cowl bolts to hood brackets

Hand tighten the cowl bolts to the hood hinge brackets.

ViCowl Installation

Lower hood and check centering

Lower the hood and check for centering, adjust as necessary.

Tighten rear and front bolts for hood gap

Tighten rear bolts first, then front bolts to close hood gaps.

Maintenance/Care

Contact Information

Related product manuals