Carefully unpack and remove the device. Make sure that the device and the cable are intact. If you notice
that any part is damaged do not use the product!
Soldering tip installation / replacement
Do not operate the soldering station if the tip is not installed.
- Only remove the tip of the soldering iron when the appliance is switched o and the tip of the soldering iron hascooled down completely.
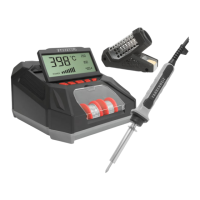
- Always tin the tip before using the soldering station for the rst time (and when using each new soldering iron (5)). To do this: Put
the plug in the wall socket and turn the on / o button (6) to position “I”. Set the desired temperature (200 - 450 ° C) by pressing the
appropriate button. The display (4) shows the current soldering iron temperature. Wait for the appliance to reach the set temperature,
then melt a little tin and coat the soldering tip evenly with it.
Start-up and temperature setting:
Insert the mains plug into the mains socket and turn the on / o button (6) to the “I” position.
Use the “200”, “300”, “400”, and “+” and “-” buttons to set the desired temperature. Use a suitable solder tin for soldering. Proper soldering is
only possible if the soldering temperature is also correct. If the soldering temperature is too high, the tin will burn out and the workpiece
might be damaged.
Do not keep molten tin on the soldering tip!
Shutdown
After using the soldering iron for precision work, always place the soldering iron (2) in the soldering iron holder (3). Turn the on / o
button (6) to the “0” position and wait until the soldering iron has cooled down completely. Unplug the device when not in use.
Tip cleaning sponge
CAUTION: Never touch the tip cleaning sponge (8) with the hot soldering tip if the sponge is dry! Doing so
may damage the sponge!
Caution! Risk of burns! During operation, the appliance can become very hot, especially the soldering tip. Use
extreme caution during the soldering operation.
- The 48 W power is ideal for soldering electrical components.
- Due to its design, it is particularly suitable for hard-to-reach places as well as for precision soldering work. Clean the soldering iron
tip (5) with a damp cleaning sponge (8).
- After cleaning, tin the tip of the soldering iron again (5).
- Touch the point required for soldering with the tip of the soldering iron (5), heat this point.
- Melt the soldering iron between the soldering point and the tip (5) of the soldering iron.
- Add more tin until the point to be soldered is completely covered with fused.
- Then remove the tip of the soldering iron to avoid overheating the molten solder.
- Allow the solder to solidify, avoid shocks and impacts.
- The resin is usually located inside the solder.
After nishing work, wait for the machine to cool down and put it back in the original box. Store in a dry, well-ventilated place,
out of reach of children.
Proper and regular cleaning improves safety and prolongs the life of the device
Attention! To prevent electric shock and burns, switch o the appliance, unplug it and let it cool down before cleaning and maintenance.
- Clean the device with a slightly damp (chemical-free) microber cloth. Wipe the housing and soldering iron dry.
- Clean the appliance regularly!
- Do not immerse the appliance in water or any other liquid.
 Loading...